State Management
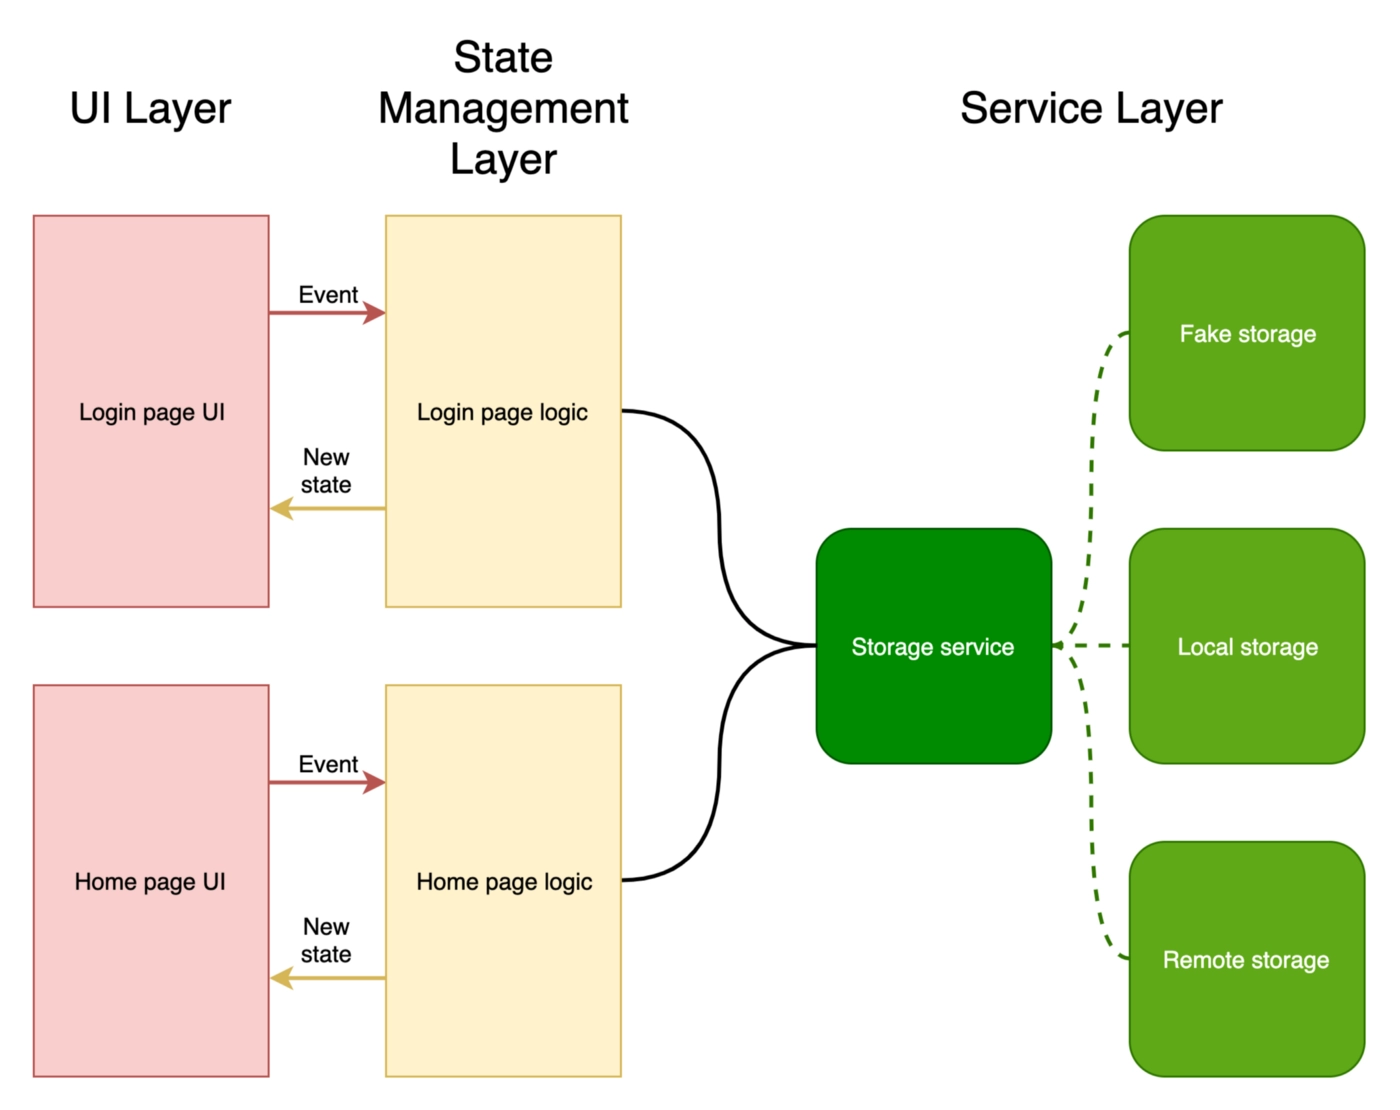
One of the most valuable and famous activities in the lifespan of an application is state management. Flutter is declarative, according to the documentation. It signifies that Flutter's UI is based on the current state of your app.
To grasp the notion of state management, consider the following example. Assume you've generated a customer or product list in your app. Suppose you've dynamically added a new client or product to that list. Then, to see the newly added item in the record, you must reload the list. As a result, you must reload the list whenever you add a new item. To boost performance, this sort of programming necessitates state management to manage such a situation. The state is updated every time you create a modification or update it.
Types of State Management
The state management in Flutter is divided into two categories, as listed below:
- Ephemeral State
- App State
Ephemeral State
This state is also known as the User Interface State (UI State) or the Local State. It is a form of state linked to a specific widget or a state contained within a single widget. You don't need to employ state management strategies in this situation. Text Field is a similar example of this condition.
Example:
class MyHomepageState extends State<MyHomepage> {
  String _name = "Hey Ninja!!!!";

  @override

  Widget build(BuildContext context) {

    return RaisedButton(

      child: Text(_name),

      onPressed: () {

        setState(() {

          _name = _name == "Hey Ninja!!!!" ? "Coding Ninjas" : "Hey Ninja!!!!";

        });
      },
    );
  }
}
App State
It's not the same as the ephemeral state. It's a state that we want to preserve throughout user sessions and communicate across different portions of our app. As a result, this state type can be applied universally. It's also referred to as a shared state or application state. User preferences, login information, alerts in a social media app, the shopping basket in an e-commerce app, and so on are all examples of this state.
Using the provider package, you may study the most basic example of app state management. The provider's state management is simple to grasp and needs little code. A third-party library is a supplier. To use this library, we must first learn three key ideas.
- ChangeNotifier
- ChangeNotifierProvider
- Consumer
ChangeNotifier
ChangeNotifier is an introductory class that notifies its listeners when anything changes. It is simple to comprehend, implement, and optimize for a small group of listeners. It is utilized for the listener to notice a change model. We simply use the notifyListener() function to notify the listeners in this case.
Example:
import 'package:flutter/material.dart';

class Counter with ChangeNotifier {
  int _count;

  Count(this._count);

  getCount() => _count;
  setCount(int count) => _count = count;

  void increment() {
    _count++;
    notifyListeners();
  }

  void decrement() {
    _count--;
    notifyListeners();
  }
}
ChangeNotifierProvider
ChangeNotifierProvider is a widget that delivers a ChangeNotifier instance to its children. It is part of the provider bundle. The code samples below will help you grasp the notion of ChangeNotifierProvider.
Example:
class MyApp extends StatelessWidget {
  @override
  Widget build(BuildContext context) {
    return MaterialApp(
      theme: ThemeData(
        primarySwatch: Colors.blue,
      ),
      home: ChangeNotifierProvider<CountModel>(
        builder: (_) => CountModel(),
        child: CountView(),
      ),
    );
  }
}
Consumer
It is a supplier who does not perform anything special. It invokes the provider in a new widget and passes the build implementation to the builder. The code below describes it in further detail.
Example:
return Consumer<Count>(
  builder: (context, count, child) {
    return Text("Total price: ${count.total}");
  },
);
Code
Let us have a look at the complete code to show state management. Copy the code given below and paste it into the main.dart file.
Code:
import 'package:flutter/material.dart';

void main() => runApp(MyApp());

class MyApp extends StatelessWidget {
  // Root widget
  @override
  Widget build(BuildContext context) {
    return MaterialApp(
      // Name of the Application
      title: 'Flutter  State Management(Coding Ninjas)',
      theme: ThemeData(
        primarySwatch: Colors.red,
      ),
      home: MyHomepage(),
    );
  }
}

class MyHomepage extends StatefulWidget {
  @override
  MyHomepageState createState() => MyHomepageState();
}

class MyHomepageState extends State<MyHomepage> {
  String _name = "Hey Ninja!!!!";

  @override
  Widget build(BuildContext context) {
    return RaisedButton(
      child: Text(_name),
      onPressed: () {
        setState(() {
          _name = _name == "Hey Ninja!!!!" ? "Coding Ninjas" : "Hey Ninja!!!!";
        });
      },
    );
  }
}
Output:
When you run the above code, you will see the output as given below:
Frequently Asked Questions
What is flutter?
Flutter is a framework that allows you to create entirely platform-agnostic mobile applications for iOS and Android.
What are the advantages of flutter?
The following are some of the advantages of using flutter:
- Cross-platform Development
- Reduce Code Development
- Live and Hot Reloading
- Flexible UI
- Good community support
What is a state in flutter?
A state is data that may be read when the widget is created and may change or be adjusted over the app's lifetime.
Explain state management in a flutter.
One of the most valuable and famous activities in the lifespan of an application is state management. State management is used to boost the overall performance of our application.
What is Ephemeral State?
This state is also known as the User Interface State (UI State) or the Local State. It is a form of state linked to a specific widget or a state contained within a single widget.
Conclusion
In this article, we have extensively discussed Flutter state management and its uses. We looked at various categories of state management in the flutter.
After reading about Flutter State Management, are you not feeling excited to read/explore more articles on flutter? Don’t worry; Coding Ninjas has you covered. To learn, see Flutter basics, Flutter App Development, and Flutter navigation.
Refer to our Guided Paths on Coding Ninjas Studio to upskill yourself in DSA, Competitive Programming, JavaScript, System Design, and many more! If you want to test your competency in coding, you may check out the mock test series and participate in the contests hosted on Coding Ninjas Studio! But suppose you have just started your learning process and are looking for questions asked by tech giants like Amazon, Microsoft, Uber, etc. In that case, you must look at the problems, interview experiences, and interview bundle for placement preparations.
Nevertheless, you may consider our paid courses to give your career an edge over others!
Do upvote our blogs if you find them helpful and engaging!
Happy Learning!


 8+ registered

