Table of contents
1.
Introduction
2.
Flutter Switch
3.
Properties of Switch Widget
4.
Flutter Switch Example
4.1.
How to customize the Switch button in Flutter?
4.2.
Example
5.
Frequently Asked Questions
5.1.
What is Flutter used for?
5.2.
What is the major usage of a switch in an app?
5.3.
What is a widget, and what are the types of widgets?
6.
Conclusion
Last Updated: Mar 27, 2024
Medium

Flutter Switch

Author SHIVAM SINHA
0 upvote
Career growth poll
Do you think IIT Guwahati certified course can help you in your career?

Introduction

A switch has two states, either ON or OFF. Its working is very similar to the electrical switches in our house. Typically, it is a button with a thumb slider where we can drag it to the ON (Checked) state or OFF (Unchecked) state.

Flutter Switch

In Flutter, the switch is a widget representing two states, either ON or OFF. Its state is not set by itself. To change the states, the onChanged property is called. The switch state is dependent on the value returned by this property. If the value returned is true, then the switch is in the ON state, and if the value returned by this property is false, then the switch is in the OFF state. If we want the switch widget to be disabled, then the onChanged property is set to NULL. In this article, we will dive deep into the switch widget in the flutter application to understand the flutter switch.

Properties of Switch Widget

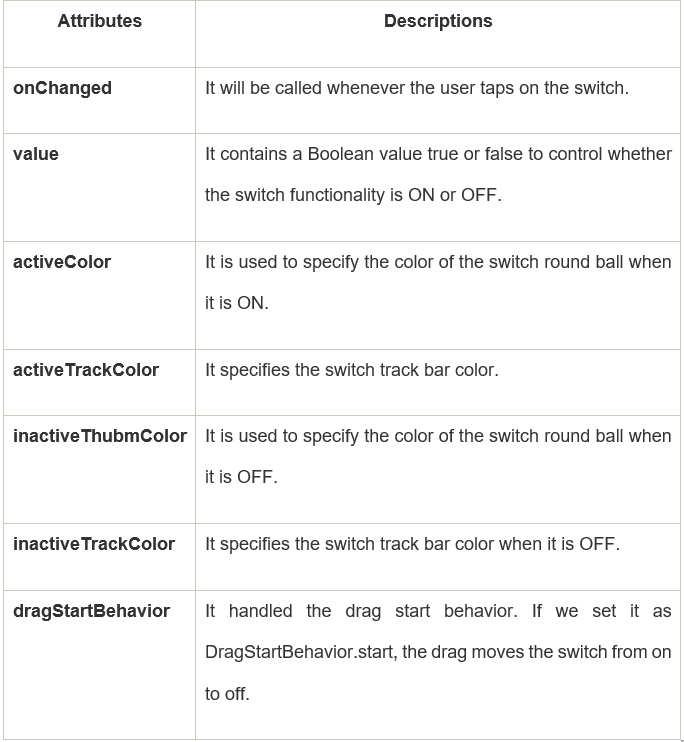
Let’s see some of the important attributes of the switch widget:

Flutter Switch Example

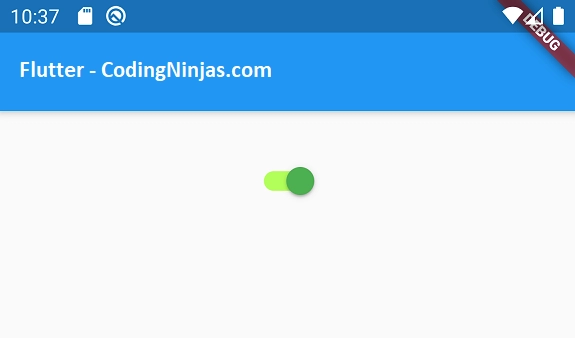
In the following example, we have created a simple Flutter application in which we defined a Switch widget. Whenever the Switch is toggled, onChanged is called with the new state of Switch as a value.

We have defined a boolean variable isSwitched to store the state of Switch.

We are creating a basic Flutter application with the following code

import 'package:flutter/material.dart';
 
void main() {
  runApp(MaterialApp(
    home: MyApp(),
  ));
}
 
class MyApp extends StatefulWidget {
  @override
  _State createState() => _State();
}
 
class _State extends State<MyApp> {
  bool isSwitched = false;
 
  @override
  Widget build(BuildContext context) {
    return Scaffold(
        appBar: AppBar(
          title: Text('Flutter - CodingNinjas.com'),
        ),
        body: Center(
          child: Switch(
            value: isSwitched,
            onChanged: (value) {
              setState(() {
                isSwitched = value;
                print(isSwitched);
              });
            },
            activeTrackColor: Colors.lightGreenAccent,
            activeColor: Colors.green,
          ),
        )
    );
  }
}


Output:

Run this application, and you should get the UI shown in the screenshot below.


When you press the Switch, the Switch toggles the state, from off to on,

 and is displayed as shown below.


How to customize the Switch button in Flutter?

Flutter provides an amazing feature of customization, which makes the user interface more interactive. This can be done by adding the custom-switch dependency in the pubspec.YAML file and then importing it into the dart file.

Let’s understand this with the help of an example.

Example

Open the main.dart file and replace it with the following code:

import 'package:flutter/material.dart';  
import 'package:custom_switch/custom_switch.dart';  
  
void main() => runApp(MyApp());  
  
class MyApp extends StatelessWidget {  
  @override  
  Widget build(BuildContext context) {  
    return MaterialApp(  
        home: Scaffold(  
            appBar: AppBar(  
              backgroundColor: Colors.blue,  
              title: Text("Coding Ninjas Custom Example"),  
            ),  
            body: Center(  
                  child: SwitchScreen()  
            ),  
        )  
    );  
  }  
}  
  
class SwitchScreen extends StatefulWidget {  
  @override  
  SwitchClass createState() => new SwitchClass();  
}  
  
class SwitchClass extends State {  
  bool isSwitched = false;  
  @override  
  Widget build(BuildContext context) {  
    return Column(  
        mainAxisAlignment: MainAxisAlignment.center,  
        children:<Widget>[  
            CustomSwitch(  
              value: isSwitched,  
              activeColor: Colors.blue,  
              onChanged: (value) {  
                print("VALUE : $value");  
                setState(() {  
                  isSwitched = value;  
                });  
              },  
            ),  
          SizedBox(height: 15.0,),  
          Text('Value : $isSwitched', style: TextStyle(color: Colors.green,  
              fontSize: 30.0),)  
        ]);  
    }  
}  


Output:

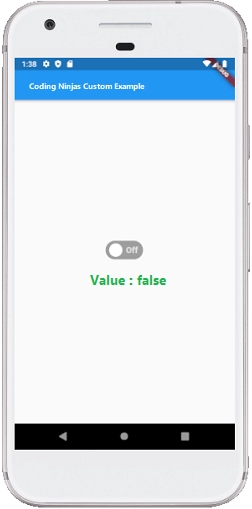
When we run the application in the emulator or device, we should get UI similar to the following screenshot:

                                Flutter Switch


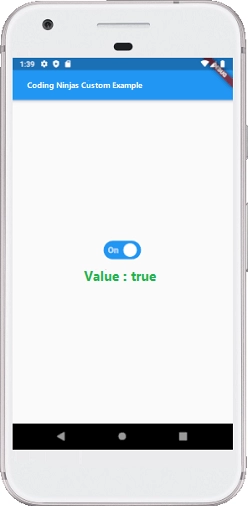
If we press the switch, it will change its state from OFF to ON. See the below screenshot:

                                 Flutter Switch


Frequently Asked Questions

What is Flutter used for?

Flutter is Google's free and open-source UI framework for creating native mobile applications. Released in 2017, Flutter allows developers to build mobile applications with a single codebase and programming language. This capability makes building both iOS and Android apps simpler and faster.

What is the major usage of a switch in an app?

The Switch is common and used for different purposes in an app, but the major seen usage of the switch is in switching between the dark and light theme of the app.

What is a widget, and what are the types of widgets?

Each element on the screen of the Flutter app is a widget. The view of the screen completely depends upon the choice and sequence of the widgets used to build the app. And the structure of the code of an app is a tree of widgets. There are broadly two types of widgets in the flutter: Stateless Widget and Stateful Widget.

Conclusion

In this article, we have discussed the Flutter switch widget through different examples. We also discussed some properties of switch widgets.

Enhance your skills in Data Structures and AlgorithmsCompetitive ProgrammingJavaScriptSystem Design, and more with our Coding Ninjas Studio  Guided Path. If you want to sharpen your coding skills to the test, check out the mock test series and enter the contests on Coding Ninjas Studio! If you are a beginner and want to know what questions big giants like Amazon, Microsoft, and Uber ask, check the problemsinterview experiences, and interview bundle for placement preparations.

You may consider our paid courses curated by experts to give your career an edge over others!

Do Upvote and Happy Learning!

Live masterclass