Table of contents
1.
Introduction
2.
Properties of Flutter Table
3.
When do we use the Table widget
4.
Steps to create a Table
5.
Syntax to add a Row
6.
Rules for Using Flutter Table Widget
7.
Example
7.1.
Output
8.
Flutter DataTable
9.
Syntax of DataTable
10.
Example
10.1.
Output
11.
Frequently Asked Questions
11.1.
In Flutter, how do we use tables?
11.2.
In Flutter, how do we use borders?
11.3.
What is Flutter DataTable?
11.4.
Can we add color to a column in Flutter?
11.5.
Define the createRenderObject method in Flutter Table.
11.6.
What's the difference between the DataTables widget and Tables Widget in Flutter?
12.
Conclusion
Last Updated: Mar 27, 2024
Easy

Flutter Table

Career growth poll
Do you think IIT Guwahati certified course can help you in your career?

Introduction

A table enables the user to organise data into rows and columns. It stores and shows our data collected, allowing us to readily compare pairs of related variables.

A user can organise data in rows and columns in a table. It is used to store and present our data collected, making it easier to compare similar numbers. Flutter also allows users to design a table arrangement in the mobile application. The Flutter Table widget may be used to construct a table with the table layout algorithm applied to its children.

This blog will briefly discuss the Flutter table, its various properties, and how to implement it in your project.

Properties of Flutter Table

Following are the main properties of the Flutter table:

  • children: A list of table rows (ListTableRow>) is passed as an input to this Table widget attribute. A list of widgets can be sent to TableRow as children.
  • columnWidhts: The width of the columns in the Table widget is determined by this attribute.
  • textDirection: It specifies how columns in the Table are arranged. It may be read from left to right or right to left.
  • defaultColumnWidth: The TableComumnWidth class is used as an input parameter to set the default column width in the Table widget.
  • key: This parameter controls how widgets in the widget tree replace one another.
  • border: This property accepts a TableBorder widget as an argument and sets the Table's border. The table widget has no border by default.
  • textBaseline: This property takes the TextBaseline enum as an argument. Using this attribute, we may define a horizontal line to align text on the screen inside the Table widget.
  • defaultVerticalAlignment: This property uses the TableCellVerticalAlignment enum as a parameter to set the vertical alignment of cells in the Table.
     

To learn more about Flutter, check out Flutter guided path on Coding Ninjas Studio.

When do we use the Table widget

When we wish to store numerous rows with the same column width and each column (Table) has equal data, we may use a table widget. Flutter offers a different solution to the same problem by utilizing the GridView widget.

Steps to create a Table

  1. First, insert a Table widget inside the body.
  2. We must include TableRow(s) in the table widget's children. Because the table widget contains several rows, we use children rather than the child.
  3. Finally, we must include TableCell(s) as children of the TableRow widget. We may now write any widget in this location, such as a text widget.

Syntax to add a Row

The syntax to add a row is as follows:

TableRow(children: [  
  TableCell(child: Text('Coding Ninjas')),  
  TableCell(  child: Text('Flutter Table')),  
  TableCell(child: Text('Android')),  
  TableCell(child: Text('Web')),  
]),  

Rules for Using Flutter Table Widget

We need to take care of some rules while implementing the Flutter table. These rules are as follows:

  • This widget determined the column width, which is evenly shared amongst TableCells. If it is not equal, we will receive an error message stating that every TableRow in a table must have the same number of children for every column to be filled. Otherwise, the Table will have holes in it.
  • Each row has the same height, equal to the tallest TableCell.
  • A table's children can only have TableRow widgets.

Example

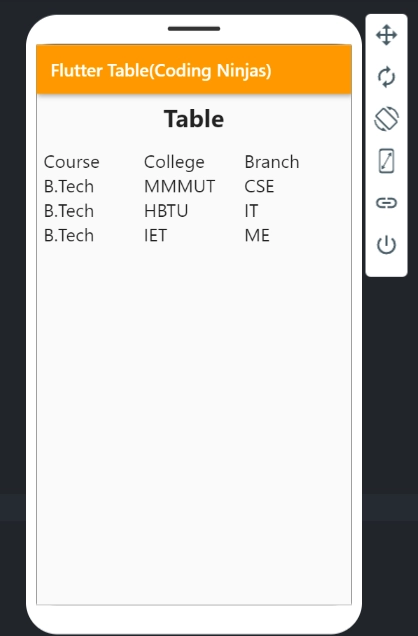
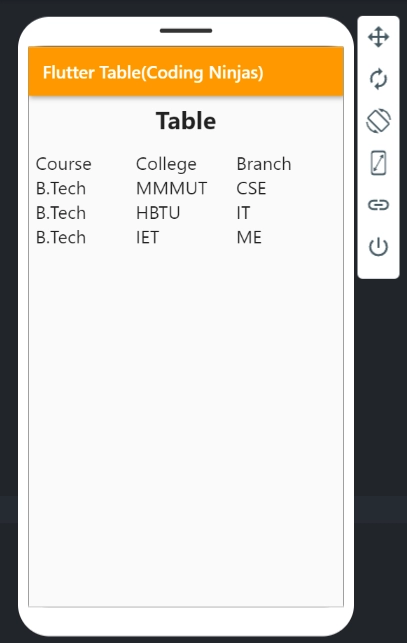
Let us try to cover everything connected to the Flutter Table widget with the assistance of an example:

import 'package:Flutter/material.dart';

void main() {
  runApp(MyApp());
}

class MyApp extends StatelessWidget {
  // This widget is the root
  // of your application.
  @override
  Widget build(BuildContext context) {
    return MaterialApp(
      title: 'Table',
      theme: ThemeData(
        primarySwatch: Colors.blue,
      ),
      home: MyHomePage(),
      debugShowCheckedModeBanner: false,
    );
  }
}

class MyHomePage extends StatefulWidget {
  @override
  _MyHomePageState createState() => _MyHomePageState();
}

class _MyHomePageState extends State {
  @override
  Widget build(BuildContext context) {
    return Scaffold(
      appBar: AppBar(
        title:Text("Flutter Table(Coding Ninjas)"),
        backgroundColor: Colors.orange,
      ),
      body: Column(
        children:[
          Padding(
            padding: const EdgeInsets.all(8.0),
            child: Text("Table",textScaleFactor: 2,style: TextStyle(fontWeight:FontWeight.bold),),
          ),
          Padding(
            padding: const EdgeInsets.all(8.0),
            child: Table(
            // textDirection: TextDirection.rtl,
            // defaultVerticalAlignment: TableCellVerticalAlignment.bottom,
            // border:TableBorder.all(width: 2.0,color: Colors.red),
            children: [
              TableRow(
                children: [
                  Text("Course",textScaleFactor: 1.5,),
                  Text("College",textScaleFactor: 1.5),
                  Text("Branch",textScaleFactor: 1.5),
                ]
              ),
               TableRow(
                children: [
                  Text("B.Tech",textScaleFactor: 1.5),
                  Text("MMMUT",textScaleFactor: 1.5),
                  Text("CSE",textScaleFactor: 1.5),
                ]
              ),
              TableRow(
                children: [
                  Text("B.Tech",textScaleFactor: 1.5),
                  Text("HBTU",textScaleFactor: 1.5),
                  Text("IT",textScaleFactor: 1.5),
                ]
              ),
              TableRow(
                children: [
                  Text("B.Tech",textScaleFactor: 1.5),
                  Text("IET",textScaleFactor: 1.5),
                  Text("ME",textScaleFactor: 1.5),
                ]
              ),
            ],
        ),
          ),
        ]
      ),
    );
  }
}

Output

 We see the following screenshot when we start the program in an emulator or on a device.

Flutter DataTable

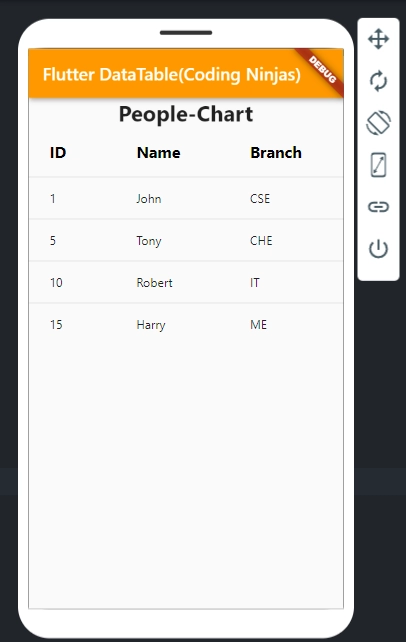
Flutter also provides a DataTable widget for creating tables in our applications. It is a data table in material design where we may show data with column labels and rows. This widget automatically modified the Table column based on the cell values. Displaying data with this widget is costly since all data must be measured twice. It measured the size of each column first, and then it laid out the Table. As a result, we must guarantee that this widget can only be utilised with fewer rows.

The columns and rows properties of the DataTable widget were used to store information. The columns property holds data in an array of DataColumns, while the rows property holds data in an array of data rows. Sub-property cells in the DataRow accept an array of DataCell. A sub-property label in the DataColumn accepts widgets as a value. In addition, we may include Text, Images, Icons, or any other widget in the DataTable.

Syntax of DataTable

The DataTable syntax is as follows:

DataTable(  
  columns: [  
    DataColumn(label: ),  
    DataColumn(label: )),  
  ],  
  rows: [  
    DataRow(cells: [  
      DataCell( ),  
      DataCell( ),  
      ...  
      DataCell( ),  
    ]),  
    DataRow(cells: [  
      DataCell( ),  
      DataCell( ),  
      ...  
      DataCell( ),  
    ]),  
  ],  
),  

Example

Let's look at how to utilize DataTable in a Flutter project. This section will construct a basic data table with three column labels and four rows.

import 'package:Flutter/material.dart';  

void main() {
runApp(MyApp());
}

class MyApp extends StatefulWidget {  
  @override  
  _DataTableExample createState() => _DataTableExample();  
}  
 
class _DataTableExample extends State<MyApp> {  
  @override  
  Widget build(BuildContext context) {  
    return MaterialApp(  
      home: Scaffold(  
          appBar: AppBar(  
            title: Text('Flutter DataTable(Coding Ninjas)'),
            backgroundColor: Colors.orange,),  
            body: ListView(children: <Widget>[  
            Center(  
                child: Text(  
                  'People-Chart',  
                  style: TextStyle(fontSize: 25, fontWeight: FontWeight.bold),  
                )),  
            DataTable(  
              columns: [  
                DataColumn(label: Text(  
                    'ID',  
                    style: TextStyle(fontSize: 18, fontWeight: FontWeight.bold)  
                )),  
                DataColumn(label: Text(  
                    'Name',  
                    style: TextStyle(fontSize: 18, fontWeight: FontWeight.bold)  
                )),  
                DataColumn(label: Text(  
                    'Branch',  
                    style: TextStyle(fontSize: 18, fontWeight: FontWeight.bold)  
                )),  
              ],  
              rows: [  
                DataRow(cells: [  
                  DataCell(Text('1')),  
                  DataCell(Text('John')),  
                  DataCell(Text('CSE')),  
                ]),  
                DataRow(cells: [  
                  DataCell(Text('5')),  
                  DataCell(Text('Tony')),  
                  DataCell(Text('CHE')),  
                ]),  
                DataRow(cells: [  
                  DataCell(Text('10')),  
                  DataCell(Text('Robert')),  
                  DataCell(Text('IT')),  
                ]),  
                DataRow(cells: [  
                  DataCell(Text('15')),  
                  DataCell(Text('Harry')),  
                  DataCell(Text('ME')),  
                ]),  
              ],  
            ),  
          ])  
      ),  
    );  
  }  
}

Output

 We see the following screenshot when we start the program in an emulator or on a device.

Frequently Asked Questions

In Flutter, how do we use tables?

In Flutter, we may make a table by utilizing the Table widget, which employs the table layout method for its children.

In Flutter, how do we use borders?

We may add borders to a Table by using the border property, as seen below:

border: TableBorder.all(width: 1, color: Colors.purple),

What is Flutter DataTable?

You may use DataTable to display fewer rows in a table. DataTable is a graphical data table that allows you to show a table with column names and rows.

Can we add color to a column in Flutter?

With the aid of datagridRowAdapter, you can offer the color to our widget based on the column name in the buildRow function.

Define the createRenderObject method in Flutter Table.

Using the parameters given by this RenderObjectWidget, Flutter creates an instance of the RenderObject class that this RenderObjectWidget represents.

This method should not interact with the rendered object's children. Instead, that should be handled by the function in the object displayed by this object's createElement method that overrides RenderObjectElement.mount. Consider SingleChildRenderObjectElement.mount.

What's the difference between the DataTables widget and Tables Widget in Flutter?

Both allow widgets like TextField, Slider, or plain Text as cell content. There are some variances everywhere:

Feature

Table

DataTable

Checkbox column no showCheckBoxColumn
Set column width columnWidth no
Set row height no dataRowHeight
Sortable no integrated

Conclusion

In this article, we have extensively discussed Flutter Table. We start with a brief introduction of the Flutter Table and then discuss the steps to implement it.

After reading about the Flutter Table, are you not feeling excited to read/explore more articles on the topic of Flutter? Don't worry; Coding Ninjas has you covered. To learn, see the difference between Flutter and react nativerichtext widget in a Flutter Flutter interview questions, and the growing demand for Google’s Flutter.

Refer to our Guided Path on Coding Ninjas Studio to upskill yourself in Data Structures and AlgorithmsCompetitive ProgrammingJavaScriptSystem Design, and many more! If you want to test your competency in coding, you may check out the mock test series and participate in the contests hosted on Coding Ninjas Studio! But if you have just started your learning process and are looking for questions asked by tech giants like Amazon, Microsoft, Uber, etc., you must look at the problemsinterview experiences, and interview bundle for placement preparations.

Nevertheless, you may consider our paid courses to give your career an edge over others!

Do upvote our blogs if you find them helpful and engaging!

Happy Learning!

Live masterclass