Attributes in TextField Widget
The following are some of the most frequent TextField widget attributes:
- decoration: It's used to display the decoration that surrounds TextField.
- border: This property generates a rounded rectangular border around TextField by default.
- labelText: This property indicates the label text on a TextField selection.
- hintText: This property is used to display the hint text within the TextField.
- icon: It's used to add icons to TextField directly.
Using TextField in Flutter App
The following instructions will show you how to use the TextField widget in a Flutter app:
Step 1
In the IDE you used, create a Flutter project. We can use Android Studio or VS Code for this.
Step 2
In Android Studio, open the project and go to the lib folder. Open the main.dart file in this subdirectory and import the material.dart package as follows:
import 'package:flutter/material.dart';
Step 3
Next, use the void main run app method to call the main ‘MyApp’ class, and then name your main widget class MyApp extends with StatefulWidget:
void main() => runApp( MyApp() );
class MyApp extends StatefulWidget { }
Step 4
In the class widget build area, create the Scaffold widget -> Column widget as shown below:
class MyApp extends StatefulWidget {
  @override
  Widget build(BuildContext context) {
    return Scaffold(
        appBar: AppBar(
          title: Text('Flutter TextField Example'),
        ),
        body: Padding(
            padding: EdgeInsets.all(15),
            child: Column(
              children: <Widget> [

              ]
              )
            )
              )
         );
  }
}
Step 5
Create the TextField widget using the code below.
child: TextField(
                    obscureText: true,
                    decoration: InputDecoration(
                      border: OutlineInputBorder(),
                      labelText: 'EnterPassword',
                      hintText: 'Write your password here',
                    ),
                  ),
Let's have a look at the TextField Widget's whole source code. Two TextFields and one RaisedButton are used in this Flutter application. The user hits the button after filling out the information. Because we haven't given the button's onPressed() property any value, it won't be able to print them to the console.
See what happens if you replace the following code in the ‘main.dart’ file.
import 'package:flutter/material.dart';

void main() {
  runApp(MaterialApp( home: MyApp(),));
}

class MyApp extends StatefulWidget {
  @override
  _State createState() => _State();
}

class _State extends State<MyApp> {
  @override
  Widget build(BuildContext context) {
    return Scaffold(
        appBar: AppBar(
          title: Text('TextField FirstApp'),
        ),
        body: Padding(
            padding: EdgeInsets.all(15),
            child: Column(
              children: <Widget>[
                Padding(
                  padding: EdgeInsets.all(15),
                  child: TextField(
                    decoration: InputDecoration(
                      border: OutlineInputBorder(),
                      labelText: 'Your User Name',
                      hintText: 'Enter Your Name',
                    ),
                  ),
                ),
                Padding(
                  padding: EdgeInsets.all(15),
                  child: TextField(
                    obscureText: true,
                    decoration: InputDecoration(
                      border: OutlineInputBorder(),
                      labelText: 'Your Password',
                      hintText: 'Enter Password',
                    ),
                  ),
                ),
                RaisedButton(
                  textColor: Colors.white,
                  color: Colors.black,
                  child: Text('Sign In'),
                  onPressed: (){},
                )
              ],
            )
        )
    );
  }
}
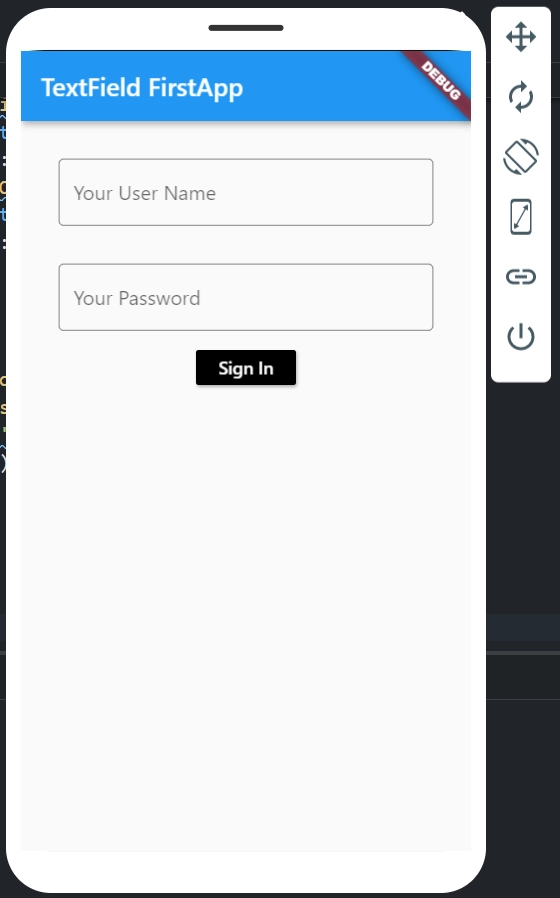
Output
When we start the program on the Android emulator, we should see something like this:
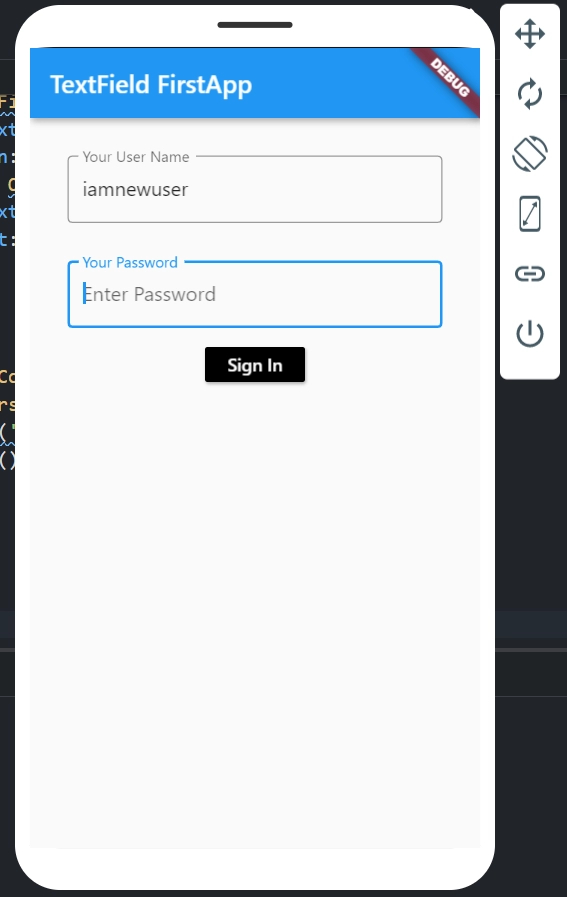
When we click inside the text box, a keyboard appears from the bottom of the screen, the label appears in the upper left corner of the border, and the suggestion text appears in the field. The screenshot below explains it better:
How to Get the Value of the TextField
We know that the TextField widget in Flutter does not have an id as it does on Android. The onChanged method and the controller method are the two main ways Flutter allows the user to obtain a text.
Both are covered in detail below:
1. The onChanged method: It is the most straightforward approach to getting the value of a text field. This method saves the current value in a simple variable, subsequently passed to the TextField widget.
The following is an example:
String value = "";
TextField(
  onChanged: (text) {
    value = text;
  },
)
2. Controller method: This is a typical way of retrieving text field values. It will be attached to the TextField widget and will listen for changes in the text value of the widget.
The following is an example of code:
TextEditingController mycontroller = TextEditingController();
TextField(
  controller: mycontroller,
)
Listening to the changes with this sample code.
controller.addListener(() {
  // WriteHereSomething
});
Get or set the value with this sample code.
print(controller.text); // CurrentValue Print
controller.text = "AnyText Here"; // NewValue Set
Let's take a closer look at the second method for retrieving the text field value in a Flutter application using the steps below:
- Make a TextEditingController first.
- Use the controller property to attach the TextEditingController to a TextField.
- Use the text() method supplied by the TextEditingController to get the value of the TextField.
Now open the ‘main.dart’ file in your IDE and start a new Flutter project. In the ‘main.dart’ file, replace the following code. When the user presses a button in this example, the alert dialogue with the current value of the text field will appear.
import 'package:flutter/material.dart';

void main() {
  runApp(MaterialApp( home: MyApp(),));
}

class MyApp extends StatefulWidget {
  @override
  _State createState() => _State();
}

class _State extends State<MyApp> {
  TextEditingController nameController = TextEditingController();
  TextEditingController passwordController = TextEditingController();
  @override
  Widget build(BuildContext context) {
    return Scaffold(
        appBar: AppBar(
          title: Text('TextField MyApp'),
        ),
        body: Padding(
            padding: EdgeInsets.all(15),
            child: Column(
              children: <Widget>[
                Padding(
                  padding: EdgeInsets.all(15),
                  child: TextField(
                    controller: nameController,
                    decoration: InputDecoration(
                      border: OutlineInputBorder(),
                      labelText: 'Enter User Name',
                      hintText: 'Enter Your Name',
                    ),
                  ),
                ),
                Padding(
                  padding: EdgeInsets.all(15),
                  child: TextField(
                    controller: passwordController,
                    obscureText: true,
                    decoration: InputDecoration(
                      border: OutlineInputBorder(),
                      labelText: 'Your Password',
                      hintText: 'Enter Password',
                    ),
                  ),
                ),
                RaisedButton(
                  textColor: Colors.white,
                  color: Colors.black,
                  child: Text('Sign In'),
                  onPressed: (){
                    return showDialog(
                      context: context,
                      builder: (context) {
                        return AlertDialog(
                          title: Text("Warning!!"),
                          // Get the text that the user has entered by using
                          // TextEditingController
                          content: Text(nameController.text),
                          actions: <Widget>[
                            new FlatButton(
                              child: new Text('OK'),
                              onPressed: () {
                                Navigator.of(context).pop();
                              },
                            )
                          ],
                        );
                      },
                    );
                  },
                )
              ],
            )
        )
    );
  }
}
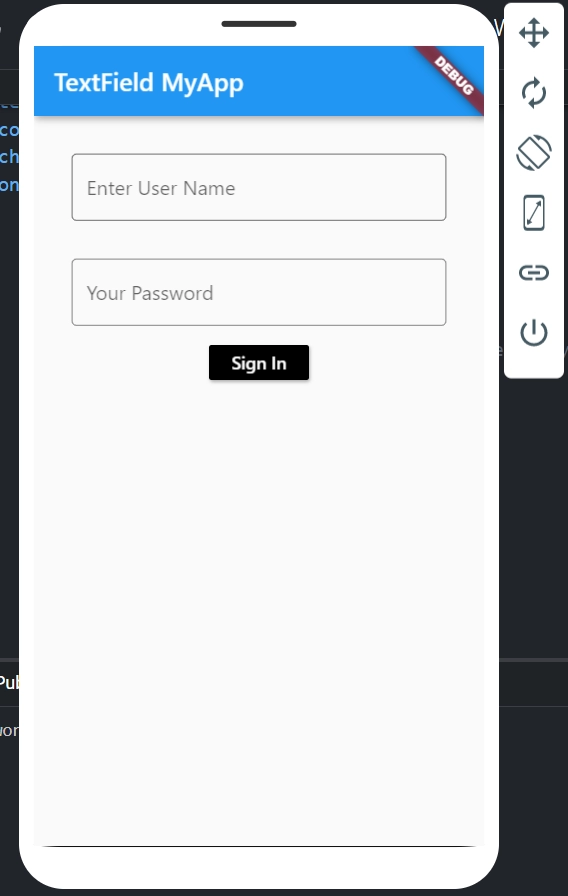
Output
When we start the program on the Android emulator, we should see something like this:
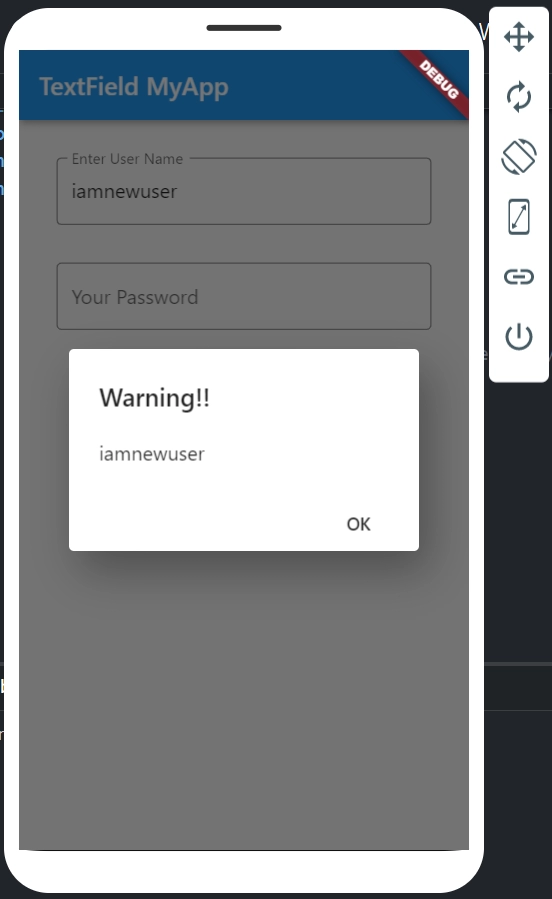
Add values as displayed in the field by clicking inside the text box. When we clicked the sign-in button, an alert dialogue box showed the content that the user had typed into the form. If we click on the OK button, the alert dialog will disappear.
Look into the below screenshot:
Properties of TextField in Flutter
There are so many properties of TextField in Flutter, and some of them are mentioned below:
Expandable TextField in Flutter
We sometimes wish to enlarge a TextField so that it can have multiple lines. By adding the attributes maxLines and setting it to null, which is one by default, Flutter can simply accomplish this. By default, we can specify the precise value to enlarge the number of lines.
TextField(
  maxLines: 4,
)
Changing Size of the TextField Value
The TextField widget also allows us to limit the number of characters entered into the text field. This can be accomplished by using the maxLength properties as shown below:
TextField(
  maxLength: 10,
),
Hide/Obscure the Value of a TextField
Obscure denotes that the field is difficult to read or comprehend. The hidden text is difficult to read. It's primarily utilised in Flutter with a password-protected text field. By setting the obscureText property to true, we may make the value in a TextField obscure.
TextField(
  obscureText: true,
),
Frequently Asked Questions
What is Flutter TextField?
A TextField or TextBox is an input element that holds the alphanumeric data, such as name, password, address, etc. It is a graphical user interface control element that allows users to enter text data using programmable code.
What is the use of the showCursor property in TextField?
Whether the pointer should be visible, when the EditableText is focused, the cursor refers to the flashing caret.
What is the createState() method, and why do we use it?
This widget's mutable state is created at a certain point in the tree.
To return a newly constructed instance of their related State subclass, subclasses should override this method:
@override
State<MyWidget> createState() => _MyWidgetState();
What is textCapitalization property?
Sets how the platform keyboard chooses between uppercase and lowercase letters.
This option only applies to text keyboards; other keyboard types will be ignored. Capitalization is context-sensitive.
What is the difference between labelText and hintText in Flutter?
labelText: If the input field is empty or unfocused, labelText displays the label at the top. labelText goes above the input field when it gains focus.
hintText: It displays a hint to the user.
Conclusion
In this article, we have discussed Flutter TextField, which is one of the essential topics in the Flutter. We have also discussed creating it and the different ways to do it. So basically, a TextField or TextBox is an input element that holds the alphanumeric data, such as name, password, address, etc. It is a graphical user interface control element that allows users to enter text data using programmable code.
We hope that this blog has helped you enhance your knowledge regarding Flutter TextField. If you want to learn more, check out our articles on Flutter TextField, Flutter Stateful and Stateless Widgets, Flutter Forms, and Flutter Card.
Refer to our guided paths on Coding Ninjas Studio to learn more about DSA, Competitive Programming, JavaScript, System Design, etc. Enroll in our courses and refer to the mock test and problems available; look at the Top 150 Interview Puzzles, interview experiences and interview bundle for placement preparations.
Do upvote our blog to help other ninjas grow.
Happy Coding!


 9+ registered

