Example Application
Starting a Project
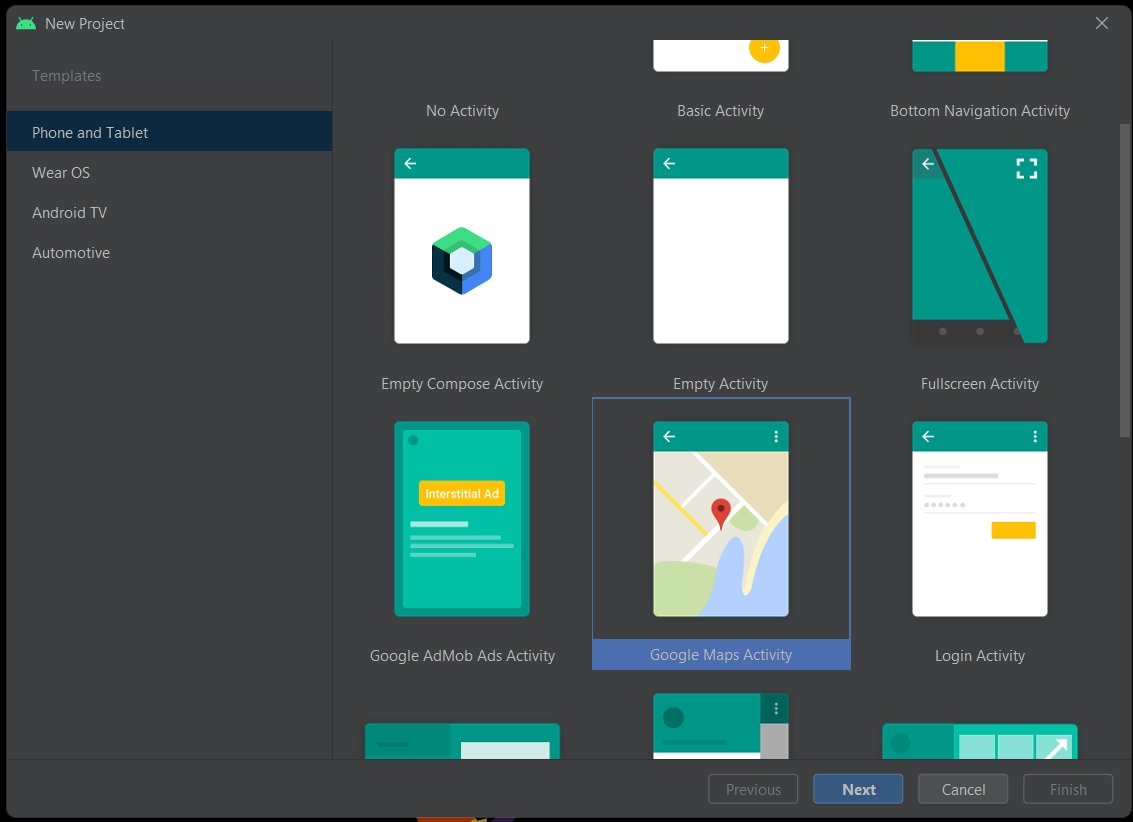
Firstly, we will open the android studio. If in case you don’t have an android studio setup, consider reading this article. Start a new project and select the Google Maps Activity.
After the project has been built, completely open the file google_map_api.xml. In this file, we must set the API key of our map API then only our map API will work. It is an effortless procedure to generate the API key. There is a link given in this file (on the 7th line), press Ctrl and hover over the link and then click (you can also copy-paste the link in your browser).

Generating the API key
Google Cloud Platform will open where you need to create a new project, enable the API, and create a new API key.
Give a project name and location.

Click enable API button.

Click on create new API key button to generate the API key.


Copy the generated API key and paste it on the google_maps_api.xml file in place of
YOUR_API_KEY.
Permissions
Copy these lines of code to your AndroidManifest.xml file in order to get all the required permissions for the app .

   <uses-permission android:name="android.permission.ACCESS_FINE_LOCATION" />
   <uses-permission android:name="android.permission.INTERNET" />
   <uses-permission
 android:name="android.permission.ACCESS_COARSE_LOCATION" />
You also need to add one dependency in the build.gradle file in the dependencies section and click on the sync button.
implementation 'com.google.android.gms:play-services-maps:18.0.2'
Designing the Map Fragment
Content of activity_maps.xml
<?xml version="1.0" encoding="utf-8"?>
<fragment xmlns:android="http://schemas.android.com/apk/res/android"
   xmlns:map="http://schemas.android.com/apk/res-auto"
   xmlns:tools="http://schemas.android.com/tools"
   android:layout_width="match_parent"
   android:id="@+id/frag_map"
   android:layout_height="match_parent"
   tools:context=".MapsActivity"
  android:name="com.google.android.gms.maps.SupportMapFragment"/>
In MapsActivity.java write these lines of code
package com.example.googlemapapi_dem
import android.os.Bundle;
import androidx.fragment.app.FragmentActivity;
import com.example.googlemapapi_demo.databinding.ActivityMapsBinding;
import com.google.android.gms.maps.CameraUpdateFactory;
import com.google.android.gms.maps.GoogleMap;
import com.google.android.gms.maps.OnMapReadyCallback;
import com.google.android.gms.maps.SupportMapFragment;
import com.google.android.gms.maps.model.LatLng;
import com.google.android.gms.maps.model.MarkerOptions;

public class MapsActivity extends FragmentActivity implements OnMapReadyCallback {

   privae GoogleMap myMap;
   private ActivityMapsBinding ourbinding;
   double lon = 78.38, lat = 11.05;

   @Override
   protected void onCreate(Bundle savedInstanceState) {
       super.onCreate(savedInstanceState);

       ourbinding = ActivityMapsBinding.inflate(getLayoutInflater());
       setContentView(ourbinding.getRoot());

       // Get the SupportMapFragment and notified when the map is ready to be used.
       SupportMapFragment myMapFragment = (SupportMapFragment) getSupportFragmentManager()
               .findFragmentById(R.id.frag_map);
       myMapFragment.getMapAsync(this);
   }
   @Override
   public void onMapReady(GoogleMap googleMap) {
       myMap = googleMap;
       // Add a marker in place and move the camera
       LatLng place = new LatLng(lat, lon);
       myMap.addMarker(new MarkerOptions().position(place).title("Marker in Place"));
       myMap.moveCamera(CameraUpdateFactory.newLatLng(place));
Designing the UI
Add a new empty activity to the app from the procedure shown in the picture below. Add it as launcher activity. Add this picture to your drawable folder with the name tamil_nadu.jpg

Now simply, we will design the XML file of the newly added activity (activity_main.xml) and code its .java/.kt file accordingly.
activity_main.xml
<?xml version="1.0" encoding="utf-8"?>
<androidx.constraintlayout.widget.ConstraintLayout xmlns:android="http://schemas.android.com/apk/res/android"
   xmlns:app="http://schemas.android.com/apk/res-auto"
   xmlns:tools="http://schemas.android.com/tools"
   android:layout_width="match_parent"
   android:layout_height="match_parent"
   tools:context=".MainActivity">

   <TextView
       android:id="@+id/tv_head"
       android:layout_width="wrap_content"
       android:layout_height="wrap_content"
       android:text="Google Map Demo"
       android:textSize="40dp"
       android:textStyle="bold"
       android:textColor="@color/black"
       app:layout_constraintTop_toTopOf="parent"
       app:layout_constraintRight_toRightOf="parent"
       app:layout_constraintLeft_toLeftOf="parent"
       android:layout_marginTop="30dp"/>

   <TextView
       android:id="@+id/tv_enter"
       android:layout_width="wrap_content"
       android:layout_height="wrap_content"
       android:text="Tamil Nadu"
       android:textSize="30dp"
       android:textColor="@color/black"
       app:layout_constraintTop_toBottomOf="@id/tv_head"
       app:layout_constraintRight_toRightOf="parent"
       app:layout_constraintLeft_toLeftOf="parent"
       android:layout_marginTop="50dp"/>
   <ImageView
       android:id="@+id/iv_tamil"
       android:layout_width="match_parent"
       android:layout_height="wrap_content"
       android:src="@drawable/tamil_nadu"
       app:layout_constraintTop_toBottomOf="@id/tv_enter"
       app:layout_constraintRight_toRightOf="parent"
       app:layout_constraintLeft_toLeftOf="parent"
       android:layout_marginLeft="30dp"
       android:layout_marginRight="30dp"/>

   <Button
       android:id="@+id/bt"
       android:layout_width="match_parent"
       android:layout_height="50dp"
       android:text="Navigate"
       app:layout_constraintTop_toBottomOf="@id/iv_tamil"
       app:layout_constraintRight_toRightOf="parent"
       app:layout_constraintLeft_toLeftOf="parent"
       android:layout_marginLeft="30dp"
       android:layout_marginRight="30dp"/>

</androidx.constraintlayout.widget.ConstraintLayout>
MainActivity.java
package com.example.googlemapapi_demo;

import androidx.appcompat.app.AppCompatActivity;
import android.content.Intent;
import android.os.Bundle;
import android.view.View;
import android.widget.Button;

public class MainActivity extends AppCompatActivity {

   @Override
   protected void onCreate(Bundle savedInstanceState) {
       super.onCreate(savedInstanceState);
       setContentView(R.layout.activity_main);
       Button bt = findViewById(R.id.bt);
       bt.setOnClickListener(new View.OnClickListener() {
           @Override
           public void onClick(View view) {
               Intent intent = new Intent(MainActivity.this,MapsActivity.class);
               startActivity(intent);
           }
       });
   }
}
Now you are all set up and have completed all the procedures for building a simple Google Maps API application. Select an Android emulator to run the app. You will get this as output in the emulator


Frequently Asked Questions
-
What is the use of the API key?
Without an API key, your API URL will not work means you will get no results.
-
Are these API keys are different for everyone?
Yes, these API keys are different for everyone.
-
What if we do not add uses-permission in the AndroidManifest.xml file?
Your app will not get permission to access the mobile’s location and internet.
Conclusion
In this article, we have extensively discussed the Google Maps API in Android and its implementation in Android Studio. We discussed how API Keys could be created and used in an android application.
We hope that this blog has helped you enhance your knowledge regarding Google Maps API. If you want to learn more about using API in Android, refer to this article. And to learn in-depth about android development, check out our Android Development course on the Coding Ninjas website. Do upvote our blog to help other ninjas grow.
Happy Coding!


 9+ registered

