CAM
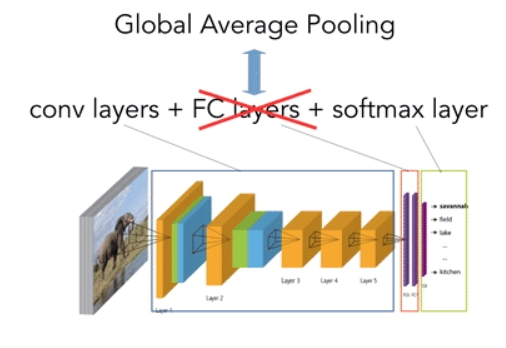
Class Activation Map is a technique to find discriminative class regions for CNN predictions by generating class activation maps. The base network is modified and all the fully connected layers at the end are removed. And a tensor product is included which takes Global-Averaged-Pooled convolutional feature maps as its input and gives the probability of each class as the output.
Source - link
This is a major drawback of CAM. The model needs to be retrained. Grad CAM addresses this problem. The Grad CAM method doesn’t require you to drop the fully connected layers and can be applied to any general CNN model.
Grad CAM
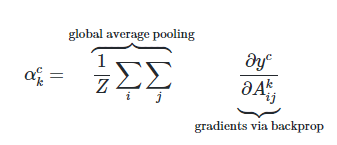
Grad CAM makes use of CAM procedure but further extends its applicability by incorporating gradient information. The gradient of the loss with respect to the final convolutional layer determines the associated weights with each of its feature maps. The gradients flowing back are global-average-pooled to obtain the weights.
Source - link
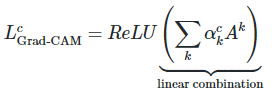
Grad CAM’s heatmap is a weighted combination of feature maps just like CAM. But it’s followed by ReLU function.
Source - link
Source - link
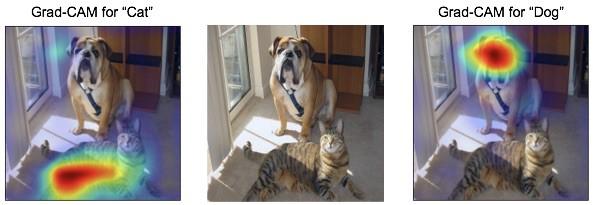
Grad CAM is a generalization of CAM and that’s what allows it to be applicable to any CNN-based architecture.
Grad CAM Implementation using Keras
The implementation sample was provided by the official Keras documentation. The image is taken as a screenshot from here.
import numpy as np
import tensorflow as tf
from tensorflow import keras

# Display
from IPython.display import Image, display
import matplotlib.pyplot as plt
import matplotlib.cm as cm

You can also try this code with Online Python Compiler
model_builder = keras.applications.xception.Xception
img_size = (299, 299)
preprocess_input = keras.applications.xception.preprocess_input
decode_predictions = keras.applications.xception.decode_predictions

last_conv_layer_name = "block14_sepconv2_act"

# The local path to our target image
img_path = keras.utils.get_file(
  "african_elephant.jpg", "https://i.imgur.com/Bvro0YD.png"
)

display(Image(img_path)
You can also try this code with Online Python Compiler
Grad CAM algorithm
def get_img_array(img_path, size):
  # `img` is a PIL image of size 299x299
  img = keras.preprocessing.image.load_img(img_path, target_size=size)
  # `array` is a float32 Numpy array of shape (299, 299, 3)
  array = keras.preprocessing.image.img_to_array(img)
  # We add a dimension to transform our array into a "batch"
  # of size (1, 299, 299, 3)
  array = np.expand_dims(array, axis=0)
  return array


def make_gradcam_heatmap(img_array, model, last_conv_layer_name, pred_index=None):
  # First, we create a model that maps the input image to the activations
  # of the last conv layer as well as the output predictions
  grad_model = tf.keras.models.Model(
      [model.inputs], [model.get_layer(last_conv_layer_name).output, model.output]
  )

  # Then, we compute the gradient of the top predicted class for our input image
  # with respect to the activations of the last conv layer
  with tf.GradientTape() as tape:
      last_conv_layer_output, preds = grad_model(img_array)
      if pred_index is None:
          pred_index = tf.argmax(preds[0])
      class_channel = preds[:, pred_index]

  # This is the gradient of the output neuron (top predicted or chosen)
  # with regard to the output feature map of the last conv layer
  grads = tape.gradient(class_channel, last_conv_layer_output)

  # This is a vector where each entry is the mean intensity of the gradient
  # over a specific feature map channel
  pooled_grads = tf.reduce_mean(grads, axis=(0, 1, 2))

  # We multiply each channel in the feature map array
  # by "how important this channel is" with regard to the top predicted class
  # then sum all the channels to obtain the heatmap class activation
  last_conv_layer_output = last_conv_layer_output[0]
  heatmap = last_conv_layer_output @ pooled_grads[..., tf.newaxis]
  heatmap = tf.squeeze(heatmap)

  # For visualization purpose, we will also normalize the heatmap between 0 & 1
  heatmap = tf.maximum(heatmap, 0) / tf.math.reduce_max(heatmap)
  return heatmap.numpy()
You can also try this code with Online Python Compiler
Testing
img_array = preprocess_input(get_img_array(img_path, size=img_size))
# Make model
model = model_builder(weights="imagenet")
# Remove last layer's softmax
model.layers[-1].activation = None
# Print what the top predicted class is
preds = model.predict(img_array)
print("Predicted:", decode_predictions(preds, top=1)[0])
# Generate class activation heatmap
heatmap = make_gradcam_heatmap(img_array, model, last_conv_layer_name)
# Display heatmap
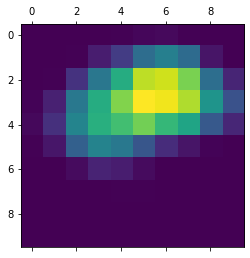
plt.matshow(heatmap)
plt.show()
You can also try this code with Online Python Compiler
Predicted: [('n02504458', 'African_elephant', 9.862389)]
Creating a superimposed virtualisation
def save_and_display_gradcam(img_path, heatmap, cam_path="cam.jpg", alpha=0.4):
  # Load the original image
  img = keras.preprocessing.image.load_img(img_path)
  img = keras.preprocessing.image.img_to_array(img)

  # Rescale heatmap to a range 0-255
  heatmap = np.uint8(255 * heatmap)

  # Use jet colormap to colorize heatmap
  jet = cm.get_cmap("jet")

  # Use RGB values of the colormap
  jet_colors = jet(np.arange(256))[:, :3]
  jet_heatmap = jet_colors[heatmap]

  # Create an image with RGB colorized heatmap
  jet_heatmap = keras.preprocessing.image.array_to_img(jet_heatmap)
  jet_heatmap = jet_heatmap.resize((img.shape[1], img.shape[0]))
  jet_heatmap = keras.preprocessing.image.img_to_array(jet_heatmap)

  # Superimpose the heatmap on original image
  superimposed_img = jet_heatmap * alpha + img
  superimposed_img = keras.preprocessing.image.array_to_img(superimposed_img)

  # Save the superimposed image
  superimposed_img.save(cam_path)

  # Display Grad CAM
  display(Image(cam_path))


save_and_display_gradcam(img_path, heatmap)
You can also try this code with Online Python Compiler
Output:

Limitations of Grad CAM
- Grad CAM algorithm fails to localise multiple occurrences of an object in the input image.
- Localisation of heatmap may be inaccurate with reference to class region coverage due to partial derivatives premise.
-
The continual up and down sampling may lead to signal loss.
Also read, Sampling and Quantization
Frequently Asked Questions
What is the need for Grad CAM?
Deep learning models aren’t very transparent with the way they come up with their predictions. However, as a practitioner, it’s important to ensure the model is focusing on the right features to make its predictions. This problem is addressed by Grad CAM which generates a heatmap that indicates which features in the image are focused on and to what extent.
How is Grad CAM different from CAM?
CAM method requires you to drop the fully connected layers. This modification means that the model would’ve to be retrained. Grad CAM preserves the fully connected layers.
What are the further improvements in Grad CAM?
Further improvements in Grad CAM are made in terms of better localisation as well explaining occurrences of multiple objects in a single image which is implemented in improved version of Grad CAM i.e, Grad CAM++.
Conclusion
The blog beings by highlighting a major drawback of deep learning models, their lack of transparency. This problem was addressed by Grad CAM. the blog thoroughly covers the algorithm along with its implementation and limitations.
Refer to our Guided Path on Coding Ninjas Studio to upskill yourself in Data Structures and Algorithms, Competitive Programming, JavaScript, System Design, Machine learning and many more! If you want to test your competency in coding, you may check out the mock test series and participate in the contests hosted on Coding Ninjas Studio! But if you have just started your learning process and are looking for questions asked by tech giants like Amazon, Microsoft, Uber, etc; you must look at the problems, interview experiences, and interview bundle for placement preparations.
Nevertheless, you may consider our paid courses to give your career an edge over others!
Do upvote our blogs if you find them helpful and engaging!
Happy Learning!!


 9+ registered

