Do you think IIT Guwahati certified course can help you in your career?
Introduction
A stopwatch is one of the most widely used apps, it is so much in-demand that many companies have created in-built stopwatch apps for Android Devices.
By creating a stopwatch app you will get familiarised with the various time and date management functions in the Android Studio. There are a handful yet highly-advantageous functions used for dealing with date and time components within any TextView.
A stopwatch is widely used in the sports sector for time-keeping, having a stopwatch in the cellular phone becomes very handy for coaches, trainers, runners, and other sports professionals. Apart from sports, a stopwatch is used in the education sector, for time-keeping during quizzes, debate competitions, and so on.
The UI design and the Java Code of a stopwatch are very elementary. There are three buttons in the user-interface. First, the “start” button is used for starting the timer from an initial zero second. Second, the “stop” button, which can also be named the “pause” button, stops the increment but doesn’t take the reading back to zero. If you click on the “start” button again, the timer will increment from the value at which it was stopped earlier. The last button is the “reset” button, it sets the value of the timer back to zero seconds.
Follow the steps given in both the phases for creating a stopwatch app. If you have an intention of adding any extended feature such as storing the time at various laps into an adaptor, you can move ahead with that and modify the UI design according to your wish.
1. How do we set the colour of the Action Bar and the Status Bar?
For setting the colour of the action bar and the status bar, you need to know which is the action bar and which is the status bar. The bar which is thinner and contains the icons depicting the battery resource, network connection, sim card details is the status bar, whereas, the bar that represents the name of the app and contains the menu option is known as the Action bar.
By default, the colour of the status bar is dark green, and while that of the action bar is a lighter shade of green, just like the Whatsapp action bar and status bar. Refer to the figure given below to see which attribute drives the colour of which component.
To change the colour of the Action Bar and the Status bar, you can go to the app directory > res directory > values directory > colour.xml file:
The colorPrimary attribute is for the colour of the Action Bar and the colorPrimaryDark is for the colour of the Status bar. You can change them to the desired colour by entering the hex code of the colour.
2. What is function of the following xml attribute android:onClick=”Start”?
If we use the Java code for linking a button with any method, there are numerous steps that we need to follow such as, creating a button object and assigning the reference variable to it, after that calling the on click listener method on that object, and then finally calling the desired method in the on click listener, this becomes a tedious process for the code developers.
Image Source: Android_Ride
XML allows us to use the on Click attribute for invoking any method written in the Java class without the hassle of creating any reference variable for the UI component. This reduces a significant amount of boilerplate code from the MainActivity.Java class.
3. What is function of the following XML attribute android:layout_gravity=”center_horizontal”?
The gravity attribute in XML is used for specifying the alignment of the contents of an object within the object itself. android: layout_gravity is an attribute that a user component that acts like a child assigns to its parents, to specify its own alignment inside the parent.
Suppose, if a textView has layout_gravity as the centre, this implies that the text view will be aligned at the centre of its parent. There are many options for the gravity attribute such as parentStart, parentEnd, horizontal, vertical, centre, right, left, fill_horizontal, fill_vertical, clip_horizontal, clip_vertical, and so on. Adding these attributes facilitates the creation of well-structured and uniform layouts.
Image Source: StackOverflow
4. What do we use “id” attribute in XML code: android:id=”@+id/stop_button”?
For the unique identification of any View object, it must be assigned an integer ID within the tree. Initially, in the XML attribute, the id assigned to any View object is a string ID which is later typecast into a unique integer ID. The XML attribute syntax is common to all the view objects, be it a TextView, EditText, Button, Spinner, and so on.
Each string ID has the at-symbol (@), this marks that the parser should expand the following characters and treat them as the unique string ID. While the plus symbol (+) indicates that this new ID resource must be appended to the resources (in the R.java file).
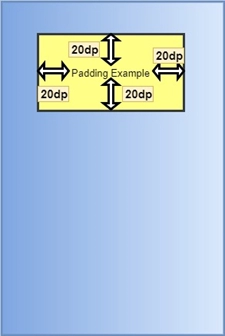
5. What is the significance of the android:padding=”16dp” attribute in the XML code?
If you want a gap between a view’s content and its edges, you can add the padding attribute in your XML code. Padding is used for pushing the contents of the root layout i.e. the rectangle from itself by the dimension given in the XML padding attribute. Padding can be added uniformly for all sides or PaddingLeft, PaddingRight, PaddingTop, PaddingBottom can be used for adding a space in a particular direction.
Padding is expressed in pixels. It can even be added in the Java Code, but the XML attribute is handier. You can even address padding as an internal margin.
The diagram given below will make your concept better:
Image Source: StudyTonight
Phase 2: Java Code
CONSTITUENT VARIABLES:
IsRunning –It is a global variable. We declare it private so that it is not accessed outside the class. The isRunning variable is a Boolean variable. If the stopwatch is running its value is set to true, else it is set to false.wasRunning -sec – The value of the timer is driven by the sec variable, that represents seconds.
Later, the hours and minutes are determined by the help of the sec variable. It is set as zero in the beginning and every time the reset button is clicked.
CONSTITUENT METHODS:
Start() – The start method is used for setting the value of the variable isRunning to true. This value is then checked in the startTimer function.
Stop() – The stop method is used for setting the value of the variable isRunning to false. This value is then checked in the startTimer function.
Reset() – The reset method is used for setting the value of the variable isRunning to false and it re-initialises the variable seconds to zero.
StartTimer() – The startTimer method increments the value of the seconds variable if the value of the isRunning variable is true. It extracts the pointer of the TextView with the help of the reference variable and then formats the seconds into hours, minutes and seconds.
Later the text view is set accordingly to distinctly represent the three components of time with the help of the seconds (sec) variable.
HANDLER:
A Handler allows code-scheduling in Android Studio. Any code component that has to place in an alternate thread can be placed in a Handler. We have employed the handler for running the incrementing the second variable at the lapse of one second.
For this, we have embarrassed the scheduled code in a Runnable object.
After this, we trigger the post() and postDelayed() methods for invoking the code at the desired instant(scheduling).
The post() method: It is used for running any code immediately, In this case, it takes only a single parameter, which is a runnable kind of object. A Runnable object in Androidville is analogous to a Runnable in the traditional Java: it depicts any job you want to run. You just need to place the code in the run() method of Runnable and the Handler ensures that this code is triggered as soon as possible.
The postDelayed() method: It works analogously to the post() method, except for the fact that it doesn’t run the code immediately. The postDelayed() method takes two parameters, namely, a Runnable and along. The long value specifies the delay in milliseconds, while the Runnable carries the code component you wish to run in its run() method. The code is run after a gap of the milliseconds mentioned in the long parameter.
The below mentioned Java class contains the complete code for the Stopwatch app:
package com.example.stopwatch_;


import androidx.appcompat.app.AppCompatActivity;


import android.os.Bundle;
import android.os.Handler;
import android.view.View;
import android.widget.TextView;


import java.util.Locale;


public class MainActivity extends AppCompatActivity {


    //declaration of global variables
    private int sec = 0;
    private boolean isRunning;
    private boolean wasRunning;


    @Override
    protected void onCreate(Bundle savedInstanceState)
    {
        super.onCreate(savedInstanceState);
        setContentView(R.layout.activity_main);
        if (savedInstanceState != null)
        {


            sec = savedInstanceState.getInt("seconds");
            isRunning = savedInstanceState.getBoolean("running");
            wasRunning = savedInstanceState.getBoolean("wasRunning");
        }
        startTimer();
    }


    @Override
    public void onSaveInstanceState(Bundle savedInstanceState)
    {
        super.onSaveInstanceState(savedInstanceState);
        savedInstanceState.putInt("seconds", sec);
        savedInstanceState.putBoolean("running", isRunning);
        savedInstanceState.putBoolean("wasRunning", wasRunning);
    }


    @Override
    protected void onPause()
    {
        super.onPause();
        wasRunning = isRunning;
        isRunning = false;
    }


    @Override
    protected void onResume()
    {
        super.onResume();
        if (wasRunning) {
            isRunning = true;
        }
    }


    public void Start(View view)
    {
        isRunning = true;
    }


    public void Stop(View view)
    {
        isRunning = false;
    }


    public void Reset(View view)
    {
        isRunning = false;
        sec = 0;
    }


    private void startTimer()
    {
        final TextView timer = (TextView)findViewById(R.id.timer);


        final Handler hd = new Handler();


        hd.post(new Runnable() {
            @Override


            public void run()
            {
                int hours_var = sec / 3600;
                int minutes_var = (sec % 3600) / 60;
                int secs_var = sec % 60;


                String time_value = String.format(Locale.getDefault(),
                "%d:%02d:%02d", hours_var, minutes_var, secs_var);


                timer.setText(time_value);


                if (isRunning)
                {
                    sec++;
                }


                hd.postDelayed(this, 1000);
            }
        });
    }
}
You can also try this code with Online Java Compiler
Try implementing the code yourself and extend the functionalities by adding adapters or fragments. The more you practise the more you grow. However, if you stumble across anything you can refer to my GitHub repository.
Frequently Asked Questions
What is the use of a date and time picker in Android?
One can choose a date in his/her custom user interface by using the Android Date Picker to specify the day, month, and year of a project. The user interface control known as Android TimePicker allows users to select the time in either AM/PM mode or 24-hour format.
How can I change the font color in Android Studio?
You can change the font color in Android studio in two different ways. You can either change it directly by adding a color attribute to the XML code or through the MainActivity File. You can change the font color in Java and Kotlin codes for Android studio.
What is the use of a handler in Android Studio?
A Handler allows code scheduling in Android Studio. A handler enables secondary threads in other applications to communicate with the user interface. Any code component that has to place in an alternate thread can be placed in a Handler. It is very helpful since Android restricts other threads from directly contacting the UI thread.
Conclusion
We have discussed how to build a stopwatch app in Android studio. We started with the app's design and understood how to implement the design using java code. We hope you liked this article.


 9+ registered

