Do you think IIT Guwahati certified course can help you in your career?
Introduction📘
Ready API is a SOAP API and REST automation testing tool. Ready API is an API testing platform intended to streamline our testing workflows. It is an easy-to-use no-code API testing platform. Ready API platform speeds security, functional, and load testing of SOAP, RESTful, GraphQL, and other web services.
Ready API allows groups to create, manage and execute automated security, functional, and performance tests in one centralized interface. This speeds up API quality for DevOps and Agile software development teams. In this article, we will see how to customize the Ready API. Let’s get started!
Configuring Ready API👩💻
This section will show how we can use Ready API according to our needs and achieve the best while using the product.
Topics we will coverA are:
🎯 Preferences
🎯 Plugin Development
🎯 JVM Settings
🎯 Workspaces
🎯 Logs in Ready API
🎯 Accessibility Features
Preferences
In Ready API Preferences, there are various settings and customizations for multiple features and tools that we can configure.
1.Open the Preferences dialog.
We can open the preferences in Ready API in two ways:
♦️ Click on preferences on the right side of the ready API toolbar.
– Or –
♦️ Go to File> Preferences from the main menu.
2.Option Reference
In preferences, the options are organized in the following ways:
Network
HTTP
Proxy
Internal Browser
Security
WS-I
SSL
Global security
WS-A
Other
REST
WSDL
Virtual Service Transactions
ReadyAPI
Global Properties
Interface
UI
Editor
Testing
Test History
Global Sensitive Information Tokens
Performance Testing
Default Test case Options
Coverage
Code templates
Debug Context Filter
Notifications
Version Update
Integrations
JIRA
JDBC
AlertSite Connector Plugin
Zephyr Squad
SwaggerHub
Git
3.Export and Import Preferences
If we have already installed ReadyAPI, our saved preferences will automatically be imported to the new version.
4.Search Preferences
We can also use the search box to find a setting by part of its name quickly:
When we type a keyword to search, tabs containing matches appear on the window's left side. The matches are highlighted.
Plugin Development
1. Introduction
Plugins are modules that expand the functionality of tools in either SoapUI and Ready API. Plugins are developed in Java. Also, Plugins use the Plugin Framework, which provides interfaces and annotations that can be used to modify or extend functionality. Plugins are distributed as a JAR file containing all the plugin functionality and all the required third-party libraries.
Plugins can be used for
📌 Integration: Integrate with other platforms, tools, or technologies.
📌 protocol functionality: Add new functionality to an existing protocol.
📌 API functionality: Tailor functionality for certain APIs.
📌 Protocols: Adds new API types or protocols.
2. Background
Now, we are going to see the background of ReadyAPI plugin development.
🕵️♀️Languages: we can develop plugins for Ready API in any languages that target the JVM or the scripting API, but we advise not to use it and recommend using currently supported languages such as Groovy and Java.
Java: As Ready API is written in Java, Java is a logical choice for plugin development.
Groovy: Groovy is based on Java but with additional features. Inside Ready API, Groovy is used as an internal scripting language.
🕵️♀️API JavaDocs: version Ready API 3.40.2
The following resources consist of an overview of available methods and classes:
Ready API core
It describes the methods and classes that connect to the core Ready API functionality.
Ready API Test core
It describes the methods and classes that connect to the basic Ready API test functionality.
Ready API Test Pro specific
It describes the methods and classes related to the Ready API Test functionality that needs a Ready API Test pro license.
Ready API runners
It describes the methods and classes that connect to Ready API command-line runners..
🕵️♀️ UISupport: It is the show for basic UI-related tasks. It consists mainly of the methods we will need to interact with the GUI and build a user interface for our Plugin.
GUI Examples
UISupport.showInfoMessage(String)
UISupport.confirm(String, String)
UISupport.selectAndShow(ModelItem)
3. Structure
A plugin is a JAR file that contains all the plugin functionality and all the required third-party libraries. In functionality, a plugin can have any combination of the following:
Functionality
Actions
An application user uses these features. Usually, actions are accessed via toolbars and menus.
Listeners
The task of the listener is to wait for events to happen. Once the event occurs, listeners perform their function.
Factories
This adds basic functionality to a testing project environment. This includes testing objects in a project, objects in a user interface, and any particular behavior required in a project.
UI Objects
UI objects involve Editors.
Testing Objects
These testing objects, like test steps and assertions, are a case where Plugins might be of interest.
Behavior
Any particular behavior in our API that requires special handling can be a good case for creating a plugin..
4. Tools
🕵️♀️ About Tools Used: For plugin development for Ready API, we are required to have a development environment (suggested: IntelliJ IDEA) and a build tool (suggested: Apache Maven).
🕵️♀️ Maven: Maven is a build automation tool for java projects. It is used to monitor buildings and dependencies. SmartBear anticipates a maven archetype we can use in our project.
🕵️♀️ IntelliJ IDEA: It is used globally by ReadyAPI developers. Its community edition is free and has everything required for plugin development.
Note: If IntelliJ IDEA is unsuitable, you can use NetBeans, Eclipse, or any other development environment.
🕵️♀️ Plugin Development Kit: ReadyAPI Plugin Development kit is provided by SmartBear. This kit contains a Maven archetype for our plugin projects. It also contains a simple plugin template that has extension mechanisms.
5. Developing Plugins
🧿 Introduction
The development process for creating a plugin is simple, which is as follows:
📌 A Basic Project
📌 Create a plugin project- maven archetype: generate.
🎯Package and Build–maven install.
🎯 Install the plugin file, and add it to our Ready API.
🎯 Try out the Plugin, and also check if it works.
🎯 Again, remove the Plugin. We will replace it with the modified version.
📌 Customize the Plugin.
📌 Open the project in any java development environment which we are using.
🎯 Change the PluginAction.java class.
🎯 Modify/edit metadata to speculate changes.
🎯 package and Build – mvn install.
🎯 Install the plugin file, and add it to our Ready API.
🎯 Try out the Plugin, and also check if it works.
🧿 Creating a Project
Maven Archetype: The Plugin Development kit contains the Maven plugin archetype. The Maven archetype can be used to add a new project to an existing one and create new projects.
🕵️♀️ Install: For creating a basic project from the Maven archetype, we need to run the following maven command from the terminal or command line:
The above command will download the archetype from the smartBear and start creating the project. Then we will be asked to provide the following:
groupId
is the groupId that is to be used in the generated pom.xml file. For example, "com.myninja";
artifactId
Is the artifact set in the created pom.xml?
version
is the initial version of the plugin.
package
It is where plugin code will be generated, default to the specified groupId;
language
In which language to generate for, provide either Groovy or Java;
type
It is the type of Plugin we want to generate.
After this, we are advised to confirm the given values:
♦️ Type y and press Enter.
🕵️♀️ Build: To build a plugin,
Confirm that you have a pluginConfig class and that the @PluginConfiguration annotation has a valid version attribute value("ex. 1.0.0").
Move to the plugin directory and run the command – maven install.
This will create a plugin jar file in the target folder of our project.
🧿 Libraries
Any third-party libraries used in the Plugin must be included in the completed Plugin, even if they are also used by core Ready API functionality. When we install a plugin in Ready API, the Plugin manager unwraps all the libraries in that Plugin and performs a reverse lookup to load the bundled third-party libraries.
🕵️♀️ Packaging Libraries: Libraries used in plugins should be added to the project in a directory called libs. We need to configure the assembly through our project pom.xml as given below:
Annotations in Ready API are used to identify plugins. Annotations store metadata about the actual code. While creating plugins, we add the corresponding annotations to code classes to determine the extension type and provide other info.
JVM Settings
1. Modifying JVM Settings
As Ready API runs, some parameters are passed to the JVM to prepare the environment. We can modify these parameters according to the requirements.
🕵️♀️ Setting Command line and JVM Options
Depending on how we run Ready API, JVM passes the parameters from different locations:
Running Ready API via…
Passes parameters from…
Command line
The .bat/.sh script.
Executable
The helper .vmoptions file.
🎯Running Ready API through Command Line
When we use the .sh file or the .bat file to run Ready API, the JVM uses parameters mentioned in the script file. All these parameters are kept in the JAVA_OPTS variable. When Java is called by script, specified parameters are passed as command-line arguments. We can find the needed parameters and modify them according to our requirements. Given below are how variables look like in the script file:
In the.bat file
set JAVA_OPTS=-Xms128m -Xmx%READY_XMX% -XX:MinHeapFreeRatio=20 -XX:MaxHeapFreeRatio=40 -XX:MaxPermSize=256m -Dsoapui.properties=soapui.properties
Open this file in any text editor to modify any parameter. Also, if the parameter is absent, we can add it.
🎯 Adding New Parameters
To merge a new parameter to the existing specified parameters, we need to specify the JAVA_OPTS variable itself before specifying the required parameter.
For example,
In the .bat file
set JAVA_OPTS=%JAVA_OPTS% -Dsoapui.browser.disabled="true"
This command controls the process for getting credential information from a request..
-Djavax.security.auth.useSubjectCredsOnly=false
Workspaces
1. Managing Workspaces
We can arrange workspaces in multiple ways. We can rename and create workspaces, switch between them, and load them from a file. We can also remove all the projects from a workspace.
🕵️♀️ Creating a new workspace For creating a new workspace:
Goto File>Workspace>New Workspace.
The New workspace dialog will be displayed.
Enter the workspace name. Click OK.
Specify the folder where we want to contain our workspace.
🕵️♀️ Renaming workspaces
For renaming the workspace:
Goto File>Workspace>Rename Workspace.
The Rename workspace dialog will be displayed.
Modify the name of the current workspace. Press OK.
🕵️♀️Switching between workspaces
We can switch between workspaces in two ways. Either switch to a recently used workspace or open the corresponding workspace file.
For switching between workspaces:
Goto File>Workspace>Switch Workspace
Then browse the workspace file that is required. Select it and press open.
The Switch workspace dialog will appear if we haven't saved projects in the current workspace.
Press Yes to save the projects.
🕵️♀️ Clearing Workspaces
To clear all the projects from the current workspace:
Goto File> Workspace> Clear Workspace.
The Clear workspace dialog will be displayed.
Press Yes.
All the workspaces are cleared.
2. Modes
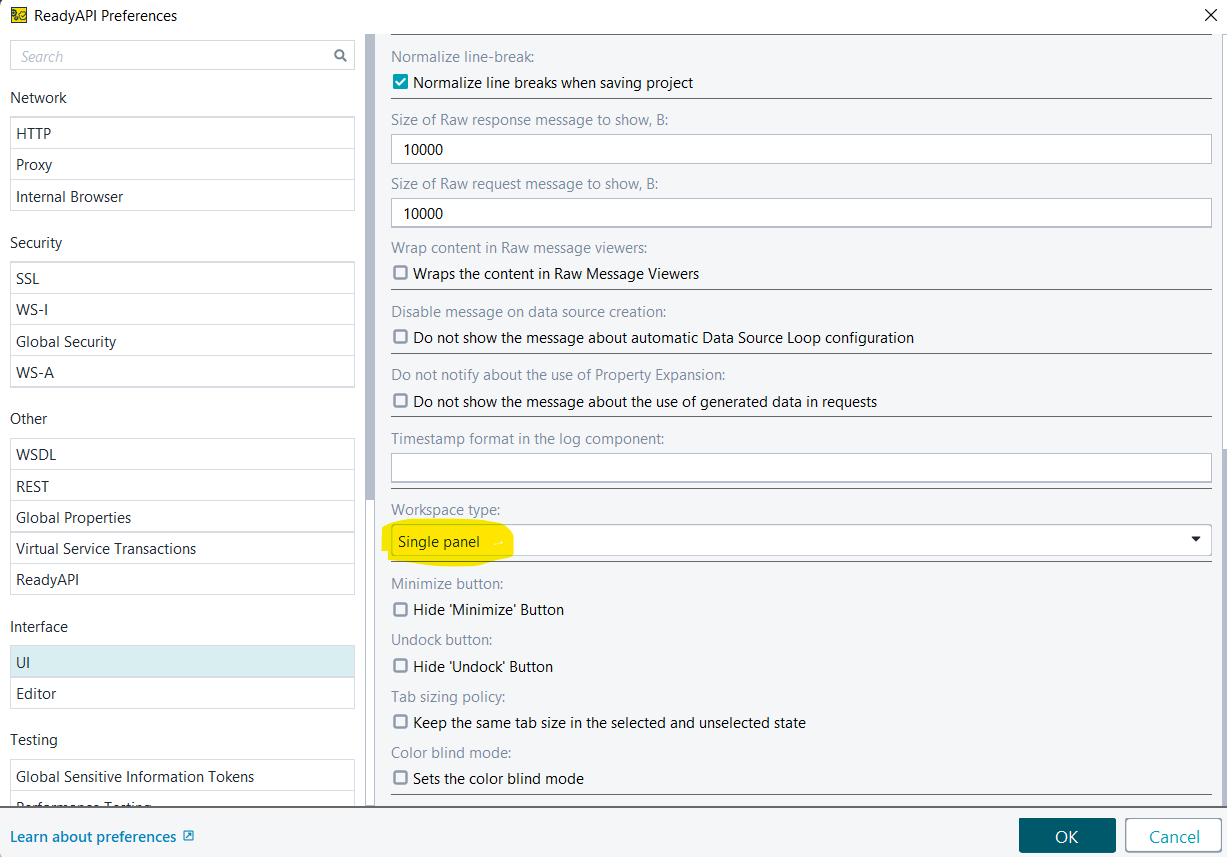
There are two modes in which we can use Ready API workspaces. This workspace type can be set in the UI section in Ready API preferences.
To specify the modes in which we want to work:
Goto Preferences> UI tab> find workspace type> Select a mode from a dropdown list.
🕵️♀️ Single Panel mode: This workspace type allows us to see the objects of the project in a single panel of the Ready API window. Select the necessary element in the Navigator for switching the project content.
🕵️♀️ Tabbed Mode: In the Tabbed mode, Ready API displays opened objects of the projects on tabs. To open the projects' contents in the corresponding editor, we must double-click the required element in the Navigator section.
Logs in Ready API
Logs in Ready API provide information about incidents/events in Ready API.
🕵️♀️View Logs: To view logs, Go to show Logs in the left lowermost corner.
🕵️♀️ Available Logs
We can access the logs which are mentioned below:
Log
Contains
Script log
Info posted to log via scripts.
HTTP log
HTTP message exchange.
Jetty log
Info regarding built-in Jetty web server.
Ready API log
Project-level events.
WS-RM log
WS-Reliable messaging events in ReadyAPI.
Performance log
Info regarding load test runs in Ready API performance.
🕵️♀️ Context Menu
The context menu keeps the commands we can use to change the logs.
Options
Description
Clear
Reset the log and clear all information from it.
Enable
They are enabled only when selected. Otherwise, no info will be posted to the log.
Clear all logs
Reset all available logs and delete all info from them.
Copy to clipboard
Copy the log contents present to the clipboard.
Export to File
Save the log info to the .log file.
Set Max Rows
Limit the no.of log rows. Delete oldest items first.
Accessibility Features
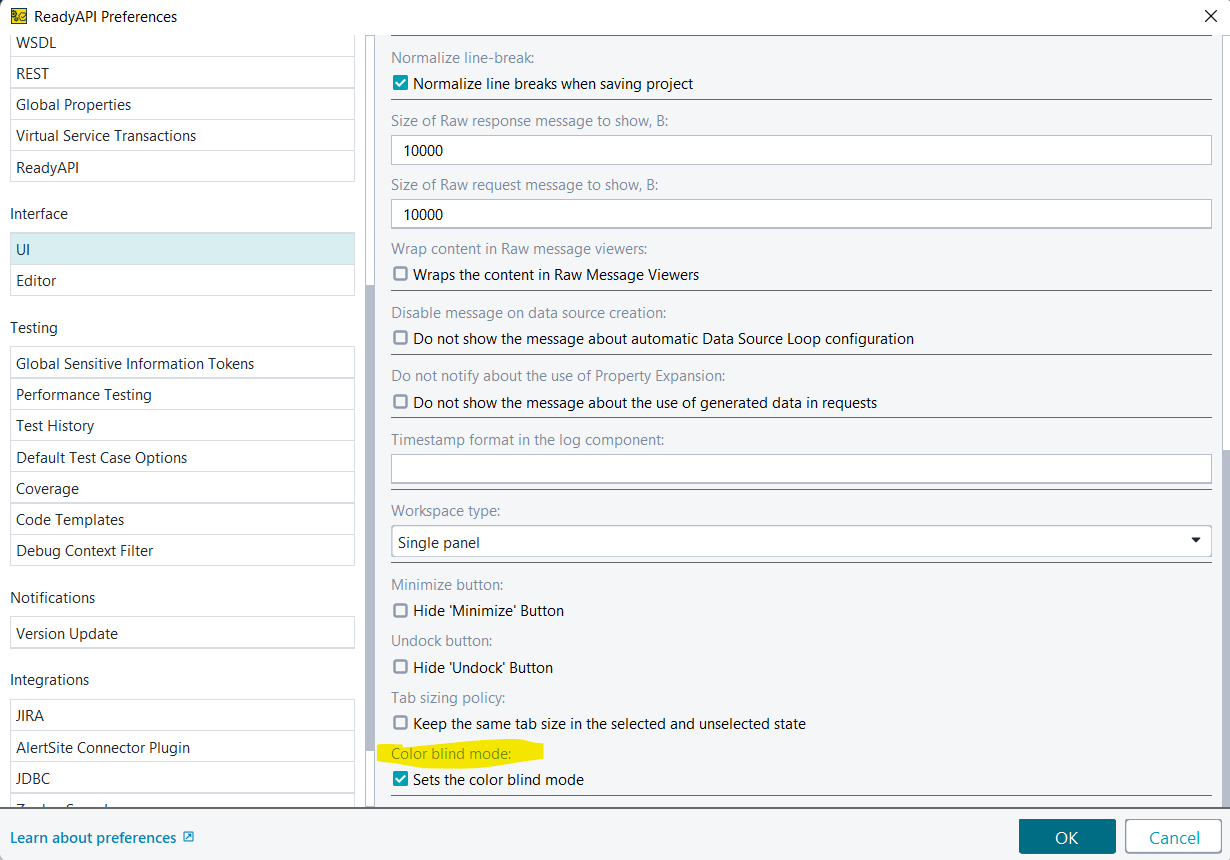
🕵️♀️ Color Perception Assistance: Ready API has a setting that is useful for users with red-green color blindness. This setting helps enhance their experience with the product. This option enables a special UI mode. Ready API uses more color blindness-friendly colors in panels, progress bars, and icons in this special UI mode.
To enable this:
Goto Preferences > UI > Color blind mode
🕵️♀️ Text Scaling: In script editors in ready API, we can easily change the text size by selecting CTRL and rotating the mouse wheel.
For increasing the font size: press CTRL and rotate down the mouse wheel.
To decrease the font size: press CTRL and rotate the mouse wheel.
Frequently Asked Questions
What is Ready API used for?
Ready API is used to create, manage, and execute security, automated functional, and performance tests in a single centralized interface.
Is Ready API the same as SoapUI?
SoapUi is an open-source tool for automated web service testing by Smartbear. While Ready API is a platform with the next-generation soapUI as one of its test modules.
Is Ready API automation tool?
Ready API is a SOAP API, a REST automation testing tool.
What is the difference between ready API and Postman?
Ready API is built throughout each test case so that the tests can store different endpoints, pieces of data, or resources. Whereas, Postman is built throughout each endpoint in an API which makes end-to-end testing impossible to track & follow.
What is the difference between SOAP API and REST?
SOAP is a protocol, whereas REST is an architectural style.
Conclusion
In this article, we have discussed how to customize Ready API in detail. We started with the Introduction of Ready API; then, we saw preferences, Plugin development, workspaces, logs in Ready API, JVM settings, and accessibility features.


 9+ registered

