Do you think IIT Guwahati certified course can help you in your career?
Introduction
Image captioning is the process of generating strings that describe images present in a given dataset. In this article, you learn how to build an image caption generator using Tensorflow, Keras, and Jupyter Notebook.
TensorFlow is an open-source library used for machine learning. It allows you to create data flow graphs that describes how the data will flow through a sequence of processing nodes.
Keras is another open-source library commonly used in machine learning for training and building neural networks. It is also used for image classification and natural language processing.
Let’s get started.
Model Architecture
In this model, we will use a CNN to extract features from the input images and encode them.
For training our model, we will use the Flickr 8k dataset. This dataset consists of 8000 images that have five different captions. You should download it from this link.
Now let’s look at the definition of a CNN.
CNN
CNN stands for Convolutional Neural Network, and it is commonly used in machine learning for image and video recognition. They are particularly useful for working with images due to their grid-like structure.
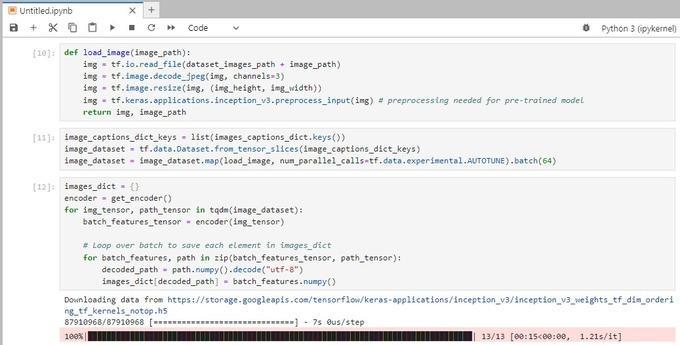
For this project, we will use a pre-trained CNN model called Inception V3 from Keras.
Before moving forward, install Jupyter Notebook and create a new Python notebook. Make sure you store the dataset in the same directory.
Let’s get started with building the image caption generator.
Step 1: Importing Dependencies
Run the following code in a Jupyter Notebook cell to import all the required libraries.
import re
import random

import numpy as np
import tensorflow as tf
import matplotlib.pyplot as plt

from tensorflow import keras
from time import time

from tqdm import tqdm # progress bar
from sklearn.model_selection import train_test_split # Dividing train test
You can also try this code with Online Python Compiler
The dataset is divided into two parts, one for training and the other for validation. The “validation_split” variable signifies the percentage of images from our dataset that will be used for validation. In our case, 20% of the dataset will be used for validation, while the other 80 percent will be used for training the model.
Step 3: Preprocessing Captions
In this step, we will pre-process the captions by splitting them and adding the <start> and <end> tokens.
Then we will create a dictionary with image filename as the key and an array of captions as the value.
Run the code below to define the preprocessing function:-
images_captions_dict = {}

with open(dataset_path + "/captions.txt", "r") as dataset_info:
    next(dataset_info) # Omit header: image, caption

    # Using a subset of 4,000 entries out of 40,000
    for info_raw in list(dataset_info)[:4000]:
        info = info_raw.split(",")
        image_filename = info[0]
        caption = get_preprocessed_caption(info[1])


        if image_filename not in images_captions_dict.keys():
            images_captions_dict[image_filename] = [caption]
        else:
            images_captions_dict[image_filename].append(caption)
You can also try this code with Online Python Compiler
Tokenization is the process of converting the labels into a numerical form that can be used by machine learning algorithms.
We will use the tokenizer available in Keras.
top_k = 5000
tokenizer = tf.keras.preprocessing.text.Tokenizer(num_words=top_k,
                                                  oov_token="<unk>",
                                                  filters='!"#$%&()*+.,-/:;=?@[\]^_`{|}~ ')

tokenizer.fit_on_texts(y_train_raw)

# Introduce padding to make the captions of the same size for the LSTM model
tokenizer.word_index['<pad>'] = 0
tokenizer.index_word[0] = '<pad>'

# Create the tokenized vectors
y_train = tokenizer.texts_to_sequences(y_train_raw)

y_train = tf.keras.preprocessing.sequence.pad_sequences(y_train, padding='post')

max_caption_length = max(len(t) for t in y_train)
You can also try this code with Online Python Compiler
Buffer size is the number of elements that would be loaded in memory while training, and the
batch size is the number of samples that are processed together in a single iteration.
While training our model, we will use a batch size of 64.
Step 8: Models Definition
We will now define the encoder and decoder models.
class CNN_Encoder(tf.keras.Model):
    # Since you have already extracted the features and dumped it using pickle
    # This encoder passes those features through a Fully connected layer
    def __init__(self, embedding_dim):
        super(CNN_Encoder, self).__init__()
        # shape after fc == (batch_size, 64, embedding_dim)
        self.flat = tf.keras.layers.Flatten()
        self.fc = tf.keras.layers.Dense(embedding_dim) #, activation='relu')

    def call(self, x):
        x = self.flat(x)
        x = self.fc(x)
        return x
You can also try this code with Online Python Compiler
class RNN_Decoder(tf.keras.Model):
    def __init__(self, embedding_dim, units, vocab_size):
        super(RNN_Decoder, self).__init__()
        self.units = units

        # input_dim = size of the vocabulary
        # Define the embedding layer to transform the input caption sequence
        self.embedding = tf.keras.layers.Embedding(vocab_size, embedding_dim)

        # Define the Long Short Term Memory layer to predict the next words in the sequence
        self.lstm = tf.keras.layers.LSTM(self.units, return_sequences=True, return_state=True)

        # Define a dense layer to transform the LSTM output into prediction of the best word
        self.fc = tf.keras.layers.Dense(vocab_size) #, activation='softmax')

    # A function that transforms the input embeddings and passes them to the LSTM layer
    def call(self, captions, features, omit_features = False, initial_state = None, verbose = False):
        if verbose:
            print("Before embedding")
            print(captions.shape)

        embed = self.embedding(captions) #(batch_size, 1, embedding_dim)

        if verbose:
            print("Embed")
            print(embed.shape)

        features = tf.expand_dims(features, 1)

        if verbose:
            print("Features")
            print(features.shape)

        # Concatenating the image and caption embeddings before providing them to LSTM
        # shape == (batch_size, 1, embedding_dim + hidden_size)
        lstm_input = tf.concat([features, embed], axis=-2) if (omit_features == False) else embed

        if verbose:
            print("LSTM input")
            print(lstm_input.shape)

        # Passing the concatenated vector to the LSTM
        output, memory_state, carry_state = self.lstm(lstm_input, initial_state=initial_state)

        if verbose:
            print("LSTM output")
            print(output.shape)

        # Transform LSTM output units to vocab_size
        output = self.fc(output)

        return output, memory_state, carry_state

    def reset_state(self, batch_size):
        return tf.zeros((batch_size, self.units))
You can also try this code with Online Python Compiler
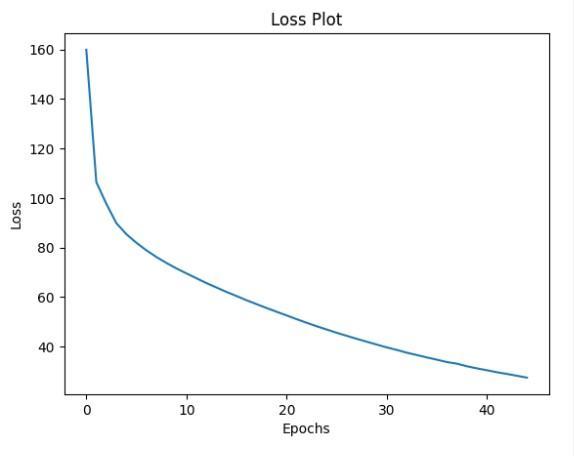
Before training the model, we will initialize the encoder and decoder and define a few utility functions.
units = embedding_dim = 512 # As in the paper
vocab_size = min(top_k + 1, len(tokenizer.word_index.keys()))

# Initialize encoder and decoder
encoder = CNN_Encoder(embedding_dim)
decoder = RNN_Decoder(embedding_dim, units, vocab_size)

# Initialize optimizer
optimizer = tf.keras.optimizers.Adam()

# As the label is not one-hot encoded but indices. Logits as they are not probabilities.
loss_object = tf.keras.losses.SparseCategoricalCrossentropy(from_logits=True, reduction='none')

# Computes the loss using SCCE and calculates the average of singular losses in the tensor
def loss_function(real, pred, verbose=False):
    loss_ = loss_object(real, pred)

    if verbose:
        print("Loss")
        print(loss_)

    loss_ = tf.reduce_mean(loss_, axis = 1)

    if verbose:
        print("After Mean Axis 1")
        print(loss_)

    return loss_
You can also try this code with Online Python Compiler
@tf.function
def train_step(img_tensor, target, verbose=False):
    if verbose:
        print("Image tensor")
        print(img_tensor.shape)

        print("Target")
        print(target.shape)

    # The input would be each set of words without the last one (<end>), to leave space for the first one that
    # would be the image embedding
    dec_input = tf.convert_to_tensor(target[:, :-1])

    # Source: https://www.tensorflow.org/api_docs/python/tf/GradientTape
    with tf.GradientTape() as tape:
        features = encoder(img_tensor)

        if verbose:
            print("Features CNN")
            print(features)

        predictions, _, _ = decoder(dec_input, features, verbose=verbose)

        if verbose:
            print("Predictions RNN")
            print(predictions)

        caption_loss = loss_function(target, predictions) # (batch_size, )

        # After tape
        total_batch_loss = tf.reduce_sum(caption_loss) # Sum (batch_size, ) => K
        mean_batch_loss = tf.reduce_mean(caption_loss) # Mean(batch_size, ) => K

    # Updated the variables
    trainable_variables = encoder.trainable_variables + decoder.trainable_variables
    gradients = tape.gradient(caption_loss, trainable_variables)
    optimizer.apply_gradients(zip(gradients, trainable_variables))

    return total_batch_loss, mean_batch_loss
You can also try this code with Online Python Compiler
def get_caption(img):
# Add image to an array to simulate batch size of 1
features = encoder(tf.expand_dims(img, 0))
caption = []
dec_input = tf.expand_dims([], 0)
# Inputs the image embedding into the trained LSTM layer and predicts the first word of the sequence.
# The output, hidden and cell states are passed again to the LSTM to generate the next word.
# The iteration is repeated until the caption does not reach the max length.
state = None
for i in range(1, max_caption_length):
predictions, memory_state, carry_state = \
decoder(dec_input, features, omit_features=i > 1, initial_state=state)
# Takes maximum index of predictions
word_index = np.argmax(predictions.numpy().flatten())
caption.append(tokenizer.index_word[word_index])
dec_input = tf.expand_dims([word_index], 0)
state = [memory_state, carry_state]
# Filter caption
return clean_caption(caption)
raw_img = load_image(test_img_name)[0]
img = images_dict[test_img_name]
captions = images_captions_dict[test_img_name]
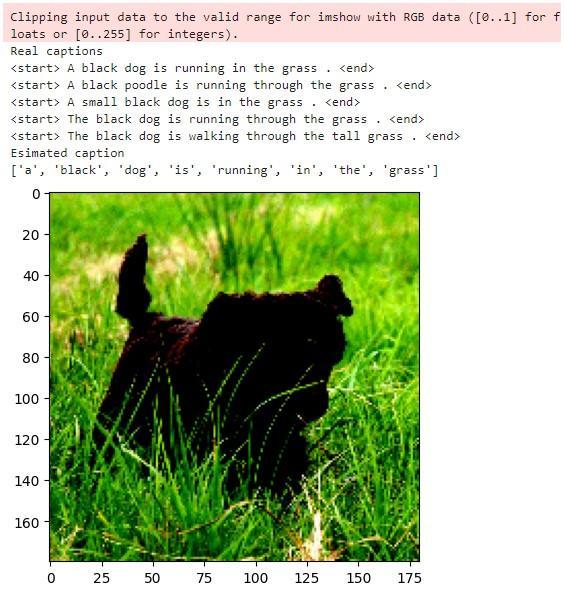
plt.imshow(raw_img)
print("Real captions")
for caption in captions:
print(caption)
print("Esimated caption")
estimated_caption = get_caption(img)
print(estimated_caption)
You can also try this code with Online Python Compiler
As you can see, the model generated a fairly accurate caption for the input image.
Frequently Asked Questions
What is a RNN?
RNN stands for Recurrent Neural Network which is commonly used in machine learning for processing sequential data with different temporal dependencies such as time series, text, speech, etc. By using recurrent connections, it can maintain and use information from previous steps while processing the current input.
What is LSTM?
LSTM is a type of recurrent neural network architecture. It stands for Long short-term memory. It can selectively remember or forget information from previous steps by using gating mechanisms.
What is Keras?
Keras is a high-level deep learning framework written in Python which provides a user-friendly interface for building neural networks. It is compatible with other deep learning backends, such as Tensorflow.
Conclusion
In this article, you learned how to build an image caption generator using Tensorflow and Keras.


 9+ registered

