Get a skill gap analysis, personalised roadmap, and AI-powered resume optimisation.
Introduction
Are you beginning with Apache Spark for big data processing and analytics? Apache Spark designs an open-source distributed computing system for big data processing that can be run on the operating systems, such as Windows, Mac, and Ubuntu. But without directly start learning it, we should begin with installing Apache Spark in our specific operating system, and this is what will we going to do here in this article.
In the article ‘Installing and Working with Apache Spark’, we will verify the Scala and Java Installations on the machine before directly installing Apache Spark, and then we will look at installing Apache Spark in Windows, Mac, and Ubuntu.
Verifying Scala and Java Installations
Apache Spark is implemented in Scala, and its core functionality relies on the Java Virtual Machine (JVM). So both Scala and Java are needed to be installed on the machine.
Installing and Verifying Java
There are several steps for installing and verifying Java on your machine, as follows:
(Note: If you think you’ve installed Java on your machine, you can skip to step 3.)
Step 1: Download the Java Development Kit (JDK) from the official Java website by this clicking the button ‘Download Java’ in the below image:
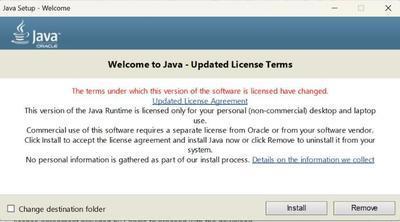
Step 2: The installer file will be downloaded after step 1. Now open the file and read the license agreement provided by Oracle and click on Install to proceed with the installation.
Step 3: Now the installation has been completed, and you can verify the installation now. Open the command prompt or terminal window and execute the following command:
java -version
If the installation is successfully installed, the above command will display a similar output to the below output showing the version of Java (the version of Java can vary depending on when you installed Java).
java version "19" 2022-09-20
Java(TM) SE Runtime Environment (build 19+36-2238)
Java HotSpot(TM) 64-Bit Server VM (build 19+36-2238, mixed mode, sharing)
Now Java is installed on your computer, and you can move to install Scala on your computer.
Installing and Verifying Scala
There are several steps for installing and verifying Scala on your machine, as follows:
(Note: If you think you’ve installed Scala on your machine, you can skip to step 3.)
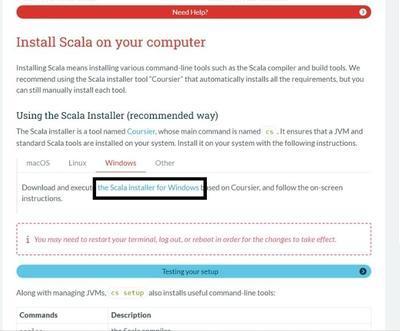
Step 1: Download the Scala Distribution from the official Scala website, and click on the link ‘the Scala installer for Windows’ that will directly download the zip file to your computer. Likewise, you can download Scala for different operating systems by switching it, as shown in the below image.
Step 2: Now, you need to extract the downloaded zip file; you can do it manually using different zipper tools like WinRar. Now an installer file will be displayed by which you can install Scala.
Step 3: Now the installation has been completed, and you can verify the installation now. Open the command prompt or terminal window and execute the following command:
scala -version
If the installation is successfully installed, the above command will display the below output showing the version of Scala (the version of Scala can vary depending on when you installed Scala):
Scala code runner version 2.11.6 -- Copyright 2002-2021, LAMP/EPFL and Lightbend, Inc.
Now Java and Scala both are successfully installed on your computer, and you can use them to develop applications with Apache Spark.
Installing Apache Spark in Windows
In this section of the article ‘Installing and Working with Apache Spark', we will see how to install Apache Spark in Windows. There are several steps for installing Apache Spark on Windows Machine, as follows:
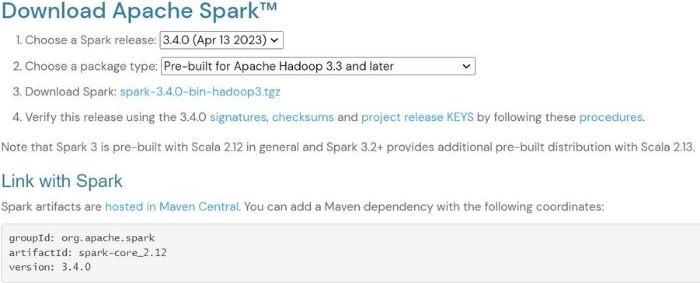
Step 1: You need to install the Apache Spark package from the Official Apache Spark website. If Hadoop is installed on your computer, you should choose the Apache Spark version according to your Hadoop version else; You can choose the Apache Spark version without Hadoop. After choosing your version and package type, you can click on the download link shown in the below image:
The above installer can be downloaded for Windows, Mac, and Ubuntu as we are downloading a zip file, which is the same for all operating systems.
Step 2: Now, as the Apache Spark package is downloaded, You need to extract the downloaded Apache Spark package to a directory (of your choice) for which you can use a zipper tool like WinRar.
Step 3: To run Apache Spark, you need to set up the environment variables, and you can do it manually. The installation has been completed, and you can verify the installation now. Open the command prompt or terminal window and execute the following command:
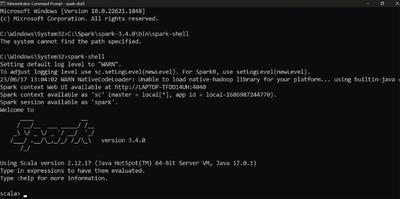
spark-shell
If the installation is successfully installed, the above command will display an interactive Scala shell to work with Spark as shown below output (You should see similar to the below output, the version can be varied):
Installing Apache Spark in Mac
In this section of the article ‘Installing and Working with Apache Spark', we will see how to install Apache Spark in Mac. There are several steps for installing Apache Spark on macOS, as follows:
Step 1: You need to install the Apache Spark package from the Official Apache Spark website. If Hadoop is installed on your computer, you should choose the Apache Spark version according to your Hadoop version else; You can choose the Apache Spark version without Hadoop.
Step 2: Now, as the Apache Spark package is downloaded, Just open the terminal on your Mac and extract the downloaded Apache Spark package. The ’tar’ command can be used to extract the package. You can use the below command to extract the Apache Spark package:
tar -xvf spark-3.4.0-bin-hadoop3.2.tgz
In the above command, 3.4.0 is the version of Spark, and 3.2 is the version of Hadoop that can be varied, so you should write the version according to which you’ve downloaded.
Step 3: You can move the extracted Apache Spark package to the directory of your choice. Here is an example of how can you move this extracted package to the ‘/usr/local’ directory for system-wide accessibility:
Step 4: To run Apache Spark, you need to set up the environment variables. Open the terminal and run the following command to open the ‘.bash_profile’ file:
nano ~/.bash_profile
Now you have to add the following content at the end of the file ‘.bash_profile’ file:
Now you can exit nano and save the changes. Run the following command to reload the updated ‘.bas_profile’:
source ~/.bash_profile
Step 5: Now the installation has been completed, and you can verify the installation now. Open the command prompt or terminal window and execute the following command:
spark-shell
If the installation is successfully installed, the above command will display an interactive Scala shell to work with Spark with the current version of Apache Spark.
Installing Apache Spark in Ubuntu
In this section of the article ‘Installing and Working with Apache Spark', we will see how to install Apache Spark in Ubuntu. There are several steps for installing Apache Spark on Ubuntu, as follows:
Step 1: You need to install the Apache Spark package from the Official Apache Spark website. If Hadoop is installed on your computer, you should choose the Apache Spark version according to your Hadoop version else; You can choose the Apache Spark version without Hadoop.
Step 2: Now, as the Apache Spark package is downloaded, Just open the terminal on your Ubuntu and extract the downloaded Apache Spark package. The ’tar’ command can be used to extract the package. You can use the below command to extract the Apache Spark package:
tar -xvf spark-3.2.0-bin-hadoop3.2.tgz
Step 3: You can move the extracted Apache Spark package to the directory of your choice. Here is an example of how can you move this extracted package to the ‘/usr/local’ directory for system-wide accessibility:
Step 4: To run Apache Spark, you need to set up the environment variables. Open the terminal and run the following command to open the ‘.bash_profile’ file:
nano ~/.bash_profile
Now you have to add the following content at the end of the file ‘.bash_profile’ file:
Now you can exit nano and save the changes. Run the following command to reload the updated ‘.bas_profile’:
source ~/.bash_profile
Step 5: Now the installation has been completed, and you can verify the installation now. Open the command prompt or terminal window and execute the following command:
spark-shell
If the installation is successfully installed, the above command will display an interactive Scala shell to work with Spark with the current version of Apache Spark.
Working with Apache Spark
As we have successfully installed Apache Spark on our computer, we can now move to work with Apache Spark. In this section, we will discuss some terminologies related to Apache Spark and the basic Spark commands that everyone should know.
Terminologies of Apache Spark
Apache Spark Shell: There is a Spark Application that is implemented by Scala that is used to create our own Standalone Spark Application by the use of a command line environment.
Task: In Spark Application, there are different stages have their own tasks, which is a unit of work to send to the executor.
Stage: The stage is a step and physical unit of an execution plan. In this stage, there is a set of parallel tasks that is one task per partition.
Spark Application: Spark Application is a self-contained computation that runs user-supplied code to compute a result.
Resilient Distributed Datasets (RDD): This is a data structure of Spark commands which is immutable and read-only.
Basic Apache Spark Commands
There are several components of Spark are discussed below with their examples:
1. Starting the Spark Shell The command ‘spark-shell’ is used to start the Spark Shell that offers you the auto-correct command line environment.
spark-shell
2. Reading a file from the local system The ‘sc’ stands for Spark Context, which is used to read the file ‘sample.txt’.
val fileData = sc.textFile(“sample.txt”)
3. Creating RDD through parallelizing The ‘parallelize’ is the method that is used to create the parallelized data called ‘data’ with the help of the ‘numArray’ array.
val numArray = Array(10, 20, 60, 1)
val data = sc.parallelize(numArray)
4. Counting the items in the parallelized data The ‘count’ is the method that is used to count the items in the parallelized data called ‘data.
data.count()
5. Reading the items of the parallelized data The ‘take’ is the method that is used to read the first 3 items of the parallelized data ‘data’. For example, {10, 20, 60}.
Apache Spark designs an open-source distributed computing system for big data processing and analytics. It offers a unified framework for processing large-scale data across multiple data sources and supports a broad spectrum of programming languages.
How to verify Java and Scala Installations?
Java verification on your machine can be done by executing a command in your command prompt, which is java -version. Scala verification on your machine can be done by executing a command in your command prompt, which is the scala -version.
Why Java and Scala Installations are necessary for Apache Spark?
Apache Spark is written in Scala which runs on Java Virtual Machine (JVM) and JVM can only run if the Java Development Kit (JDK) is installed. So both Java and Scala are necessary to install for Apache Spark.
How to install Apache Spark on Ubuntu?
You need to visit Spark's official website. Choose the version and the package type and download the desired zip file. Now unzip the downloaded zip file, set up the environment variables, and verify the installation.
Conclusion
To install Apache Spark on your computer, you need to install Java and Scala before installing Apache Spark on your computer directly. So in the article ‘Installing and Working with Apache Spark’, we discussed how to install and verify Java and Scala, installing Apache Spark in Windows, Mac, and Ubuntu.
Here are some of the articles related to Apache Spark:


 9+ registered

