Table of contents
1.
Introduction
2.
iOS Navigation Bar
3.
Adding Navigation Bar in the Application
3.1.
Using Storyboard
3.2.
Using Code
3.2.1.
Output
4.
Changing Navigation Bar Appearance
4.1.
Using Storyboard
4.2.
Using Code
5.
Frequently Asked Questions
5.1.
What is a Navigation Bar?
5.2.
What are navigation items?
5.3.
How to set large titles in the navigation bar?
5.4.
How to change the background color of the navigation bar?
5.5.
How to hide the navigation bar for a fullscreen experience for the user?
6.
Conclusion
Last Updated: Mar 27, 2024
Easy

iOS Navigation Bar

Career growth poll
Do you think IIT Guwahati certified course can help you in your career?

Introduction

Let us ask you a question. While using any application, how do you return to the previous screen on your iPhone? You do it using the button on the screen's top left corner. Right? Yes, that's right. The button that you click to go back appears on the navigation bar. It is evident by the name that the iOS navigation bar will contain items that will help us with the navigation.

ios navigation bar

In this article, we will discuss the Navigation bar in iOS and some pointers to keep in mind while using the navigation bar in your iOS app. Then we will see how we can add an iOS navigation bar to our app and how we change the appearance of the navigation bar we added. Are you excited to learn something new today? You will learn a lot in this article, so tighten your seat belts and let's begin with our journey.

iOS Navigation Bar

Navigation Bar is the bar that appears on the top of your screen and contains typical buttons, which are then used to navigate in the hierarchy of screens.

A usual iOS navigation bar looks something like this:

ios navigation bar example

There is a back button that takes you back to the previous screen on the left side, a title in the middle of the navigation bar, and an optional button on the right side which can be used as and when required. But there are other ways that navigation bars can be used. Some other examples of iOS navigation bars are also given below.

ios navigation bar example

In the above image, large titles are used along with a back button and a button on the right.

ios navigation bar example

In this image, there is no button on the right side. There is a title and a back button.

ios navigation bar example

In this image, only the title is on the navigation bar, with no button on the left or right side. Now that we have seen some examples of navigation bars, let's learn more about them.

UINavigationBar is a child of UIView class. UIView class defines the behaviors that are common to all views. A view object renders content within its bounds rectangle and handles any interactions with that content. The UIView class is a concrete class that can be instantiated and used to display a fixed background color. It can also be subclassed to draw more sophisticated content.

Now, Navigation Bar is declared as given below.

var navigationBar: UINavigationBar

iOS Navigation Bar is used in association with Navigation Controllers. Once you embed a navigation controller in your application, you can change the content of the navigation bar for each ViewController that is being pushed to the navigation stack according to the individual needs of each ViewController.

Navigation Controller is just a container that contains view controllers. An application has a whole stack of view controllers; how do you switch from one view controller to another? That's where the navigation bar comes into play. You switch between different view controllers using the button on the navigation bar.

Here we have given some of the best practices regarding the iOS Navigation Bar that you should follow while developing your application.

🧐 The title area is to be used to describe the current screen.

🤓 The title should be concise.

😎 The navigation bar can be hidden in some use cases to provide a more immersive experience to the user. For example, Photos in iOS removes the navigation bar when the user views any photo in full screen.

🤔 Using a standard back button is recommended, but if a custom back button is implemented, it should be clear that it is a back button and should be consistent throughout the app.

😁 If more than one button has text, then make sure each button has some space between them so that their texts don't run into each other.

🧐 Using large titles is preferred in Apple's official documentation so that users can stay oriented while they scroll or navigate. More about large titles are discussed later in this article.

Now that we have discussed what a navigation bar is and what are the things that you should keep in mind while using it, let's now try to add a navigation bar to our application.

Adding Navigation Bar in the Application

You can add iOS navigation bar to your application in two ways, first, by using a storyboard, and second, by writing code on the contentView page. We will discuss adding a tab bar in our application using both ways. Before proceeding further, ensure you have created a new application in XCode and follow the steps below.

Using Storyboard

Before adding the navigation bar, you can change the background color of the screen so that you can see the navigation bar that you add. You can follow the steps below to add the iOS navigation bar on your view controller.

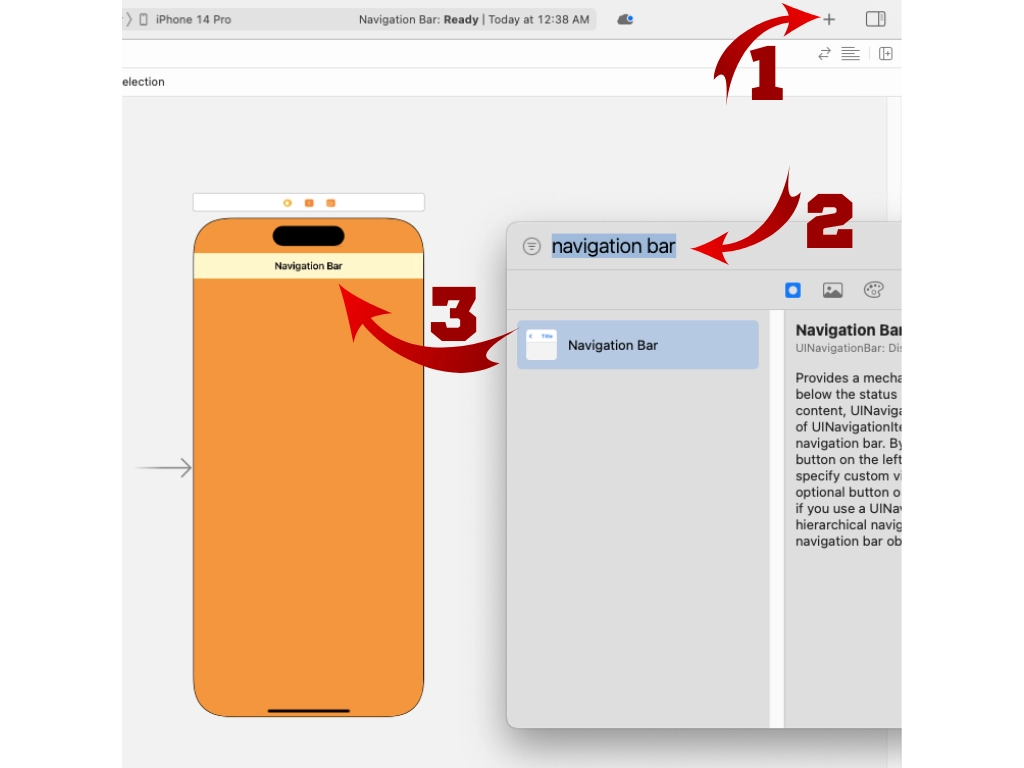
  1. Click on the + icon on your screen's top right corner. This will open the object library.
  2. Search for the navigation bar on the search bar. Navigation Bar object will appear.
  3. Drag and drop the Navigation Bar object on the bottom of your screen, as shown in the picture below.

snapshot of XCode

After these steps, you have successfully added a navigation bar to your application. Now, let's try to do the same thing by writing some code.

Using Code

Let's build an example application to understand how to add an iOS navigation bar to our application. We will create an instance of the UINavigationBar class and then add it as a sub-view in our application. Then we will add some navigation items and change the navigation bar's title. The code to do this is given below, along with the output snapshot that it produces.

import UIKit
 
class ViewController: UIViewController {
 
   override func viewWillLayoutSubviews() {
       let navigationBar: UINavigationBar = UINavigationBar(
           frame: CGRect(
               x: 0,
               y: 35,
               width: self.view.frame.width,
               height: 50
           )
       )
       navigationBar.barTintColor = UIColor.orange
       self.view.addSubview(navigationBar);
       
       let navigationItem = UINavigationItem(title: "Navigation bar")
       let rightItem = UIBarButtonItem(
           barButtonSystemItem: UIBarButtonItem.SystemItem.add,
           target: self,
           action: #selector(codingNinja)
       )
       let leftItem = UIBarButtonItem(
           barButtonSystemItem: UIBarButtonItem.SystemItem.edit,
           target: self,
           action: #selector(codingNinja)
       )
       rightItem.tintColor = UIColor.white
       leftItem.tintColor = UIColor.white
       
       
       // Adding navigation items in the navigation bar
       navigationItem.leftBarButtonItem = leftItem
       navigationItem.rightBarButtonItem = rightItem
       navigationBar.setItems([navigationItem], animated: false)
   }
   override func viewDidLoad() {
       super.viewDidLoad()
   }
 
   @objc func codingNinja() { }
}

Output

The output snapshot of the above code is shown below.

snapshot of output

Changing Navigation Bar Appearance

You can change the navigation bar's appearance using the methods and properties of UINavigationBar class. Still, you must not change its frame, bounds, or alpha value or try to modify its view hierarchy directly. If you want to change whether the navigation bar should be visible or not, it should always be done by changing its isNavigationBarHidden property.

Many more properties and methods are available to change the navigation bar's appearance. Some of the important ones are discussed in this article. Changing the properties can be done through storyboard or code. We have discussed it using both methods.

Using Storyboard

To change the navigation bar's appearance, we can click on the navigation bar that we just added, and a tab will appear on the right side of our window consisting of several options to customize our iOS navigation bar. A snapshot of the customization options shown in XCode is given below. Change the style property from the available options and see the changes yourself.

snapshot of XCode

Using Code

There are several options available to change the appearance of a navigation bar. Along with that, you can also decide when the navigation bar appears and when it should not. You can also change whether the title appears in a large format. More details and properties on changing the navigation bar's appearance are given in the table below.

properties table

Frequently Asked Questions

What is a Navigation Bar?

Navigation Bar is the bar that appears on the top of your screen and contains typical buttons, which are then used to navigate in the hierarchy of screens.

What are navigation items?

Navigation Items are displayed in the navigation bar, which interacts with the user to enable navigation in the hierarchy of views in the application.

How to set large titles in the navigation bar?

prefersLargeTitles is a property that takes boolean values and sets the title in a large format. This can be used to set large titles in the navigation bar.

How to change the background color of the navigation bar?

You can change the backgroundColor property to change the background color of the navigation bar.

How to hide the navigation bar for a fullscreen experience for the user?

hideBarsOnTap and hideBarsOnSwipe are some of the properties which can be used to hide the navigation bar on the trigger of some particular events by the user.

Conclusion

This article taught us about navigation bars in iOS and how we add them to our application. We also looked into changing its appearance using storyboard and swift. If this was your first article about learning iOS development and you needed help understanding some things, don't worry. You can refer to this article to help you create your first iOS app.

We hope this blog has helped you enhance your iOS app knowledge. Here is a list of articles that can help you learn more about ios development.

Refers to our guided paths on Coding Ninjas Studio to learn more about DSA, Competitive Programming, JavaScript, System Design, etc. Enroll in our courses and refer to the mock test and problems available. Take a look at the interview experiences and interview bundle for placement preparations.

Happy Learning Ninja! 🥷

Live masterclass