Table of contents
1.
Introduction
2.
iOS Tab Bar
3.
Adding iOS Tab Bar in the Application
3.1.
Using Storyboard
3.2.
Using Swift
4.
Changing the Tab Bar Appearance
4.1.
Using Storyboard
4.2.
Using SwiftUI
4.3.
Code
4.4.
Output
5.
Frequently Asked Questions
5.1.
What is a Tab Bar in iOS?
5.2.
What is a Tab Bar Item in iOS?
5.3.
How to add Tab Bar on a view?
5.4.
What are the functions of tabs?
5.5.
How do we customize our Tab Bar?
6.
Conclusion
Last Updated: Mar 27, 2024
Easy

iOS Tab Bar

Career growth poll
Do you think IIT Guwahati certified course can help you in your career?

Introduction

Most of you reading this article might already know what an iOS tab bar is. Even if you don't know about it, you unknowingly use it daily, be it on android or iOS. Can you guess what we are talking about 🤔?

iOS Tab Bar graphic image

You use Instagram or Linkedin. How do you switch between searching for a person and viewing your profile? You do it using a bar at the screen's bottom. You click on the profile section to view your profile, and you click on the home button to view your feed and like that. This is what the tab bar is. The icons which you are clicking on appear in a row-wise fashion in the tab bar. iOS Tab Bar is a container for different tabs that allow navigation between related content groups. It might not enough for you 😂. Don't worry; we will learn everything related to the iOS tab bar in this article. So, let's begin.

iOS Tab Bar

Tab Bar is the area that contains the list of buttons used to switch between different sub-tasks of the application. If you are trying to build an application with a single view, then the iOS tab bar is useless. But how many applications have you seen which has only one view? Either none or very few. So it is evident that iOS tab bars are very useful in iOS development as switching between tabs is one of the essential things in an application.

The Tab bar always appears at the bottom of the screen. The image below shows the tab bar's location on a screen. 

image showing example of tab bar

Tab Bar enables the users to switch between different views while preserving the current state of each section. For example: On Instagram, if you search for someone on the search tab, then switch to the profile section, and then again navigate back to the search tab, then your search results will still be there.

The iOS Tab bar is an instance of UITabBar, which inherits the UIView class. The UIView class defines the behaviors that are common to all views. A view object renders content within its bounds rectangle and handles any interactions with that content. The UIView class is a concrete class that can be instantiated and used to display a fixed background color. It can also be subclassed to draw more sophisticated content.

Now, the tab bar is declared as given below.

@interface UITabBar : UIView

Here, we have given some suggestions regarding using iOS tab bars, which should be kept in mind while developing an iOS app.

Here are a few pointers that you should keep in mind regarding iOS Tab Bar.

🧐Tab bars are generally used to navigate from one page to another.

🤓You should make sure that the tab bar is visible on every page that you are navigating to using the tab bar.

😎In general, 3 to 5 tabs are ideal for a tab bar. More tabs increase complexity which turns into a downside in user experience.

🤔Use a badge to communicate with the user wherever necessary.

😁Titles of the tab should be concrete nouns or verbs like movie, music, notifications, search, etc., and it should describe the type of content that will be shown after selecting it.

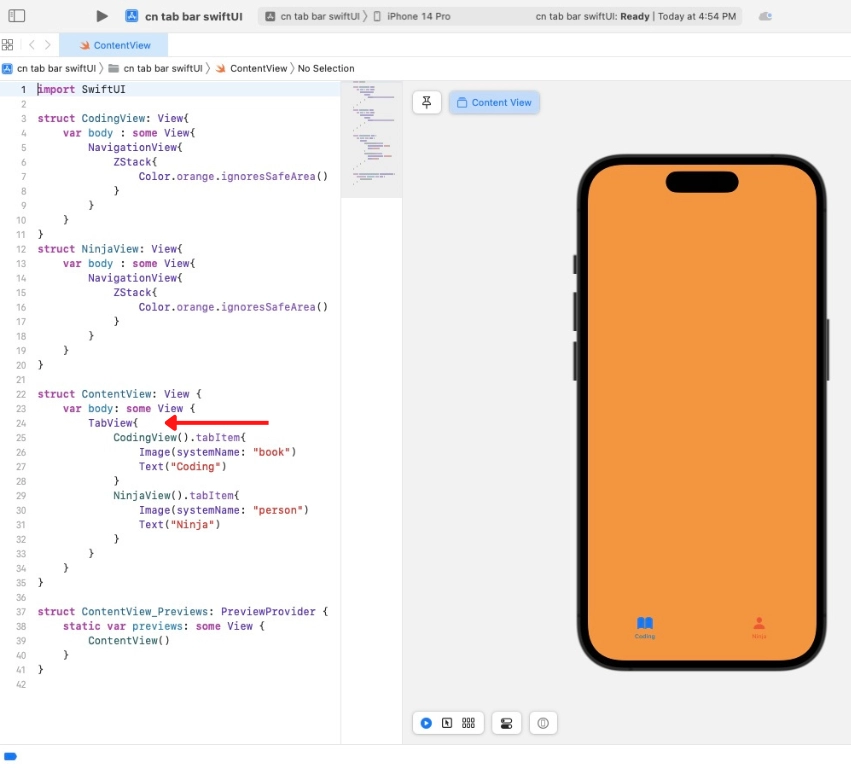
Now that we have seen some of the best practices for tab bars, let's learn about adding an iOS tab bar to our application.

Adding iOS Tab Bar in the Application

iOS Tab Bar can be added to an application in two ways, first by using a storyboard and second by writing code in the contentView page. We will learn how to add a tab bar in our application using both ways. Before proceeding further, ensure you have created a new application in XCode and follow the steps below. If you need to become more familiar with creating an application in XCode, you can refer to this article about Creating the first iOS App.

Using Storyboard

This is the easiest way to add a tab bar to your application. There are just three easy steps to do it. It's recommended that you try this yourself as well. The steps are given below, so follow along.

  1. Click on the + icon on your screen's top right corner. This will open the object library.
  2. Search for the tab bar on the search bar. Tab Bar object will appear.
  3. Drag and drop the Tab Bar object on the bottom of your screen, as shown in the picture below.
screenshot of XCode following the above steps

Isn't this easy to add it using a storyboard? Now let's try adding it by writing some code. But it's even easier than the storyboard one, trust me 😉.

Using Swift

In swiftUI, adding a tab bar to your application is as easy as writing TabView. Yes, that's it. You have to place it in the correct position 😂. TabView is a component provided by swiftUI which adds a tab bar to your view. For adding items on that tab bar, you have to use the tabItem() modifier, as shown in the image below. The same code is given at the end of this article, where we just have added some properties to the tab bar.

screenshot of XCode while writing the code

Hey! Wait. Doesn't this look boring how the tab bar appears on our screen 🤔? Let's try to change the way it looks.

Changing the Tab Bar Appearance

Similar to adding a tab bar to our application, we can change its appearance also in two ways. You can follow whichever way you like. Let's see how we apply makeup to our tab bar 😉.

Using Storyboard

When you click on the tab bar added to your view, many options will be displayed on the right side of your screen, all of which change the appearance of the selected tab bar. For example, we changed the background color of the tab bar to orange so that you can see an orange tint in the background of our tab bar. You can play with all the available options to get the desired look.

screenshot of XCode showing options to change appearance

After doing this with the storyboard, let's try to do this with swiftUI.

Using SwiftUI

To change its appearance in swiftUI, we can use the init() initialization. The swift init() initialization process involves setting an initial value for each stored property on that instance. Ensure that the init() function is in the parent view of the tab bar. We can use UITabBar.appearance().backgroundColor to modify the color of the tab bar and similarly for other properties. An example code is shown below.

screenshot of XCode while writing the code

The code written in the above example is given below, along with the output that it produces.

Code

import SwiftUI
struct CodingView: View{
   var body : some View{
       NavigationView{
           ZStack{
               Color.orange.ignoresSafeArea()
           }
       }
   }
}
struct NinjaView: View{
   var body : some View{
       NavigationView{
           ZStack{
               Color.orange.ignoresSafeArea()
           }
       }
   }
}
struct ContentView: View {
   init(){
       UITabBar.appearance().backgroundColor = UIColor.white
   }
   var body: some View {
       TabView{
           CodingView().tabItem{
               Image(systemName: "book")
               Text("Coding")
           }
           NinjaView().tabItem{
               Image(systemName: "person")
               Text("Ninja")
           }
       }
   }
}
struct ContentView_Previews: PreviewProvider {
   static var previews: some View {
       ContentView()
   }
}

Output

output of above code

We only changed the background color in our example, but you can do much more by changing different properties. Here is a list of properties in the table below, which you can explore to change the appearance of your tab bar.

Table showing properties and what they do

Here we have only discussed changing the appearance of tab bars. If you want to learn about changing the appearance of tab bar items, then you can refer to this blog on iOS tab bar items.

Frequently Asked Questions

What is a Tab Bar in iOS?

Tab Bar is a container for different tabs that allow navigation between groups of content that are related.

What is a Tab Bar Item in iOS?

Tab Bar Items are the representation for tabs that show different information. A different view is opened by clicking a tab bar item showing related information.

How to add Tab Bar on a view?

Tab Bar can be added by dragging the tab bar object from the object library to the view or using the TabView component in swiftUI.

What are the functions of tabs?

Tabs allow you to navigate between different views, all of which usually show information related to something in your application.

How do we customize our Tab Bar?

A panel on the right side of the screen will show when the tab bar is selected, which contains many options to change the tab bar's appearance.

Conclusion

This article taught us about tab bars in iOS and how we add them to our application. We also looked into changing its appearance using storyboard and swiftUI. If this was your first article about learning iOS development and you needed help understanding some things, don't worry. You can refer to this article to help you create your first iOS app.

We hope this blog has helped you enhance your iOS app knowledge. Here is a list of articles that can help you learn more about ios development.

Refers to our guided paths on Coding Ninjas Studio to learn more about DSA, Competitive Programming, JavaScript, System Design, etc. Enroll in our courses and refer to the mock test and problems available. Take a look at the interview experiences and interview bundle for placement preparations.

Happy Learning Ninja! 🥷

Live masterclass