Do you think IIT Guwahati certified course can help you in your career?
Introduction
If you open any application on your iOS device and touch anywhere on the screen, it's very likely that you just clicked on a UIView. Isn't it exciting😱? Yes, that is how essential UIView is. Every time you subscribe to a channel on youtube or click a like button on Instagram that is a UIView that you are clicking. All the buttons that you use in any iOS application are ultimately iOS UIView.
Are you excited to learn about iOS UIView? We hope yes 😀, and if not, just read along, and we will get you excited about building iOS applications and show you how easy it is 😎. iOS UIViews are the most basic things in iOS development. Everything is built on top of this only, so it's imperative to learn about it. We will start by giving you a brief introduction to iOS UIViews and some basic knowledge about it then we will teach you how to add UIView to your application. After that, we will discuss the importance of iOS UIViews and their properties. At the end of this article, we will build an application where an iOS UIView will disappear with the click of a button with an animation.
iOS UIView
UIViews are the core building elements of all iOS apps, according to Apple's developer documentation.
When we build our application's UI, everything will either be a UIView or a subclass of a UIView.
UIView is an object using which we can create and manage a rectangular area on the screen and the contents inside it. We can have any number of views inside a view. It creates a hierarchical structure of the UIViews.
UIView is a child class of UIResponder. UIResponder is an abstract interface for responding to and handling events. Instances of UIResponder represent objects that can handle and respond to arbitrary events. There are several kinds of events, including touch events, motion events, remote-control events, and press events. To handle a specific type of event, a responder must override the corresponding methods.
Now, UIView is declared as given below.
@MainActor class UIView : UIResponder
All view classes, such as UIButton, UITextView, and UILabel, descend from UIView. This justifies why we call UIViews the basic building blocks of any iOS application.
The understanding of UIView will help us to understand and utilize its descendant classes efficiently.
One of the crucial requirements for any application is to interact with the user. Now, View is the main object which interacts with the user. Due to this reason, View has many responsibilities on it. Some of the activities performed by View will be discussed later in this article. First, let's learn to add a UIView to our application.
Adding UIView
UIViews can be added to your application either from the object library or by writing the code. We will be discussing both of the methods in this article.
Note: Before proceeding, ensure you have opened XCode and created an application.
Using storyboard
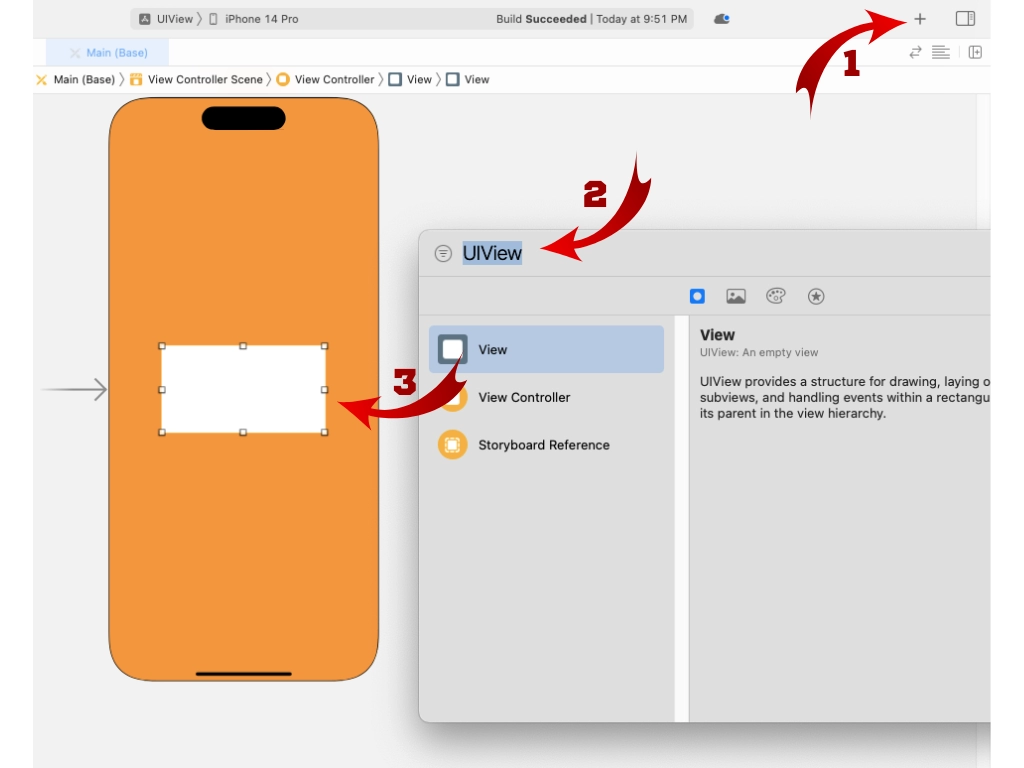
You need to follow three steps to add an iOS UIView to your application using a storyboard. These steps are given below.
Click on the + icon on the top right corner of your screen. The object library will appear.
In the search bar, search for UIView.
Drag and drop the View object onto the screen, as shown below.
Here we have changed the background color of the default view so that we can see the View that we add from the object library.
Using Code
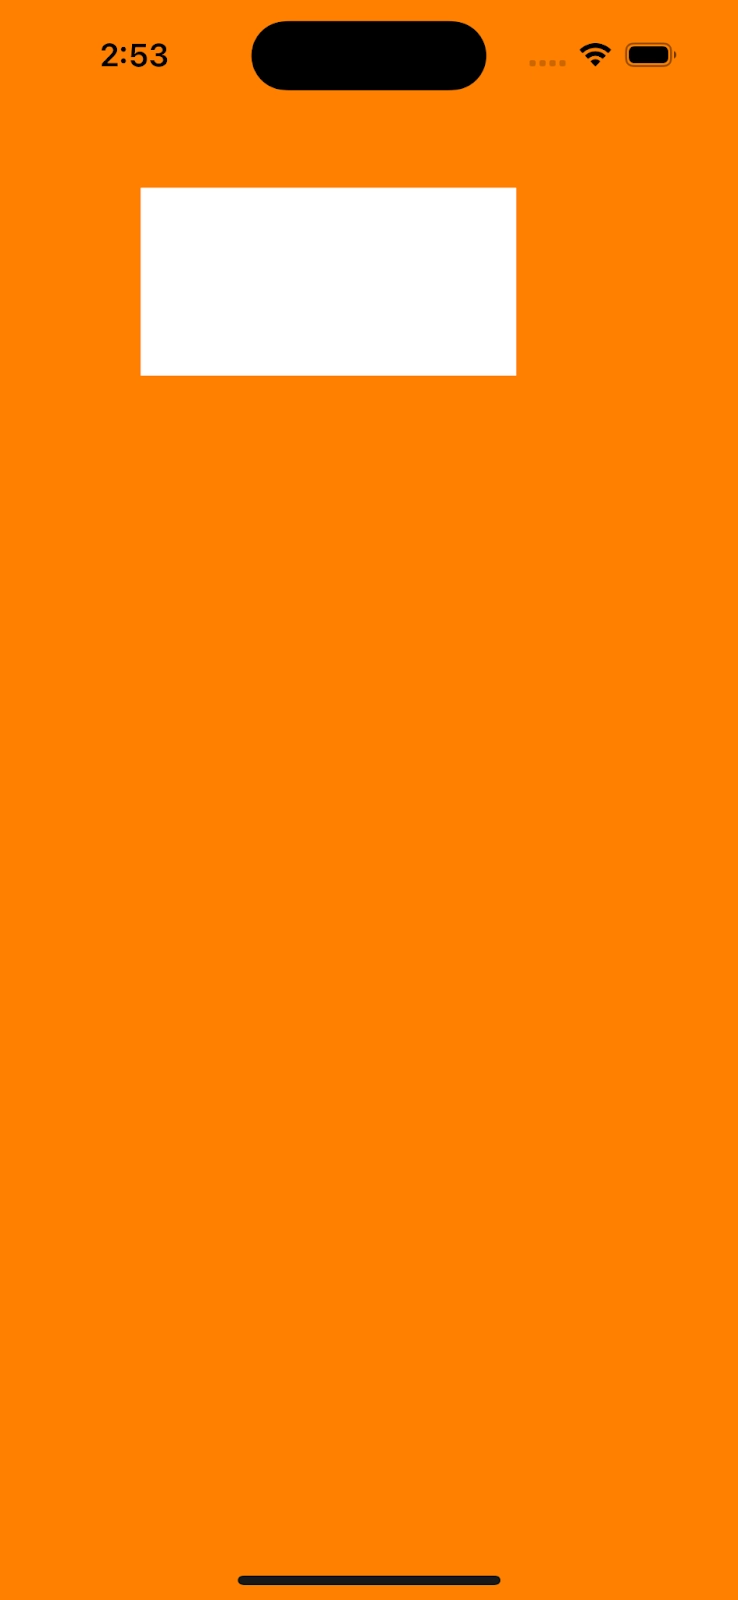
Every view controller has a UIView that we can access through the view property. Whenever we launch our application, we don't see the view controller, but we see the View that the view controller has by default. This View has properties we can modify, which will adjust how the View appears to us when we run our app. So, first, let's change this View's background color to orange so we can uniquely identify it. You can use the below-given code snippet to change its background color.
view.backgroundColor = UIColor.orange
Now, let's add our UIView to our application. We can create a new view using the UIView() initializer as given below.
let myView = UIView()
Views are rectangular regions on the screen. They have an 'x' position, a 'y' position, a 'width,' and a 'height.' So, we have created a view using the UIView initializer, but it doesn't have a width or height right now. So, to see this on the screen, we will have first to set its height and width. So, let's do it.
Every View has a property called a frame, which is a CGRect that can hold an x value, a y value, a width, and a height. Because every UIView needs a frame to be seen, there is a convenience initializer that we can use on the UIView, where we can pass in the frame. The code snippet for doing this is given below.
Now, if we run our application only writing this code snippet, we still will not be able to see the View that we just added. So, to see the View, we will have to add it as a subview to another visible view. And we know that in the beginning, only one view is visible, which is by default present in the view controller. So, let's add our View as its subview. The code to do this is given below.
view.addSubView(myView)
After adding this, myView will start appearing on our screen but remember to change its background color to be able to see it. The final code to add a view is given below, along with the output that it produces.
Note: viewDidLoad is called when the screen has loaded its interface, so this is the most common place where you will be writing your code for the screen.
Now that we have learned to add UIView to our application, let's know about the different responsibilities of UIView in any application.
Responsibilities
There are many responsibilities that an iOS UIView holds, but the most important ones are discussed below. These are something that carries the weight of running the whole application.
Drawing and animation
One way we can use UIView is to draw something on the screen by changing the View's geometry as we did in the previous example, where we added a rectangle on the screen. In the same way, we can add different shapes according to our needs in our application. In addition, we can also add other UISubview such as UILabel or UIButton.
Another way to use UIView can be animations. If you are transforming a view somehow, then that abrupt change may look different on the screen. So to avoid that, we use animations where a view slowly transitions into another state which looks appealing. There are many properties that can be animated, like frame, background color, etc.
Layout and subview management
A UIView manages its layout and its subview. What we mean by this is that every View is in charge of managing the hierarchical structure of all of its subviews.
For example, if a view consists of two other views inside it, then that View is responsible for managing the hierarchical structure and the relationship between its subviews.
Event Handling
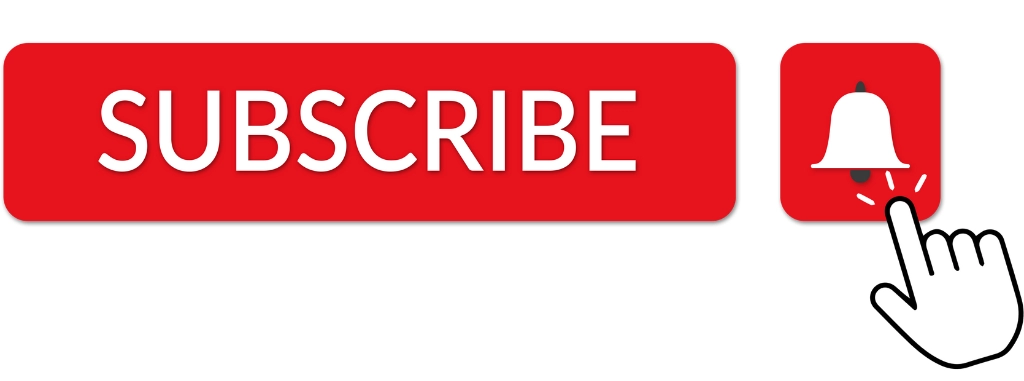
At the beginning of this article, we discussed that UIResponder is the parent class of the UIView. So, all the properties of the parent are inherited by the child. Why we are focusing on this particular parent-child relationship is because UIResponder mainly deals with four events: touch, motion, remote control, and press events, and since UIView is the child class of UIResponder, we can use these events in UIViews also. We can build a custom UIView where it responds to our touch. A subscribe button is a perfect example of event handling.
Example Application
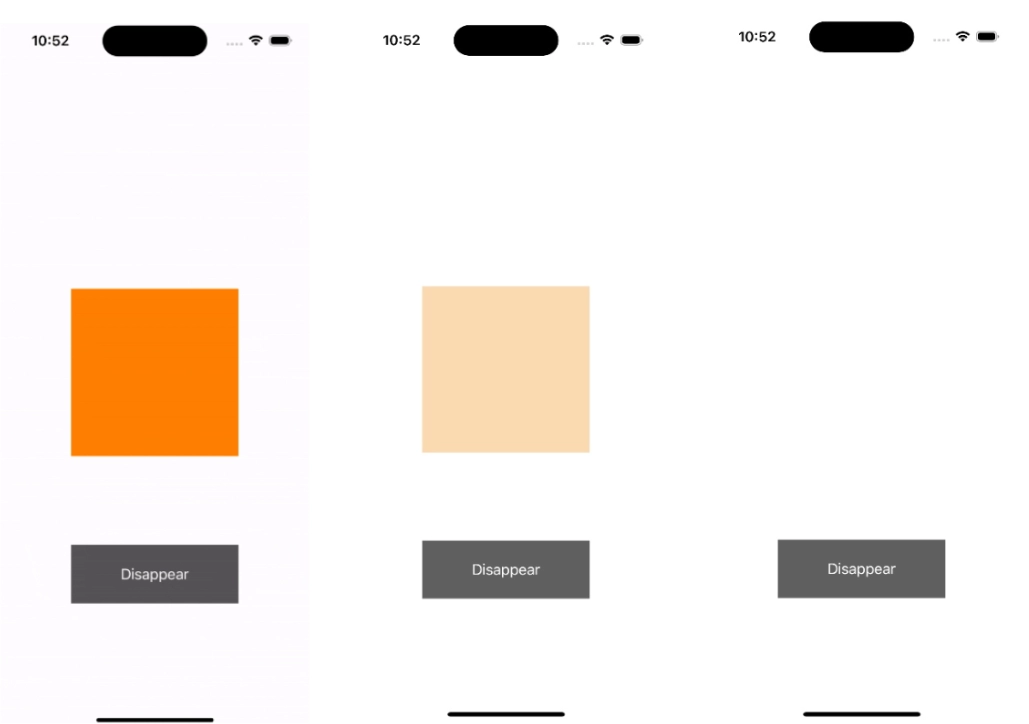
Now that we have learned about all the responsibilities of a UIView, let's implement all these in a single application. We are going to build an application with a button and a UIView, and when we click the button, that View will disappear with an animation. As you can see, this application has covered all the responsibilities of a UIView.
Drawing and animation: The View disappears with an animation
Layout and subview management: There is a button and a view inside the superView, which manages the hierarchical structure.
Event handling: When we press the button, then some action is performed.
The code for this application is given below. Copy the below-given code in the viewController file of your app to see it working on your XCode.
The orange-colored view disappears with an animation of 1 second, as shown in the snapshots below.
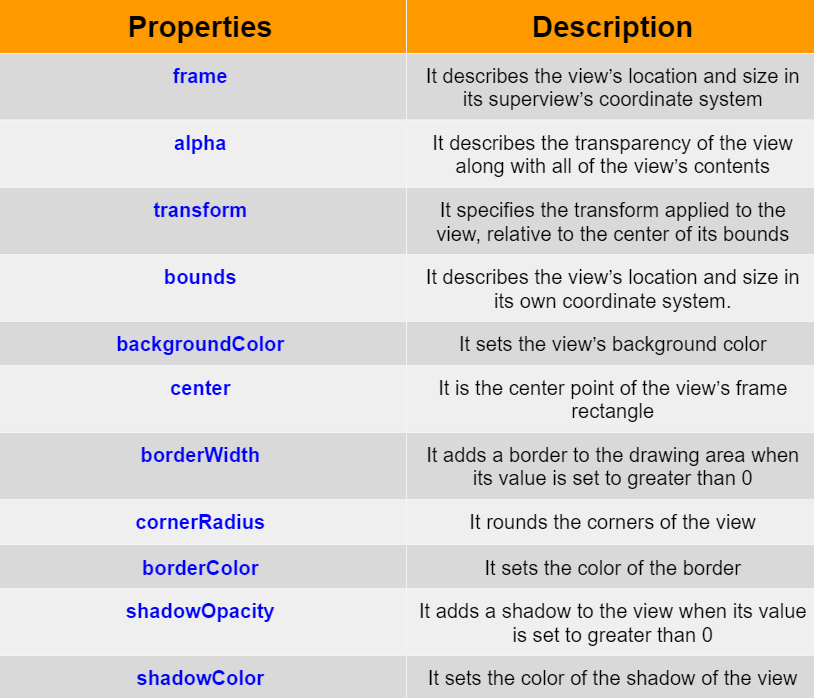
In this application, we only explored a few properties of UIViews, like backgroundColor, but we have given a list of properties of UIView, which you can refer to for help.
Properties
These are some of the primary and most widely used properties. Apart from these, there are many more properties for which you can refer to the documentation of UIView.
Frequently Asked Questions
What is a UIView?
UIView is an object using which we can create and manage a rectangular area on the screen.
What are the primary responsibilities of a UIView object?
There are three primary responsibilities of a UIView object. Drawing and animation, layout and subview management, and event handling.
Differentiate between UIView and UIViewController.
UIViewController is a class that controls the instance of a UIView class and all the logic and code behind that View, while the UIView class controls everything visible to the viewer.
What is the frame property in UIView?
The frame property determines the View's location and size in its superView's coordinate system.
How are UIButton and UIView related?
UIButton is a child class of UIView class.
Conclusion
This article taught us about iOS UIView and how we add them to our application. We also looked into changing its appearance and primary responsibilities and built an application covering all its primary responsibilities. If this was your first article about learning iOS development and you needed help understanding some things, don't worry. You can refer to this article to help you create your first iOS app.
We hope this blog has helped you enhance your iOS app knowledge. Here is a list of articles that can help you learn more about ios development.


 6+ registered

