Do you think IIT Guwahati certified course can help you in your career?
Introduction
A button is a control component with a label that, when pressed, causes an event. The Button class is used to construct a labeled button with platform independence. When the button is pressed, the application performs some action.
When we push and release a button, AWT sends an instance of ActionEvent to it by running processEvent on the button. The button's processEvent method accepts all events and then passes an action event by calling its own method processActionEvent. This technique forwards the action event to action listeners that are interested in the button's action events.
Let us understand the AWT button in detail, with the help of examples.
Button class
The Button class is used to construct a push-button control that can trigger an ActionEvent when clicked. The ActionListener interface must be implemented to handle a button click event. A button is a component that extends the JComponent class that may be applied to a container such as Frame or a component such as Panel.
AWT Button Class Declaration
public class Button extends Component implements Accessible
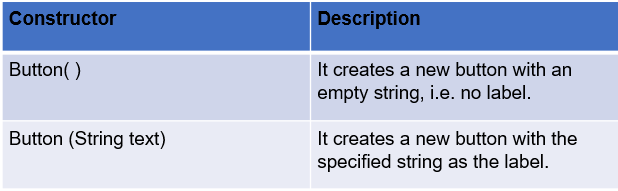
Button Class Constructors
The table below lists the several types of Button class constructors.
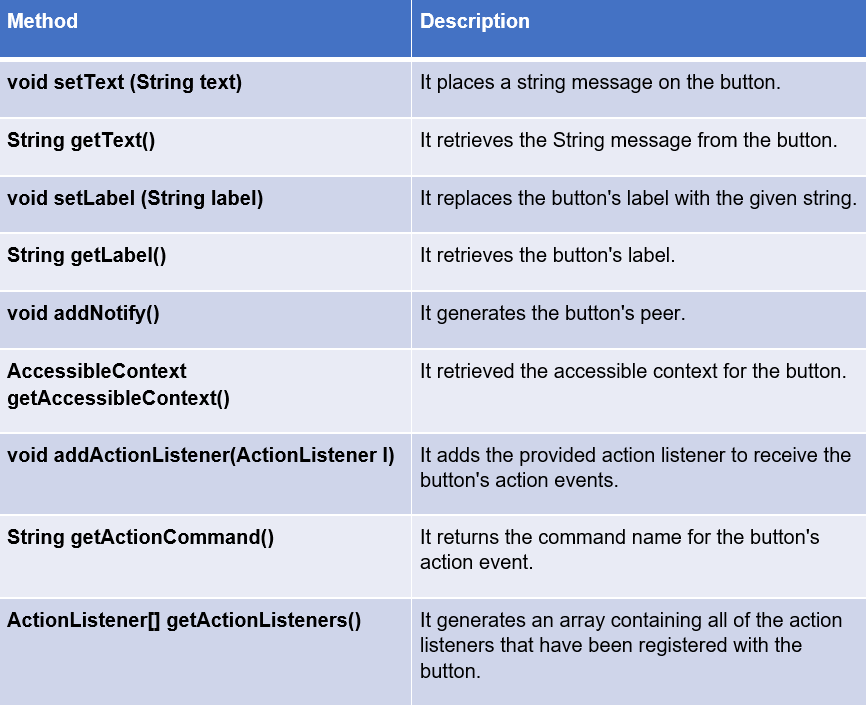
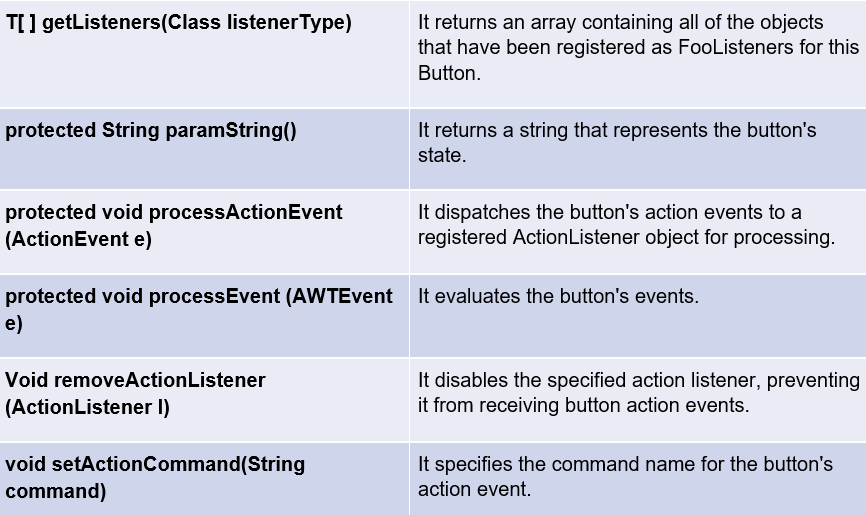
Button Class Methods
Examples
Let’s go through an example to have a better understanding of AWT Button in Java.
import javax.swing.*;
import java.awt.*;
import java.awt.event.*;
public class NewClass {
    Frame jf;
    Button b1, b2, b3;

    NewClass() {
        jf = new JFrame("Frame buttons");
        b1 = new Button();
        b2 = new Button("Click me");
        b3 = new Button();


        b3.setLabel("Third Button");


        jf.add(b1);
        jf.add(b2);
        jf.add(b3);


        jf.setLayout(new FlowLayout());
        jf.setSize(400, 200);
        jf.setVisible(true);
    }
    public static void main(String... ar) {
        new NewClass();
    }
}
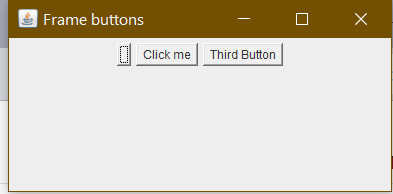
Output
When you execute the code, you'll see the following window:
import javax.swing.*;
import java.awt.*;
import java.awt.event.*;
public class NewClass implements ActionListener {
    Frame jf;
    Button b1, b2;
    Label label;

    NewClass() {
        jf = new Frame("Example Buttons");
        b1 = new Button("Yes");
        b2 = new Button("No");
        label = new Label();

        jf.add(b1);
        jf.add(b2);
        jf.add(label);


        b1.addActionListener(this);
        b2.addActionListener(this);

        jf.setLayout(new FlowLayout(FlowLayout.CENTER, 100, 20));
        jf.setSize(400, 250);
        jf.setVisible(true);
    }

    public void actionPerformed(ActionEvent ae) {
        if (ae.getActionCommand().equals("Yes")) {
            label.setText("Welcome to Coding Ninjas!! You have pressed 'Yes' button");
            jf.add(label);
            jf.setVisible(true);
        }


        if (ae.getActionCommand().equals("No")) {
            label.setText("You have pressed the 'No' button");
            jf.add(label);
            jf.setVisible(true);
        }
    }


    public static void main(String... ar) {
        new NewClass();
    }
}
Output
When you execute the code, you'll see the following window:
When you click on any of the buttons, you will be presented with an appropriate message; for example, when we click on the Yes button, we are presented with the following message:


 9+ registered

