Setting up the Environment
We will first set up an environment to perform unit testing using JUnit. Since JUnit is a Java programming language testing framework, we will be using Eclipse IDE.
So let’s start by downloading Eclipse from Eclipse Downloads | The Eclipse Foundation if you don’t have Eclipse already installed on your computer.

Click on download and then install it on your computer.
Now we will create a new Maven project in which we will write some code and then unit test those using JUnit.
Click on Create a Maven project to create a new maven project.
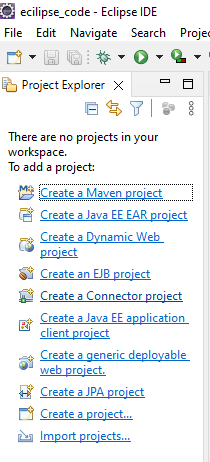
A pop will appear like this. Click on the checkbox. Create a simple project to skip archetype selection since we will be creating a simple project. Click next.
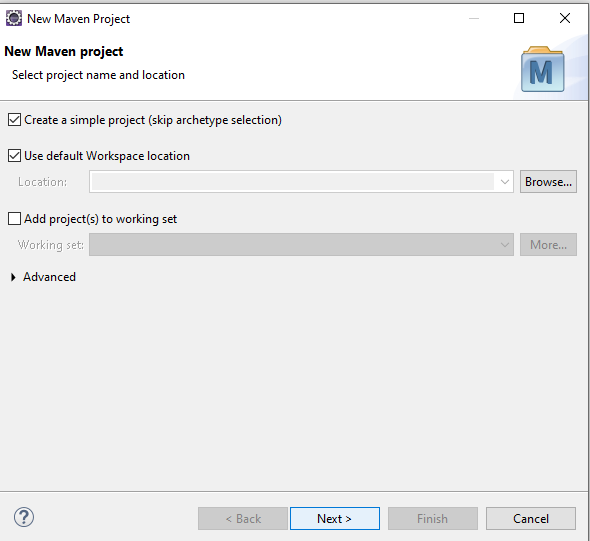
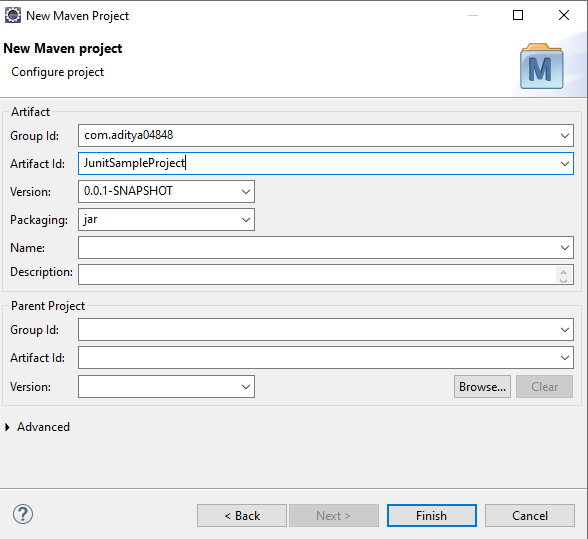
Something like this will appear, provide group id and artifact id, and click finish.
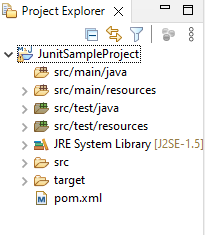
We have successfully created our new maven project. The folder structure will look like the image below, we have src/main/java where we will be writing the main code, and we also have src/test/java where we will be writing all our unit testing code.
This is an optimal structure since our main files and test files are in separate folders.
Writing Tests in JUnit
Before writing unit tests using JUnit, we must write some code to test. So I will make an addTwoNumbersMethod class inside which I will define an add method that simply adds two integers and returns the result.
Program
package com.aditya04848.junit.helper;

public class addTwoNumbersMethod {

    public static int add(int Number1,int Number2){
        int Sum;
        Sum = Number1 + Number2;
        return Sum;
    }
}

You can also try this code with Online Java Compiler
Our code is ready to be tested, so let’s create a JUnit test case.
Creating Test File
To do that Right-click -> new -> other
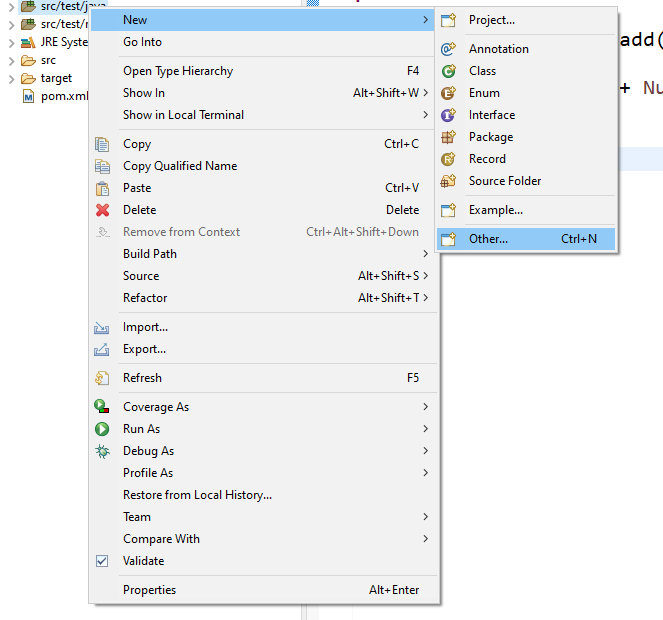
This popup will appear.
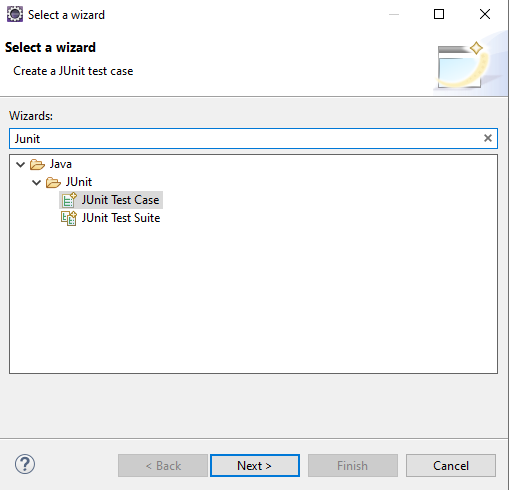
Search JUnit and select JUnit test case and click next.
Provide package name, and typically the package is taken the same as the class name it is testing.
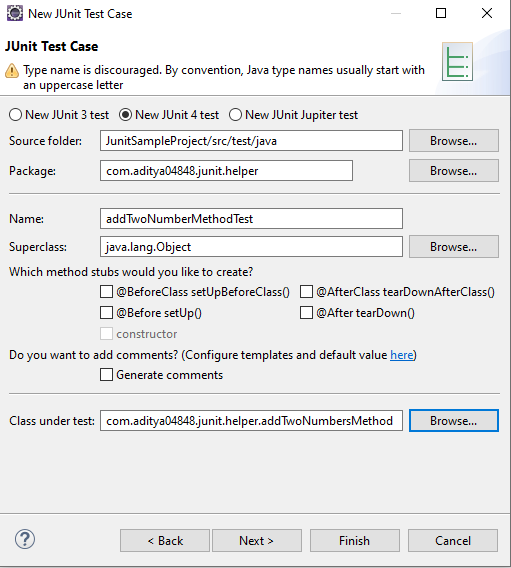
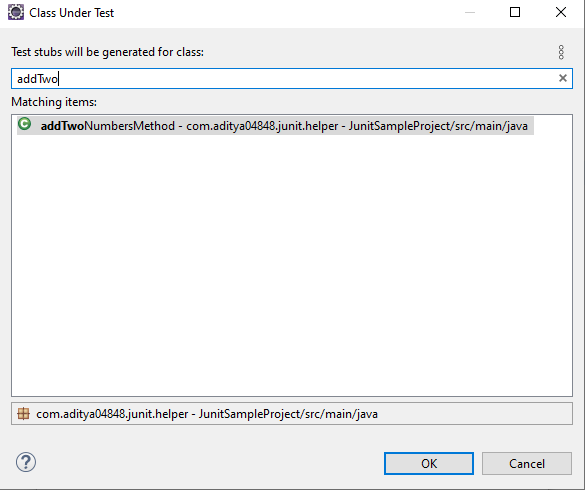
Browse for the class under test, the popup shown below will appear, search the name of the class and select it, then click finish.
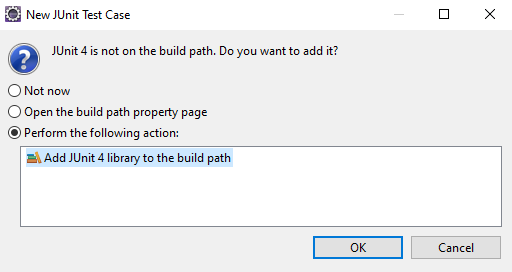
On clicking finish, this popup will appear asking to add JUnit to the build path. Ideally, we should add to pom.xml but for simplicity, let’s select add JUnit 4 library to the build path, click ok.
The following test code will be created automatically as a template test file.
Template Test Code
package com.aditya04848.junit.helper;
import static org.junit.Assert.*;

public class addTwoNumbersMethodTest {

    @Test
    public void test() {
    fail('Not yet implementaed');
    }
}

You can also try this code with Online Java Compiler
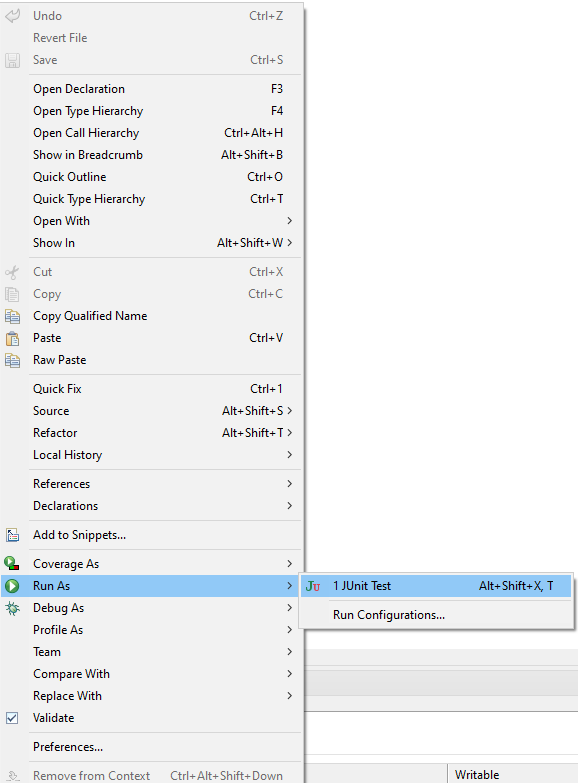
Let's actually run this and see what happens. To run the test Right-click -> Run as -> Junit test.
And we got a failure trance because of the fail() method. The red bar below indicates that our test has failed.
output

Now Let's remove the fail() method like shown in the picture below and then run again.
Empty Test Code
package com.aditya04848.junit.helper;
import static org.junit.Assert.*;

public class addTwoNumbersMethodTest {

    @Test
    public void test() {

    }
}

You can also try this code with Online Java Compiler
output

This time our test passed because in Junit if the test doesn’t fail, it is considered a pass.
Now let's write our actual testing code. After that, we will understand each and every line and its significance.
Test Code
package com.aditya04848.junit.helper;

import static org.junit.Assert.*;

import org.junit.After;
import org.junit.Before;
import org.junit.Test;

public class addTwoNumberMethodTest {

    addTwoNumbersMethod obj;

    @Before
    public void setup() {
        obj = new addTwoNumbersMethod();
    }

    @Test
    public void addTestCase1() {
        assertEquals(10, obj.add(5,5));
    }

    @Test
    public void addTestCase2() {
        assertEquals(10, obj.add(6,4));
    }

    @After
    public void tearDown( ) {
        System.out.println("test completed");
    }
}

You can also try this code with Online Java Compiler
Let’s first try to run and check if it is working.
And voila, all two of the tests passed.
Output

Let's now understand everything in the code.
Understanding Test Code
Annotations: JUnit Annotations are a special form of syntactic meta-data that can be added to Java source code for better code readability and structure.
@Test annotation defines that the below method is a test method.
@Before / @After annotation defines that the method written below will be executed before and after every @Test method. This is overkill in our project but in more complex projects,
we need some code to be executed before and after each test, so instead of writing them in each test method, Junit provides these annotations to help keep our testing code dry.
Junit provides a lot of other annotations like @BeforeClass, @AfterClass, @Ignore, etc.
assertEquals() - This method takes two parameters, the first parameter is the expected output and the second parameter is the actual output. assertEquals will check if the two are the same and will pass or fail the test based on that.
Junit also provides Test suits that help to group tests in different suits. This is very helpful when we have some of the very resource-consuming tests, and we don’t want to run them very frequently.
FAQs
-
Which methods Cannot be tested by the JUnit test class?
A method that is declared as “private,” can only be accessed within the same class. So we cannot test a “private” method of a target class from any test class.
-
Why is JUnit used?
JUnit is an open-source framework that is used for writing and running tests.
-
Can we rerun failed test cases in JUnit?
In the JUnit test framework, a class that allows you to perform retry failed tests is called TestRule. This class will rerun tests that have failed without interrupting your test flow.
-
What is a JUnit test suite?
The test suite bundles a few unit test cases and runs them together. In JUnit, both @RunWith and @Suite annotations are used to run the suite tests.
Key Takeaways
This article is a basic introduction to the JUnit unit testing framework. We’ve explained how to get started by setting up the environment and writing basic tests. The environment setting part explains the step-by-step process and the required screenshots to make it more interactive.
Check out JUnit Interview Questions here.
Learning never stops, and to feed your quest to learn and become more skilled, head over to our practice platform Coding Ninjas Studio to practice top problems, attempt mock tests, read interview experiences, and much more.!
Happy Reading!


