Example
Open Android Studio, start an empty activity, give a name to your app(Kotlin Landscape layout CN in our case), and let Android do the Gradle syncing.
Now make the layout of the portrait view as per the user's need.
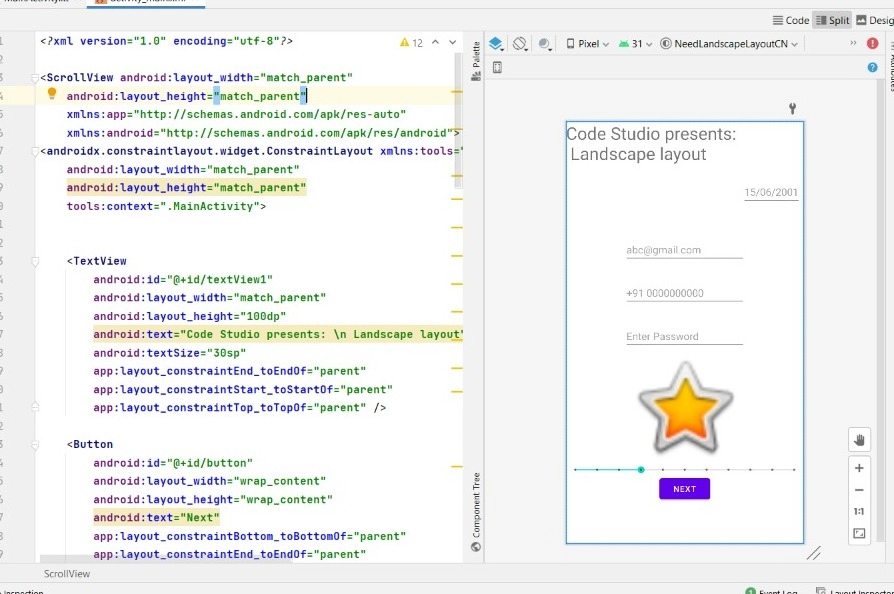
Here We have added TextView, Button, EditText, SeekBar, ImageView to our portrait view in the XML file.
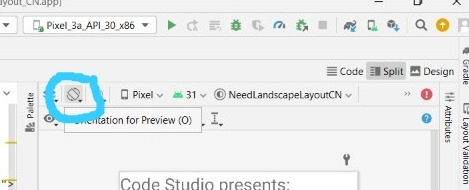
Now click on the orientation selector as shown below for orientation preview.
Then the next step is to create a landscape variation for our portrait view; for this, do
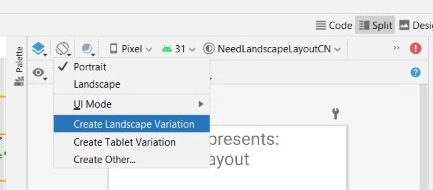
Clicking on this will create a land\activity_main.xml file.
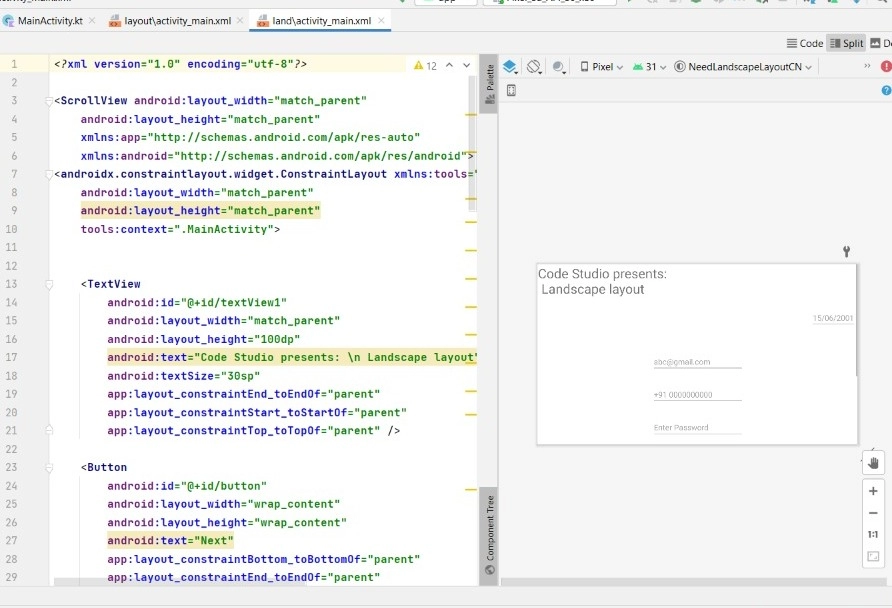
And we can edit on this land\activity_main.xml file for layout variation in our landscape view.
Code:
MainActivity.kt
import androidx.appcompat.app.AppCompatActivity
import android.os.Bundle
class MainActivity : AppCompatActivity() {
    override fun onCreate(savedInstanceState: Bundle?) {
        super.onCreate(savedInstanceState)
        setContentView(R.layout.activity_main)
    }
}
layout\activity_main.xml
In this file, we can make alignment for portrait mode.
<androidx.constraintlayout.widget.ConstraintLayout xmlns:android="http://schemas.android.com/apk/res/android"
    xmlns:app="http://schemas.android.com/apk/res-auto"
    xmlns:tools="http://schemas.android.com/tools"
    android:layout_width="match_parent"
    android:layout_height="match_parent"
    tools:context=".MainActivity">

    <TextView
        android:id="@+id/textView1"
        android:layout_width="match_parent"
        android:layout_height="100dp"
        android:text="Code Studio presents: \n Landscape layout"
        android:textSize="30sp"
        app:layout_constraintEnd_toEndOf="parent"
        app:layout_constraintStart_toStartOf="parent"
        app:layout_constraintTop_toTopOf="parent" />

    <Button
        android:id="@+id/button"
        android:layout_width="wrap_content"
        android:layout_height="wrap_content"
        android:text="Next"
        app:layout_constraintBottom_toBottomOf="parent"
        app:layout_constraintEnd_toEndOf="parent"
        app:layout_constraintStart_toStartOf="parent" />

    <EditText
        android:id="@+id/editTextTextEmailAddress"
        android:layout_width="wrap_content"
        android:layout_height="wrap_content"
        android:layout_marginTop="100dp"
        android:ems="10"
        android:hint="abc@gmail.com"
        android:inputType="textEmailAddress"
        app:layout_constraintEnd_toEndOf="parent"
        app:layout_constraintStart_toStartOf="parent"
        app:layout_constraintTop_toBottomOf="@+id/textView1" />

    <EditText
        android:id="@+id/editTextPhone"
        android:layout_width="wrap_content"
        android:layout_height="wrap_content"
        android:layout_marginTop="30dp"
        android:ems="10"
        android:hint="+91 0000000000"
        android:inputType="phone"
        app:layout_constraintEnd_toEndOf="parent"
        app:layout_constraintStart_toStartOf="parent"
        app:layout_constraintTop_toBottomOf="@+id/editTextTextEmailAddress" />

    <EditText
        android:id="@+id/editTextNumberPassword"
        android:layout_width="wrap_content"
        android:layout_height="wrap_content"
        android:layout_marginTop="30dp"
        android:ems="10"
        android:hint="Enter Password"
        android:inputType="numberPassword"
        app:layout_constraintEnd_toEndOf="parent"
        app:layout_constraintStart_toStartOf="parent"
        app:layout_constraintTop_toBottomOf="@+id/editTextPhone" />

    <EditText
        android:id="@+id/editTextDate"
        android:layout_width="wrap_content"
        android:layout_height="wrap_content"
        android:inputType="date"
        android:hint="15/06/2001"
        app:layout_constraintEnd_toEndOf="parent"
        android:layout_marginEnd="5dp"
        app:layout_constraintTop_toBottomOf="@+id/textView1" />

    <SeekBar
        android:id="@+id/seekBar"
        style="@style/Widget.AppCompat.SeekBar.Discrete"
        android:layout_width="match_parent"
        android:layout_height="wrap_content"
        android:max="10"
        android:progress="3"
        app:layout_constraintBottom_toTopOf="@+id/button"
        app:layout_constraintEnd_toEndOf="parent"
        app:layout_constraintStart_toStartOf="parent" />

    <ImageView
        android:id="@+id/imageView3"
        android:layout_width="200dp"
        android:layout_height="200dp"
        app:layout_constraintBottom_toTopOf="@+id/seekBar"
        app:layout_constraintEnd_toEndOf="parent"
        app:layout_constraintStart_toStartOf="parent"
        app:layout_constraintTop_toBottomOf="@+id/editTextNumberPassword"
        app:srcCompat="@android:drawable/btn_star_big_on" />

</androidx.constraintlayout.widget.ConstraintLayout>
land\activity_main.xml
In this file, we can make alignment for landscape mode.
<?xml version="1.0" encoding="utf-8"?>

<ScrollView android:layout_width="match_parent"
    android:layout_height="match_parent"
    xmlns:android="http://schemas.android.com/apk/res/android"
    xmlns:app="http://schemas.android.com/apk/res-auto">
<androidx.constraintlayout.widget.ConstraintLayout xmlns:tools="http://schemas.android.com/tools"
    android:layout_width="match_parent"
    android:layout_height="wrap_content"
    tools:context=".MainActivity">

    <TextView
        android:id="@+id/textView1"
        android:layout_width="match_parent"
        android:layout_height="50dp"
        android:text="Code Studio presents: \n Landscape layout"
        android:textSize="20sp"
        app:layout_constraintEnd_toEndOf="parent"
        app:layout_constraintStart_toStartOf="parent"
        app:layout_constraintTop_toTopOf="parent" />

    <Button
        android:id="@+id/button"
        android:layout_width="wrap_content"
        android:layout_height="wrap_content"
        android:text="Next"
        app:layout_constraintTop_toBottomOf="@+id/imageView3"
        app:layout_constraintEnd_toEndOf="parent"
        app:layout_constraintStart_toStartOf="parent" />

    <EditText
        android:id="@+id/editTextTextEmailAddress"
        android:layout_width="wrap_content"
        android:layout_height="wrap_content"
        android:layout_marginTop="7dp"
        android:ems="10"
        android:hint="abc@gmail.com"
        android:inputType="textEmailAddress"
        app:layout_constraintEnd_toEndOf="parent"
        app:layout_constraintStart_toStartOf="parent"
        app:layout_constraintTop_toBottomOf="@+id/textView1" />

    <EditText
        android:id="@+id/editTextPhone"
        android:layout_width="wrap_content"
        android:layout_height="wrap_content"
        android:layout_marginTop="5dp"
        android:ems="10"
        android:hint="+91 0000000000"
        android:inputType="phone"
        app:layout_constraintEnd_toEndOf="parent"
        app:layout_constraintStart_toStartOf="parent"
        app:layout_constraintTop_toBottomOf="@+id/editTextTextEmailAddress" />

    <EditText
        android:id="@+id/editTextNumberPassword"
        android:layout_width="wrap_content"
        android:layout_height="wrap_content"
        android:layout_marginTop="5dp"
        android:ems="10"
        android:hint="Enter Password"
        android:inputType="numberPassword"
        app:layout_constraintEnd_toEndOf="parent"
        app:layout_constraintStart_toStartOf="parent"
        app:layout_constraintTop_toBottomOf="@+id/editTextPhone" />

    <EditText
        android:id="@+id/editTextDate"
        android:layout_width="wrap_content"
        android:layout_height="wrap_content"
        android:inputType="date"
        android:hint="15/06/2001"
        app:layout_constraintEnd_toEndOf="parent"
        android:layout_marginEnd="5dp"
        app:layout_constraintTop_toBottomOf="@+id/textView1" />

    <SeekBar
        android:id="@+id/seekBar"
        style="@style/Widget.AppCompat.SeekBar.Discrete"
        android:layout_width="match_parent"
        android:layout_height="wrap_content"
        android:max="10"
        android:progress="3"
        app:layout_constraintBottom_toTopOf="@+id/button"
        app:layout_constraintEnd_toEndOf="parent"
        app:layout_constraintStart_toStartOf="parent" />

    <ImageView
        android:id="@+id/imageView3"
        android:layout_width="30dp"
        android:layout_height="30dp"
        app:layout_constraintBottom_toTopOf="@+id/seekBar"
        app:layout_constraintEnd_toEndOf="parent"
        app:layout_constraintStart_toStartOf="parent"
        app:layout_constraintTop_toBottomOf="@+id/editTextNumberPassword"
        app:srcCompat="@android:drawable/btn_star_big_on" />

</androidx.constraintlayout.widget.ConstraintLayout>
    </ScrollView>
Output:
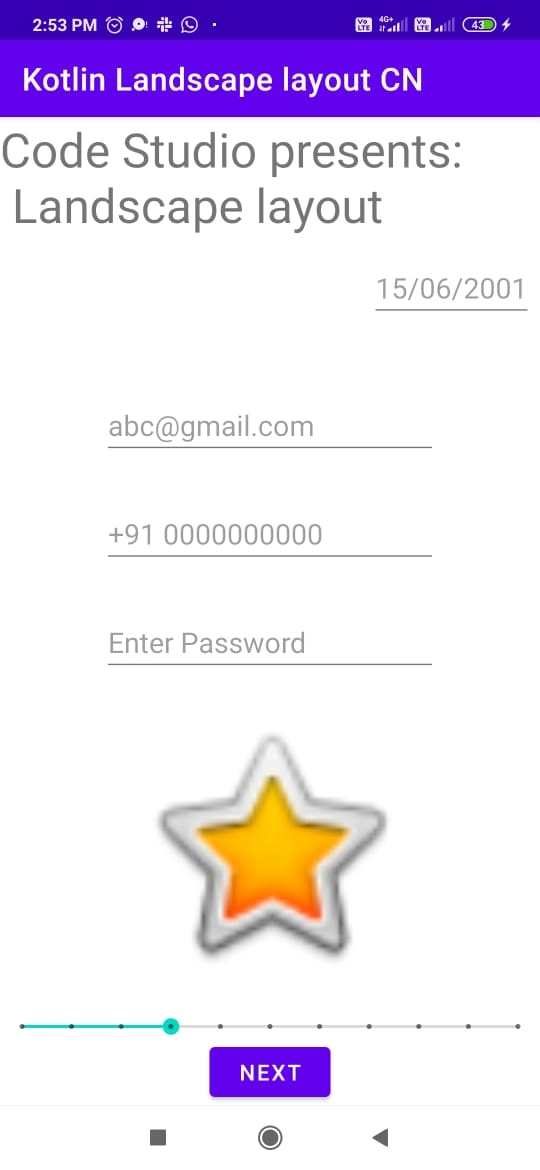
Run this code on your studio and when we launch the app, It gets opened(onStart call out) with default mode(potrait mode) calling out layout\activity_main.xml file’s layout orientation. And when we rotate our android device, land\activity_main.xml file comes in action and sets the layout orientation of our android device in landscape mode.

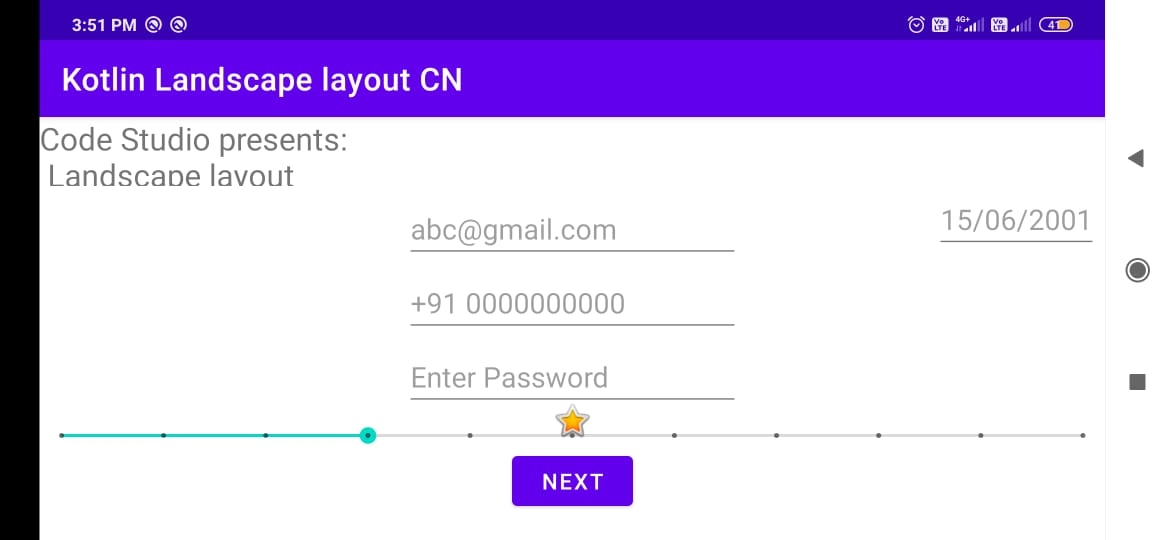
Portrait Mode Landscape Mode
FAQs
1. How do I set the orientation for portrait and landscape view on Android?
Ans: For a layout in portrait mode, edit in layout\activity_main.xml file; on the other hand, for the alignment change in landscape mode, edit in land\activity_main.xml file.
2. How is the linear layout different from the table layout?
Ans: Linear layout is a View(view group) that arranges all of the children in one direction, either vertically or horizontally, whereas table layout arranges its children in rows and column format.
3. What are common layouts in Android?
Ans: Common android layouts include Linear layout, Relative layout, Web view, Table layout, and Frame layout.
Key Takeaways
In this article, we learned about Landscape layout and its implementation. We also infer from this article why Landscape layout is necessary for almost every app.
You can head over to our Android Development Course on the Coding Ninjas Website to dive deep into Android Development and build future applications.
We hope this article has helped you enhance your knowledge of the Android UI Landscape layout. If you want to learn more, check out our Android UI and Competitive Programming articles. Do upvote this article to help other ninjas grow.


 8+ registered

