


Introduction
Linux is an open-source kernel for operating systems. It is widely used in operating systems such as Ubuntu, Debian, etc. One of the unique features of Linux is that it allows the user to have a higher degree of control over the machine. We can execute and program a vast number of things into our computer using simple commands.

Scheduling processes and commands is one of these things. If we wish to schedule a particular script to run next Monday, how would we do so? This is what we will look at in our article. There are 2 basic commands that we can use for this - at and crontab. Let's look at them both!
At Command
The at command can be used to schedule a job to run at a specific time. We can send reminders, execute system updates, and take backups at our desired time. We can specify a specific time and date (such as 12th October at 12 AM) or an interval (such as after 3 hours).
Let's look at it in detail, as well as the commands related to it.
Installing
at needs to be installed first. We can use apt-get to install it. Run the command:
sudo apt-get install at

Once it is installed, we must start it and enable it. We can do so by running the commands:
sudo systemctl start atd
sudo systemctl enable atd
(sudo might not be required, depending on the user's privileges).

Now, we can begin using the at command.
Basic Example
Let's schedule a basic task using at. We will simply output something to the terminal at the specified time.
Perform the command as given in the image. You may change the time according to your convenience. The system time when this command was written was 1:25 PM.

We can exit the input by pressing Ctrl+D.

We can see no file exists at the moment, after the command is executed- a file demo.txt will be created.

As we can see, after the time set passed, our command was executed, and our file was created.
Time Specification Format
We can specify the time in many ways and add fields such as days and months.
The rules to be followed are
-
Time should be specified as HH: MM. If it is not in 24 hour format, we should specify AM or PM after it. We can also write midnight (12 AM), noon (12 PM), or teatime (4 PM).
-
Dates can be specified as MMDDYY, MM/DD/YY, or DD.MM.YY, or YYYY-MM-DD. We can also write it as month-name day year, where year is optional. Time must always be specified after the date.
-
We can also give times as now + count of time_units. The time units can be minutes, hours, days, or weeks. So we can write something like - now + 5 hours, meaning 5 hours from now.
-
We can tell at to run the job today by adding today at the end of the command, and we can do the same for tomorrow.
Let's see a few examples.
1. To schedule a task at 10 PM next Monday:
at 10:00 PM Tuesday
2. To schedule a task at 10 PM on Dec 22nd:
at 10:00 AM december 22
(If December 22 has passed, the next year's December 22 will be considered)
3. To schedule a task at 10 PM tomorrow:
at 10:00 AM tomorrow
4. To schedule a task at 2 hours from now:
at now +2 hours
5. To schedule a task for next Tuesday, 3 hours from the current time.
at Tuesday + 3 hours
6. To schedule a task on 12 November 2022 at 12:45 PM
at 121122 12:45 PM
You can find the exact specification of the time formats in the folder located at /usr/share/doc/at-3.1.10/timespec (version may vary). Different versions may have slight formats changes, so checking this file is recommended.
Options
The various options available for the at command are as follows.
-
-V
Prints the version number of at.
-
-q
At allows us to structure different jobs into different queues. This option lets us specify which queue we want to put our job in. Queues are specified by single letters from a to z and A to Z. Queues with higher letters have lesser priorities. The special queue "=" shows jobs currently running.
-
-m
This option sends a mail to the user when the job completes, even if there is no output.
-
-f
This reads the job from a file instead of standard input.
-
-l
This runs the atq command.
-
-d
This runs the atrm command.
-
-v
Shows the execution time of the job before reading the commands to perform.
-
-c
Outputs the listed jobs to standard output.
-
-t
Lets us specify the time in the format ([[CC]YY]MMDDhhmm)
atq
To list all the jobs currently pending, type the command
at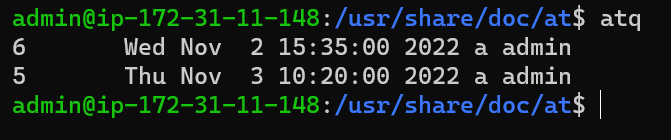
The numbers on the left represent the jobid. It starts from 1 and is increased whenever a new job is added. We see it here starting from 5 because 4 jobs were earlier added that were completed.
The jobs are listed in execution order, not addition order.
atrm
atrm is used to delete a pending job. For e.g., if we want to delete the job with jobid 5, we can type
atrm 5
No output means the job has successfully been deleted.


 9+ registered

