


Introduction

Running load tests implies simulation requests from thousands of virtual users, which requires a substantial amount of resources from the computer running the test. And indeed, one computer is incompetent to generate enough load to test the servers properly.
Hence, distributed load testing is done, which uses multiple computers to simulate load on our target server.
To remarkably increase the count of load agents and total aggregate of virtual users to imitate the online traffic, we execute our load tests on Cloud Computers.
The cloud agent must be added to your distributed test and configured to execute the tests on cloud agents.
There is a requirement for images to run the cloud tests as they are. These images can either be extracted from the SmartBear LoadUI agent or be created on our own to construct the cloud environment in a way we like.
Create our Image
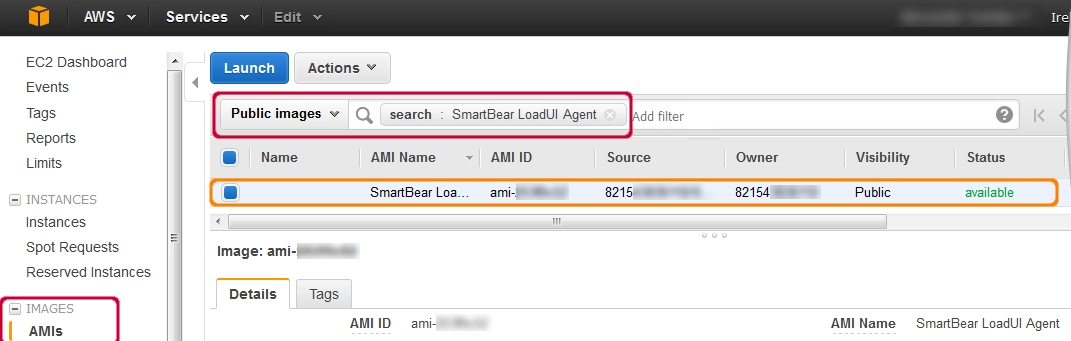
Create a custom Amazon image from the given image:
A custom image can be formed based on the SmartBear LoadUI agent’s photo.
After creating a new image instance, the image can be modified according to our requirements. Verify that you remove any private information from the image.
Create your custom amazon image from scratch
We will be creating an image using a Linux instance. In the case of using a Windows instance, the windows interface will also support performing similar actions.
For the following example, the OS used is Ubuntu 20.04 LTS.
- Launch an Amazon instance:
Commence an Amazon instance using the recommended instance type of m3.medium using a Linux-based instance as they are cheaper and will use a disk of 30 GB.
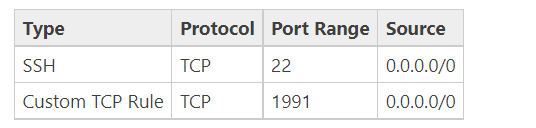
When launching your instance, you secure the instance by specifying a key pair and a security group under the following settings.
- Configure the Amazon instance:
To configure the newly launched instance, we must connect to the instance by using a secured channel. You can refer to the Amazon Documentation for detailed guidance on connecting to instances.
After a connection has been established, run the following commands in the shell:
sudo apt-get purge openssl
sudo apt-get update
sudo apt-get dist-upgrade
sudo apt-get install libfontconfig1 -y
- Install the LoadUI Agent
Download the installation files of LoadUI and run it by using the commands such as:
wget http://dl.eviware.com/ready-api/3.41.0/LoadUIAgent-x64-3.41.0.sh
bash ./loaduiagent-3.41.0_64bit.shEnsure that the LoadUI agent runs on the instance and check for the following things on your Linus instance:
- The format for loaduiagent.sh should be in Unix format. If not, you may convert it in the following manner
sudo apt-get install dos2unix dos2unix ./loaduiagent.sh
- loaduiagent.sh should be executable. If not, make it executable by
sudo chmod +x loaduiagent.sh
After the agent has started, make sure the ReadyAPI can connect to it, the public DNS can be found in the AWS Management console.
- Configure the settings of the LoadUI agent:
To successfully run ReadyAPI LoadUI as a cloud agent, the setting for “IS_AMAZON_AGENT” must be set to true.
Skipping this will make you unable to choose a custom agent port. So, it’s recommended that this setting is permanently configured.
For Linux systems, this setting can be found in the loaduiagent.bat file.
For Windows systems, this setting can be found in loaduiagent.sh file.
- Set Up the configured agent so that it can run as a service:
Now that we can run the agent, we will also set it up to run as a service by doing the following steps:
- Begin with creating a systemd service file:
sudo nano /etc/systemd/system/loaduiagent.service
- Paste the subsequent definitions to the created file
[Unit]
Description=LoadUI Agent

[Service]
ExecStart=/home/ubuntu/SmartBear/LoadUIAgent-x.y.z/bin/loaduiagent.sh
Restart=always

[Install]
WantedBy=multi-user.target
- Allow the service file to begin the service on boot:
sudo systemctl enable loaduiagent.service
- Now, the LoadUI agent is ready to be used as a service:
sudo systemctl start loaduiagent.service
- Check if the LoadUI service is running using:
sudo systemctl status loaduiagent.service
- Secure the instance created:
Before the image is finally created and ready for use, we must remove any kind of private information and bash history from the photo, especially if the image created is going to be provided to other users.
You can follow the below-mentioned steps to remove private data from the image:
Note: To remove all files with a specific extension, for e.g., .log, use the following script
sudo find / -name *.log -exec rm -f {} \;
- Make sure you are connected to the instance by using a secured channel.
- In the /etc/ssh/sshd_config file, place the following values:
- Set “PermitRootLogin” to “without-password.”
- Set “ChallengeResponseAuthentication” to “no.”
- Set “PasswordAuthentication” to “no.”
-
Disable the access to the root:
sudo passwd -l root
- Remove the SSH host key pairs:
sudo shred -u /etc/ssh/*_key /etc/ssh/*_key.pub
- Add the script given below to the /etc/rc.local file to insert public key credentials at the time of the launch
if [ ! -d /root/.ssh ] ; then
        mkdir -p /root/.ssh
        chmod 700 /root/.ssh
fi
# Fetch public key using HTTP
curl http://169.254.169.254/latest/meta-data/public-keys/0/openssh-key > /tmp/my-key
if [ $" width=" -eq 0 ] ; then
        cat /tmp/my-key >> /root/.ssh/authorized_keys
        chmod 700 /root/.ssh/authorized_keys
        rm /tmp/my-key
Fi
- Delete the file that says authorized_keys
sudo find / -name authorized_keys -exec rm -r {} ;
- Finally, delete your shell history:
sudo shred -u ~/.*history
Create an image from your instance:
In the AWS Management Console, open up the instances page and right-click on your instance. And then select Image->Create Image and follow the instructions.
After the image is created, in the tags section, add the following tags to it:
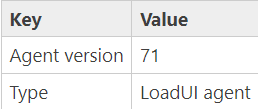
When the test is started, ReadyAPI will automatically launch the designated number of cloud agents and start simulating the traffic from them.
All the data sent between the cloud agents and the ReadyAPI is encoded, and as long as our cloud machine image is configured correctly, there’s no need to prepare the cloud agent before the load tests.
All the instances of the cloud agents are terminated when the tests have been completed.
The cloud agents have also terminated automatically if they lose connection to the ReadyAPI computer and cannot restore connection within a few minutes of the disconnection.
The instance type available for our cloud testing depends upon the image chosen and the region where the test is being held.
So the finest instance choice for our load test should be based on the testing task we wish to accomplish and the environment in which we want to simulate the virtual users.
- The higher the number of virtual users needed to simulate on each cloud agent, the higher the CPU capacity of the instance required.
- Increased scenario complexity implies increased CPU capacity of the cloud computer required.
- With a larger request size in your tests, the required RAM capacity on the cloud computers is greater.


 8+ registered

