Locating Strategies
While working with Selenium, we usually have six modes of specifying location in a particular webpage to locate certain unique web elements.
- By Identifier
- By ID
- By Name
- By XPath
- By CSS
- By DOM
By ID
When we are able to find id attributes given to certain elements and can isolate them from the same. When using this strategy, the locator is very explicit and locates the first element with the matching id attribute and is used.
Example
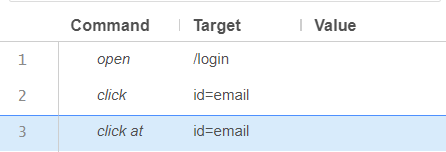
First we need to open the Selenium IDE and click on the command text box in the Test Script Editor box.
Then, our first command would encompass:
Command: open
Target: https://facebook.com/login

Upon executing this command we will be redirected to the facebook login page.
Now we need to find our first id to be isolated and tested. Here, we inspect the username text box and find the id “email”.
Now our next command will be:
Command: click at
Target: id=email

We can add another test as well:
Command: type
Target: id=email

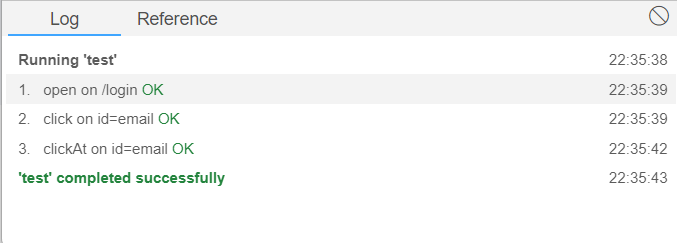
Next we simply need to run the current tests using the button on the toolbar menu of the IDE and we will be able to get the results in the Log panel at the bottom.

By Name
When using name we have to be careful of the fact that this is not an unique attribute and thus only the first element with the matching name attribute is located.
Example
The test here is done similar to that of the previous test the only difference being that the target will contain values like,
Target: name=email.
By XPath
XPath is what is used to locate nodes in XML Documents. Thus, here it acts like a substitute to id and name attribute for the elements that we want to locate.
There are two ways to represent the paths:
XPath Absolute
In absolute we need to mention the whole XPath location from the root HTML tag in the target of the command. However, this method is not very much recommended because if the location is slightly changed the script won’t be able to locate the element and the script may fail.
Syntax: //html/body/tag1[index]/tag1[index]/.../tagN[index]
XPath Attributes
Unlike absolute, in attributes we only need to locate the web elements using their different attributes which are unique and can still be used even though their location is changed.
Syntax: //htmltag[@attribute1=’value1’ and @attribute2=’value2’]
By CSS
In this method, we need to describe how we have formatted the document in markup that we are looking up in the locator. Thus it includes a combination of HTML tag, id, class and attributes and thus has six other modes to identify and locate the web elements.
- ID
- Class
- Attributes
- Substring
- Inner-text
- ID/Class & Attributes
These methods are pretty self explanatory so we will not dive deeper into it.
By DOM
DOM basically means Document Object Model and specifies the structure of our HTML elements and how they can be accessed.
In DOM there are basically four methods:
- getElementByID
- getElementByName
- dom:name
- dom:index
getElementByID
Here, we simply call the document object and the getElementById method and use it.
Syntax: document.getElementByID(“id”)
getElementByName
Here, we simply call the document object and the getElementByName method and use it.
Syntax: document.getElementByName(“name”)[index]
dom:name
Here we can specify the attribute against which the value must be matched and located, and thus the element we want to access.
Syntax: document.forms[“value”]
dom:index
We can also use integers as the index value of the dom element we want to access.
Syntax: document.forms[index]
FAQs
1. What is Selenium?
Ans: Selenium is a software testing framework for web applications that can also be used to write scripts in multiple languages and in most browsers.
2.What are the advantages of Selenium?
Ans: Some of the benefits of Selenium are Language Support, Open Sourcing, Multi-Browser Support, etc.
3. Which is the fastest Selenium Locator?
Ans: The ID locator is the fastest Selenium Locator and the most preferred one as well as ID is a unique attribute in the DOM.
4. Why is ID locator faster than XPath?
Ans: ID locator is considered as an unique key where as XPath is created using relative path and position of the elements.
Key Takeaways
In this blog, we discussed what are the different strategies used by Locators in Selenium.
You may want to learn more about JUnit annotations in Selenium here.
Learning never stops, and to feed your quest to learn and become more skilled, head over to our practice platform Coding Ninjas Studio to practise top problems, attempt mock tests, read interview experiences, and much more.!
Happy Learning!


