Do you think IIT Guwahati certified course can help you in your career?
Introduction
STM stands for “Short-Term Memory” in artificial intelligence, which is basically used for deep sequential modeling. STM is a memory system that basically stores and manipulates information for a shorter period. LSTM and Bi-LSTM are the two types under the STM (Short-Time Memory).
In the article “LSTMs and Bi-LSTM in PyTorch”, we will discuss what are LSTM and Bi-LSTM with their differences.
LSTM in PyTorch
In this section of the article “LSTMs and Bi-LSTM in PyTorch”, we will first discuss LSTM in PyTorch. LSTM is an advanced version (or an extension) of recurrent neural networks (RNNs) that was designed to model chronological sequences and long-range dependencies more precisely than the conventional RNNs.
Two of the advantages of LSTM over recurrent neural networks is that recurrent neural networks fail when RNNs cannot process longer sequences or suffer from short-term memory.
Structure of LSTM
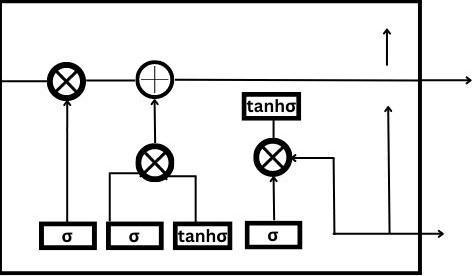
In this sub-section of the article “LSTMs and Bi-LSTM in PyTorch”, we will discuss the structure of LSTM. LSTM carries the contextual information using something called “gates”. The four layers are present that interact with each other in order to produce the output of the cell along with its state; here is the structure of LSTM below:
In the structure of LSTM, there are three gates that are contained by the LSTM. Here are the following gates:
Forget Gate: Forget gate helps LSTM to decide which information is to be forgotten away from the memory.
Input Gate: The input gate helps LSTM to decide which information to be added to the memory.
Output Gate: The output gate helps LSTM to take a new memory and to decide which part should be used to generate the output or to make an answer.
Applications of LSTM
In this sub-section of the article “LSTMs and Bi-LSTM in PyTorch”, we will discuss the advantages of LSTM. There are various applications of LSTM; here are some of the following:
It can be used in language modeling and text generation, which basically involves the computation of words.
It can also be used in speech and handwriting recognition.
It can be used in mapping a sequence in one language to a sequence in another language.
It can be used in predicting the musical notes which can be beneficial in music generation.
Bi-LSTM in PyTorch
In this section of the article “LSTMs and Bi-LSTM in PyTorch”, we will discuss Bi-LSTM in PyTorch. Bi-LSTM stands for Bidirectional LSTMs, which are the extension of the traditional LSTM that is basically used to improve the model performance. There are different real-life applications of Bi-LSTM, which are sequence classification, speech recognition, and forecasting models.
A Bi-LSTM consists of two LSTMs, where the first LSTM takes the input in the forward direction, and the second LSTM takes the input in the backward or reverse direction.
Structure of Bi-LSTM
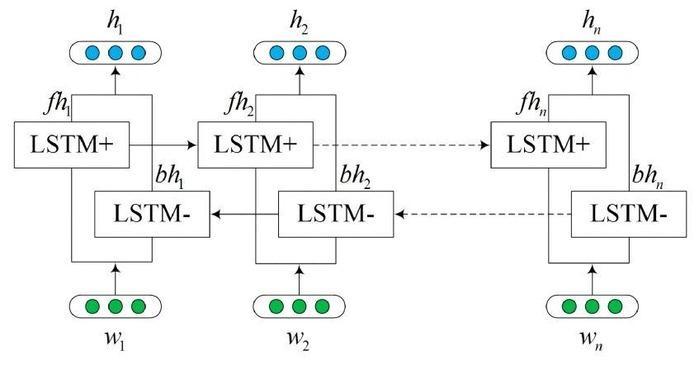
In this sub-section of the article “LSTMs and Bi-LSTM in PyTorch”, we will discuss the structure of Bi-LSTM. As we have just discussed that Bi-LSTM consists of two LSTMs, first for the forward and second for the backward or reverse direction.
(src: ieeexplore.ieee.org)
Advantages of Bi-LSTM over LSTM
In this sub-section of the article “LSTMs and Bi-LSTM in PyTorch”, we will discuss the advantages of Bi-LSTM over LSTM. There are various advantages of Bi-LSTM over LSTM, which are as follows:
It requires less resources and time to get trained and become ready for real-world application.
It reduces the case of overfitting, whereas LSTM is prone to overfitting, which can create difficulty in some cases.
It can take the inputs in both directions (forward and backward), unlike LSTM.
It also improves the model performance of LSTM models.
Implementation of LSTM in PyTorch
In this sub-section of the article “LSTMs and Bi-LSTM in PyTorch”, we will discuss the implementation of LSTM in PyTorch. we will discuss and see how can we use LSTM in PyTorch. We will take an example of the clean jokes dataset, which will be available in the form of a CSV file. We will train the LSTM network to create a text generation model that will be going to predict the next words given a series of words.
Importing Libraries
Our first step should be to import all the necessary libraries to use LSTM in PyTorch, which you can do with the given below code:
Code
Python
Python
import torch
from torch import nn
import pandas as pd
from collections import Counter
import argparse
import numpy as np
from torch import nn, optim
from torch.utils.data import DataLoader, Dataset
You can also try this code with Online Python Compiler
After importing all the necessary libraries, we need to create a dataset class that will basically load the individual samples of data from the file, which can be done with the following code:
Code
Python
Python
# custom dataset class to load the individual samples of data from csv file
class Dataset(Dataset):
    def __init__(self):
        self.words = self.load_words()
        self.uniq_words = self.get_uniq_words()


        self.index_to_word = {index: word for index, word in enumerate(self.uniq_words)}
        self.word_to_index = {word: index for index, word in enumerate(self.uniq_words)}


        self.words_indexes = [self.word_to_index[w] for w in self.words]


    def load_words(self):
        train_df = pd.read_csv('cleanjokes.csv')
        text = train_df['Joke'].str.cat(sep=' ')
        return text.split(' ')


    def get_uniq_words(self):
        word_counts = Counter(self.words)
        return sorted(word_counts, key=word_counts.get, reverse=True)


    # returns the length of the dataset
    def __len__(self):
        return len(self.words_indexes) - 4


    def __getitem__(self, index):
        return (
            torch.tensor(self.words_indexes[index:index+4]),
            torch.tensor(self.words_indexes[index+1:index+4+1]))
You can also try this code with Online Python Compiler
In the above code, we created a class named “Dataset”, where we basically load the individual samples of data from the ‘cleanjokes.csv’ file. We load each and every word from the file with the parameter passed Joke, which you can assume as a column name of the table containing all the jokes.
Creating Model
After creating the dataset class, we need to create a custom model that will define the model architecture. Here is the below code for the same:
In the above code, we created a class named “Model”, where is basically defines the model architecture. We created an LSTM layer using an LSTM object with the passed parameters like input_size, hidden_size, num_layers, and dropout, that is fully connected.
Training the Model
Here comes the first main part of the implementation, which is to train the model on the given dataset (.csv file). So here is the given function below to train the model:
In the above code, we created a function called train() with 2 arguments as dataset and model that we created initially. In this function, iteration is done 7 times which shows the number of passes to train the model on the given dataset (.csv file). Then epoch, batch number, along with the loss value, is printed for each iteration.
Testing the Model
Here comes the first main part of the implementation, which is to test the model with the given series of words after training the model on the given dataset (.csv file). So here is the given function below to train the model:
Code
Python
Python
def predict(dataset, model, text, next_words=50):
    model.eval()

    words = text.split(' ')
    state_h, state_c = model.init_state(len(words))

    for i in range(0, next_words):
        x = torch.tensor([[dataset.word_to_index[w] for w in words[i:]]])
        y_pred, (state_h, state_c) = model(x, (state_h, state_c))

        last_word_logits = y_pred[0][-1]
        p = torch.nn.functional.softmax(last_word_logits, dim=0).detach().numpy()
        word_index = np.random.choice(len(last_word_logits), p=p)
        words.append(dataset.index_to_word[word_index])

    return words

dataset = Dataset()
model = Model(dataset)

train(dataset, model)
print(predict(dataset, model, text='do sick boats'))
You can also try this code with Online Python Compiler
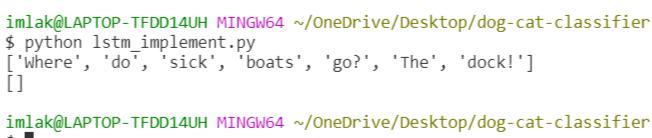
In the above code, a function is created called predict() with the arguments dataset, model and the series of words by which the prediction of the joke will be made. The text passed is ‘do sick boats’, which is nothing but a part of a joke, so the joke it will return is ‘Where do sick boats go? The dock!’.
Execution of Code
Here, the implementation of LSTM in Pytorch is completed; the code can be executed using the below command:
Code
Python Command
Python Command
python lstm_implementation.py
You can also try this code with Online Python Compiler
Here, the output is the joke that matches the given series of words (‘do sick boats’) which is ‘Where do sick boats go? The dock!’.
Implemenation of Bi-LSTM in PyTorch
In this sub-section of the article “LSTMs and Bi-LSTM in PyTorch”, we will discuss the implementation of Bi-LSTM in PyTorch.
Importing Libraries
Our first step should be to import all the necessary libraries to use Bi-LSTM in PyTorch, which you can do with the given below code:
Code:
Python
Python
import torch
import torch.nn as nn
import torch.optim as optim
import torch.nn.functional as F
from torch.utils.data import DataLoader, Dataset
import torchvision.datasets as datasets
import torchvision.transforms as transforms

# Set device
device = torch.device("cpu")
You can also try this code with Online Python Compiler
In the above, a class is created named ‘BiLSTM’ where the forward() function is created, As Bi-LSTM works for forward and backward both.
Setting Custom Network
Now, after creating the Bi-LSTM model class is created, which needs to be initialized. Here is the below code for the same:
Code:
Python
Python
# Initialize the custom network
model = BiLSTM(input_size, hidden_size, num_layers, num_classes).to(device)

# Loss function and optimizer
criterion = nn.CrossEntropyLoss()
optimizer = optim.Adam(model.parameters(), lr=learning_rate)
You can also try this code with Online Python Compiler
In the above code, the model ‘BiLSTM’ is initialized, and criterion and optimizer are created for entropy loss and learning rate, respectively.
Training the Model
Here comes the first main part of the implementation, which is to train the model on the given dataset. So here is the given function below to train the model:
Code:
Python
Python
# Train Network
for epoch in range(num_epochs):
    for batch_idx, (data, targets) in enumerate(train_loader):
        # Get data to cuda if possible
        data = data.to(device=device).squeeze(1)
        targets = targets.to(device=device)

        # forward
        scores = model(data)
        loss = criterion(scores, targets)

        # backward
        optimizer.zero_grad()
        loss.backward()

        # gradient descent or adam step
        optimizer.step()
You can also try this code with Online Python Compiler
In the above code, the model is trained where the value of num_epochs is 4, so the number of passes will be 4. Now both forward and backward reading is done as Bi-LSTM works for the backward and forward input both.
Checking Accuracy
Here comes the first main part of the implementation, which is to find the accuracy of the model on the given dataset. So here is the given function below to train the model:
Code:
Python
Python
def check_accuracy(loader, model):
    if loader.dataset.train:
        print("Checking accuracy on the training data")
    else:
        print("Checking accuracy on the test data")

    num_correct = 0
    num_samples = 0
    model.eval()

    with torch.no_grad():
        for x, y in loader:
            x = x.to(device=device).squeeze(1)
            y = y.to(device=device)

            scores = model(x)
            _, predictions = scores.max(1)
            num_correct += (predictions == y).sum()
            num_samples += predictions.size(0)


        print(f"Correct examples / total examples = {num_correct} / {num_samples} with accuracy \{float(num_correct)/float(num_samples)*100:.2f}")

    model.train()

check_accuracy(train_loader, model)
check_accuracy(test_loader, model)
You can also try this code with Online Python Compiler
In the above code, the accuracy function is created, and the function check_accuracy() is called with the arguments as train_loader and test_loader along with the model.
Execution of Code
Here, the implementation of Bi-LSTM in Pytorch is completed; the code can be executed using the below command:
Code
Python Command
Python Command
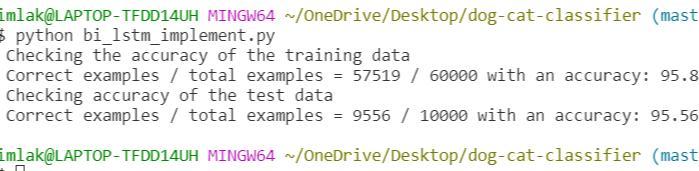
python bi_lstm_implement.py
You can also try this code with Online Python Compiler
In the above output, the accuracy for training and testing the data is printed as 95.8% and 95.56%.
Difference between LSTM and Bi-LSTM
In this section of the article “LSTMs and Bi-LSTM in PyTorch”, we will discuss the difference between LSTM and Bi-LSTM. Here is the table below to show the difference:
Basis
LSTM
Bi-LSTM
Definition
It is an advanced version (or an extension) of recurrent neural networks (RNNs) that was designed to model chronological sequences.
These are the extension of the traditional LSTM that is basically used to improve the model performance.
Applications
There are several applications, such as Robot Control, Speech Recognition, Music Composition, and handwriting recognition.
There are different real-life applications of Bi-LSTM, which are sequence classification, speech recognition, and forecasting models.
Resources and Time
It requires more resources and time to get trained on the dataset.
It requires less resources and time to get trained on the dataset.
Directions of Input
It can only take inputs in the forward direction.
It can take the inputs in both directions (forward and backward).
Model Performance
It improves the model performance but is slower than Bi-LSTM.
It improves the model performance of LSTM models (better than LSTM does).
Frequently Asked Questions
What is Deep Sequence Modelling?
Deep Sequence Models are the type of models where the information at different timestamps can be used in stock prediction, medical diagnostics, climate change, and autonomous driving.
In which IDEs Pytorch can be used?
There are various IDEs (Integrated Development Environments) where you can do the implementation, such as Microsoft Visual Studio Code, Sublime Text, Pycharm, Jupyter Notebook, and Notepad.
Why to use the Pytorch library?
Pytorch provides good flexibility and high speeds for deep neural networks and can be very beneficial in applications such as image classification, object detection, and generative tasks.
Why LSTM is better than RNN?
In RNN, the longer sequence is challenging where LSTM can be used. Using LSTM, the vanishing gradient problem does not create, whereas RNN can create.
Conclusion
Both LSTM and Bi-LSTM are used for deep sequential modeling where Bi-LSTM is an extension of LSTM which increases the performance of the LSTM model. In the article “LSTMs and Bi-LSTM in PyTorch”, we discussed what is LSTM with its structure and applications. Then we discussed what is Bi-LSTM with its structure and its advantages over LSTM. Lastly, the implementation of LSTM in PyTorch is done.
Here are more articles that are recommended to read:


 9+ registered

