


Introduction
This blog will discuss materials and textures and the differences between materials and textures. Further, we will learn how to add texture.
Materials can be assigned to different regions of meshes. Materials are data blocks that are transferred to one or more objects. Textures are applied to materials to give them more complex hues and effects. An item is coated in a material that may have several textures. Materials and textures are nearly as significant as shapes in 3D graphics. If all of the components in a scene were grey, it would be monotonous.
Materials in Blender
Meshes, curves, volumes, and other things have their appearance controlled by materials. They specify the object's material, color, texture, and how light interacts with it.
The Principled BSDF, Principled Hair and Principled Volume shaders may be used to generate physically based materials. A vast range of materials, including plastic, glass, metal, fabric, skin, hair, smoke, and fire, may be generated with these super shaders. A flexible shading node system sets up textures and develops various materials, such as toon shading.
Getting started with Materials
Material properties or the Shader Editor can be used to build materials. These show the same shader nodes and material settings in a different way. To examine how the material interacts with objects and lights in the scene, the default Shading workspace includes a Shader Editor and a 3D Viewport that can be set to Material Preview or Rendered shading. Texture Paint Mode can be used to create image textures from scratch, or we can use the Image Texture node to load in existing images. There are also several procedural texture nodes to choose from the listed.
Components of Materials
1. Surface Shader
The surface shader controls how light interacts with the mesh's surface. Incoming light is reflected, refracted into the mesh, or absorbed, according to one or more BSDFs. Emission is how light is emitted from a surface, allowing any surface to function as a light source.
2. Volume Shader
The volume shader defines the volume of the mesh's interior. A volume shader can be used alone or paired with a surface shader for foggy glass for materials like smoke and fire.
All volume shading components are combined into a single easy-to-use node with the Principled Volume shader. A single shader node, which contains scattering, absorption, and blackbody emission, can depict volumes like smoke and fire.
3. Displacement
Displacement can change the form of the surface and the volume within it.

Textures can then be applied to the mesh surface to be more detailed. Depending on the settings, the displacement may be virtual. Only the surface normals are modified to provide the sense of displacement (bump mapping) or a mix of natural and virtual displacement.
Textures in Blender
Materials in Blender are made up of picture textures. Many textures can be assigned to a single material, changing how it looks overall, and an object can also have multiple materials allocated to separate parts. The fundamental benefit of employing picture textures is the capacity to make a simple item (such as a geometric plane) appear more complicated (e.g., wood flooring). Textured models can be used in a variety of ways. Learning how to texture your models is a vital skill for 3D artists, whether they work in 3D animation, 3D video games, or 3D visual effects. Texturing sets your models apart if you want to show them off.
Textures are applied to materials to give them more complex hues and effects. An object is covered in a material that may have numerous textures, including a stone image texture, a texture to make the stone look rough, and a texture to make the stone flex in various ways.
Types of Textures
Procedural Textures
Mathematical formulas are used to generate textures in procedural texturing. This is useful because it can be used to create relatively nice-looking textures without the usage of external images, which can be finicky depending on where they are placed.
Following are the types of procedural textures:
- Ocean Texture
- Blend
- Clouds
- Distorted Noise
- Magic
- Marble
- Musgrav
- Noise
- Stucci
- Voronoi
- Wood
Volumetric Textures
A three-dimensional texture is one that is described in three dimensions. It can be made as a 3D procedural texture or as a "stack" of 2D bitmapped textures. When a volumetric texture object is cut in half, the texture is still drawn correctly on the interior. Following are the types of volumetric textures:
Voxel Data
Point Density Texture
Image or Movie
The word Image Texture simply refers to a graphic image made up of R, G, B, and sometimes Alpha values in a pixel grid. It is used as the texture's input source.
Video textures are a type of picture texture that is created from a movie file or a series of sequentially numbered independent images. They are applied in the same manner as picture textures.
Environment Maps
Material versus Texture
MATERIAL |
TEXTURE |
Material defines optical qualities. |
The texture is a pattern that breaks a material's homogeneous look. |
Material is the representation of actual material. |
It is an image mapped onto a 3-D object. |
|
A flexible shading node system sets up textures and generates various materials, such as toon shading.
|
Multiple textures can interact to create unique effects. |
Many materials include plastic, glass, metal, fabric, etc. |
An object is covered in a material that may have numerous textures, including stone image texture, a texture to make the stone look rough. |
Materials can be linked to objects and Object's data in the materials tab ‣ materials panel. |
Full details of using Image textures are on the Image Textures page. |
Adding Textures
The world around us is textured; most observable items have rough surfaces. As a result, a "texture" in computer graphics refers to how an object's surface appears, regardless of its shape. Blender makes it easier than ever to use picture textures. There are merely two items you'll need:
- Saved to your Computer is a Blender-compatible picture file.
- An object that will use the material that contains the texture.
Steps to add Textures
You'll need a texture file saved to your PC before we start adding textures in Blender. The file could be a PBR texture file or physically based rendering, which is the process of creating two-dimensional digital images that hold surface and color information and can be projected into a three-dimensional object. We can utilize any Blender-compatible format. We can find texture files on several websites.
1. Creating a new Material
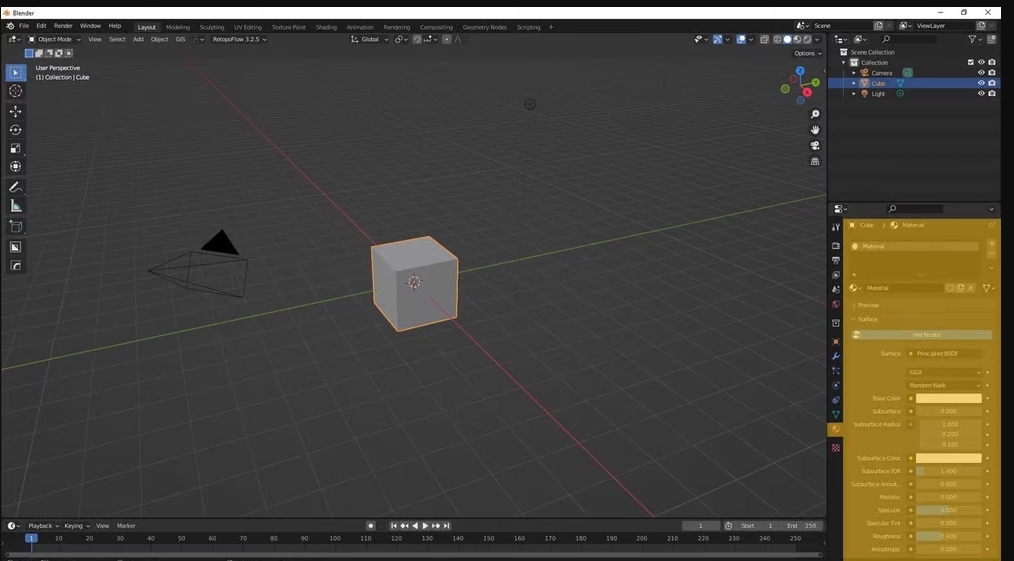
The Material Panel displays an object's materials, and you'll notice that it already has a default material named "Material."By double-clicking "Material" and inputting a more descriptive name (e.g., "cube"), you can rename the material. To add a new material slot, click the + button. You'll notice a new material symbol in the Material Panel with no name.
2. Importing Image Textures
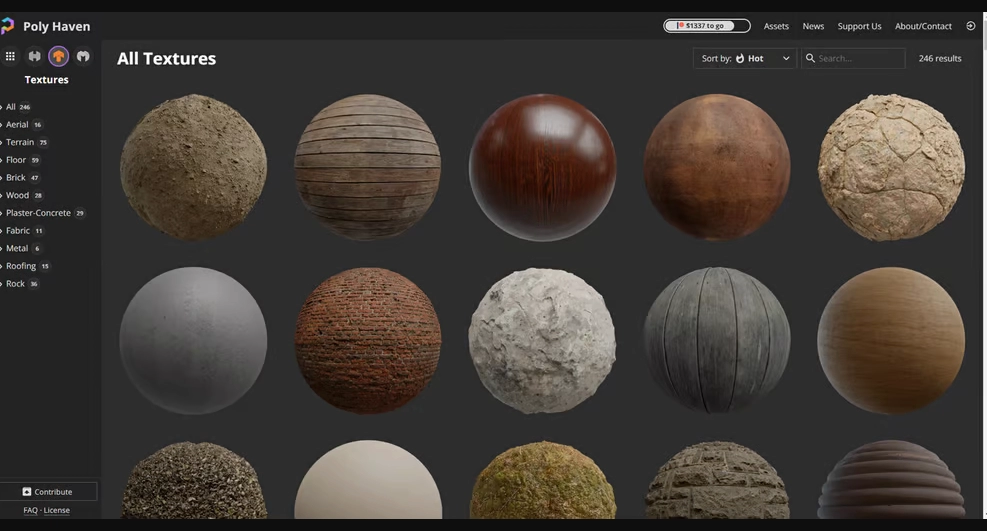
You must first download photos before using image textures in Blender. A variety of websites contain Textures. We can bring textures into the Blender after saving them. Using the Material Properties tab of the Properties editor, we'll import an image texture. You won't notice any modifications to your object right away. To observe the changes, go to Viewport Shading settings in the upper righthand corner of the 3D Viewport and alter the settings.
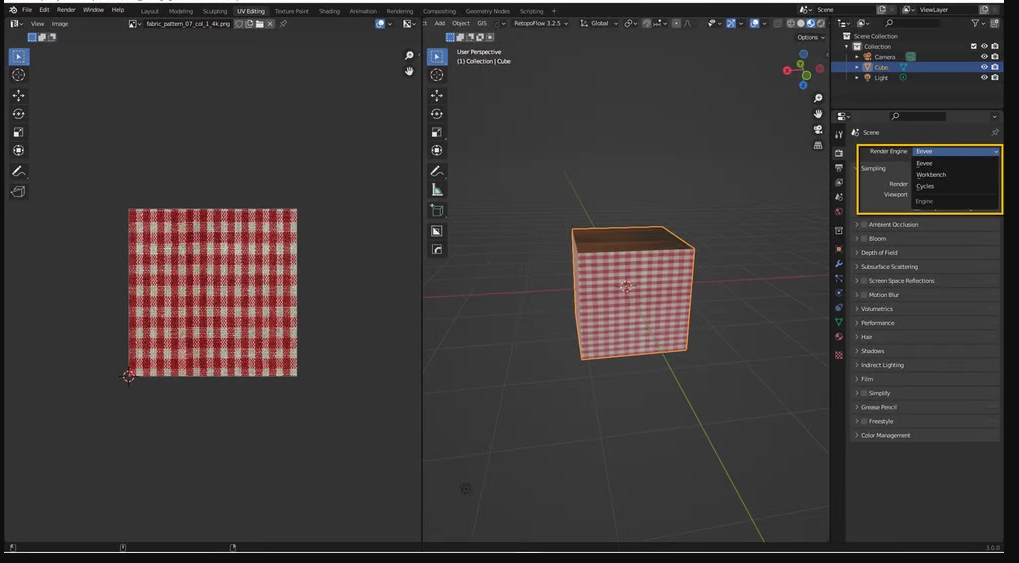
3. Unwrapping an Object
The object's image textures are now applied. After unwrapping an object, you can edit its UV in the UV Editing workspace. You may now see the unwrapped version of your item in the UV editor. By choosing the "Vertex Selection Mode" icons on the left side of the Header, just below the Top Bar, you can pick vertices, edges, faces, or UV islands. We can use UV editor's Toolbar to change whatever you've chosen. We scaled up the UV faces in the image above by pressing 'S' and moving the mouse until the stitches were the desired size.
4. Finishing touches
Now that the image textures are where you want them, it's time to render your textured cube. The rendering depicts the final appearance of our textured object. To generate, you must first choose an appropriate render engine. Hit the "F12" key to render your cube at the end

FAQs
What is Blender?
Blender is a free and open-source 3D modeling program. Modeling, rigging, animation, simulation, rendering, compositing, and motion tracking are all supported, as well as video editing and game production.
What are Materials in Blender?
Different materials can be assigned to other regions of meshes. Materials are data blocks that can be set to one or more objects.
What are Textures in Blender?
Textures are applied to materials to give them more complex hues and effects. An object is covered in a material that may have numerous textures, including a stone image texture, a texture to make the stone look rough, and a texture to make the stone flex in various ways.
Conclusion
This article briefly discussed Textures and Materials, and we have examined the differences between them and the steps to add Textures.
I hope you must have gained some insight into this topic of Textures and Materials, and by now, you must have developed a clear understanding of them. You can learn more about such topics on our platform Coding Ninjas Studio.
Must read: Passion for AR & VR leads to Snake Snack Game
You can refer to our guided paths on Coding Ninjas Studio to learn more about DSA, Competitive Programming, JavaScript, System Design, SQL problems, etc. Enroll in our courses and refer to the mock test and problems available, interview puzzles, look at the interview experiences, and interview bundles for placement preparations.
Thank you for reading.


 9+ registered

