Do you think IIT Guwahati certified course can help you in your career?
Introduction
Maven is a build automation tool mainly used for Java projects. It is managed by Apache Software Foundation and can execute tasks in different languages, including C#, Scala, Ruby etc. To support maven, we have several plugins available. These plugins are used to create jar files, war files, unit testing, code compilation etc. Each plugin generally provides a set of goals and is defined in the 'pom.xml' file.
In this blog, we will explore the maven jar plugin. We will discuss the 'pom.xml' file along with a sample project to understand how the maven jar plugin works.
Maven Jar Plugin
The maven jar plugin helps build the jar files. If our project is defined as a jar file, then maven will implicitly call it, and we don't have to explain it inside the 'pom.xml' file. We can define this plugin inside the pom file to have more control over the build. This plugin has two goals: jar and test-jar. The jar goal will allow the package into the main class as a jar file, and the test jar goal will enable the test to package as a jar file.
Sample Project
Let's discuss a sample project to understand the maven jar plugin. We will create an executable jar file using the maven jar plugin. The project will be simple to understand and print a String on the console. Follow the steps below:
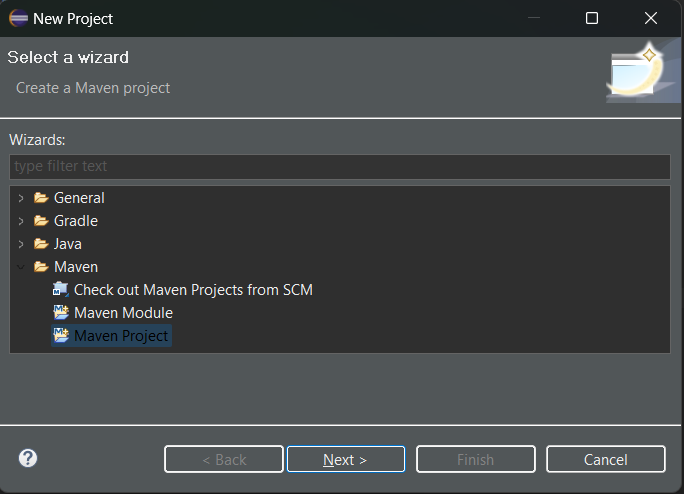
✨ Step 1: Open eclipse IDE, right-click on the project panel, and select New -> Project.
✨ Step 2: A New Project dialogue box will open, select the Maven Project option and click on next.
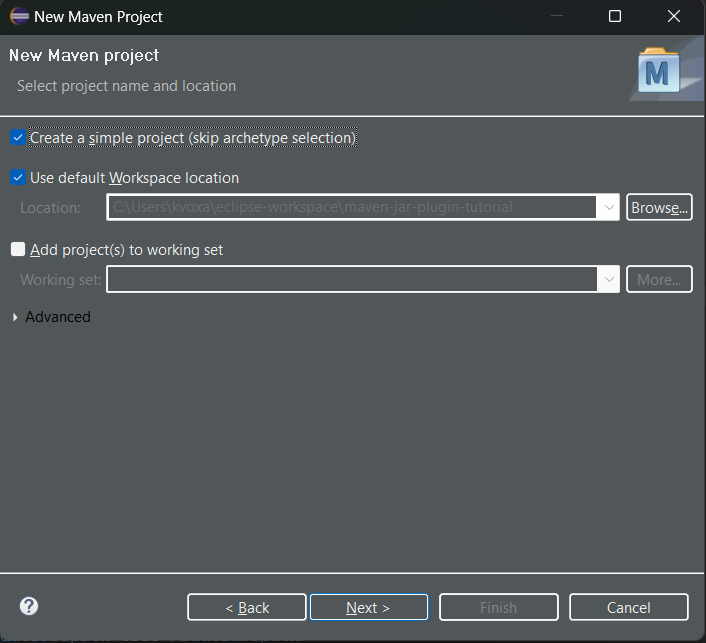
✨ Step 3: You can change your working directory at this stage. For simplicity, select the simple project option. Doing this will skip the archetype selection. Read FAQ for more details on the archetype.
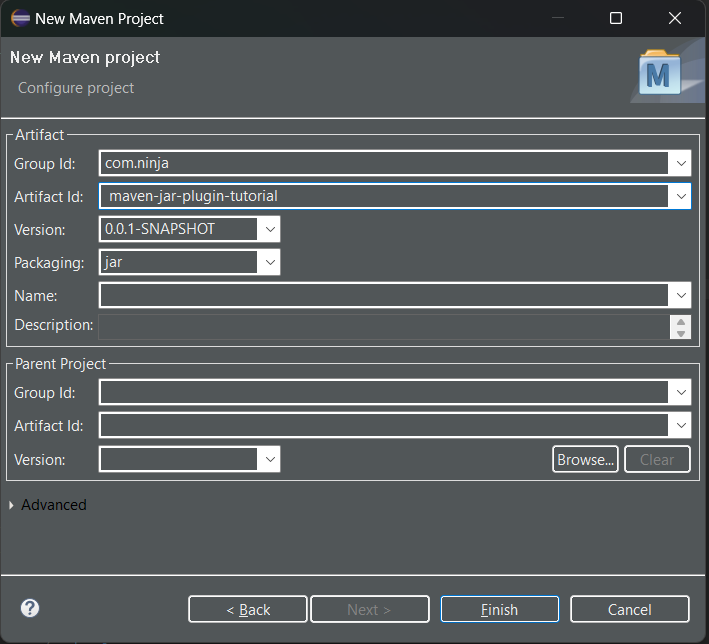
✨ Step 4: It's time to set the Group ID and Artifact ID. We have selected the Group ID as "com.ninja" and the Artifact ID as the "maven-jar-plugin-tutorial".
✨ Step 5: Click on Finish. The empty project structure is now built. We are now ready to edit the pom file and create the required java classes. You will have the basic pom file at this step.
✨ Step 6: Let's create a main entry class for our project and define a model class to represent data. Inside the src/main/java directory, create a new package and name it "com.codingninjas.model" inside the package, make the "Ninja.java" class. Follow similar steps to create the "App.java" file inside the "com.ninja.app" package. The project structure should look identical to the image given below.
✨ Step 7: Put the following contents inside the “Ninja.java” and “App.java” files.
✅ Ninja.java File
package com.codingninjas.model;

public class Ninja {
	private int id;
	private String name;

	public int getId() {
		return id;
	}
	public void setId(int id) {
		this.id = id;
	}
	public String getName() {
		return name;
	}
	public void setName(String name) {
		this.name = name;
	}
}
You can also try this code with Online Java Compiler
✨ Step 8: We are all set with our java files. It's time to edit our "pom.xml" file. We will do it in three sub-steps.
💧 Step A: Define the packaging, name, url and properties using the xml tags. All these will be under the project tag. See the snippet below to have more clarity.
💧 Step B: Insert the dependencies.
💧 Step C: We will insert the "maven jar plugin" in this step. Set the Group ID and Artifact ID as shown in the image below.
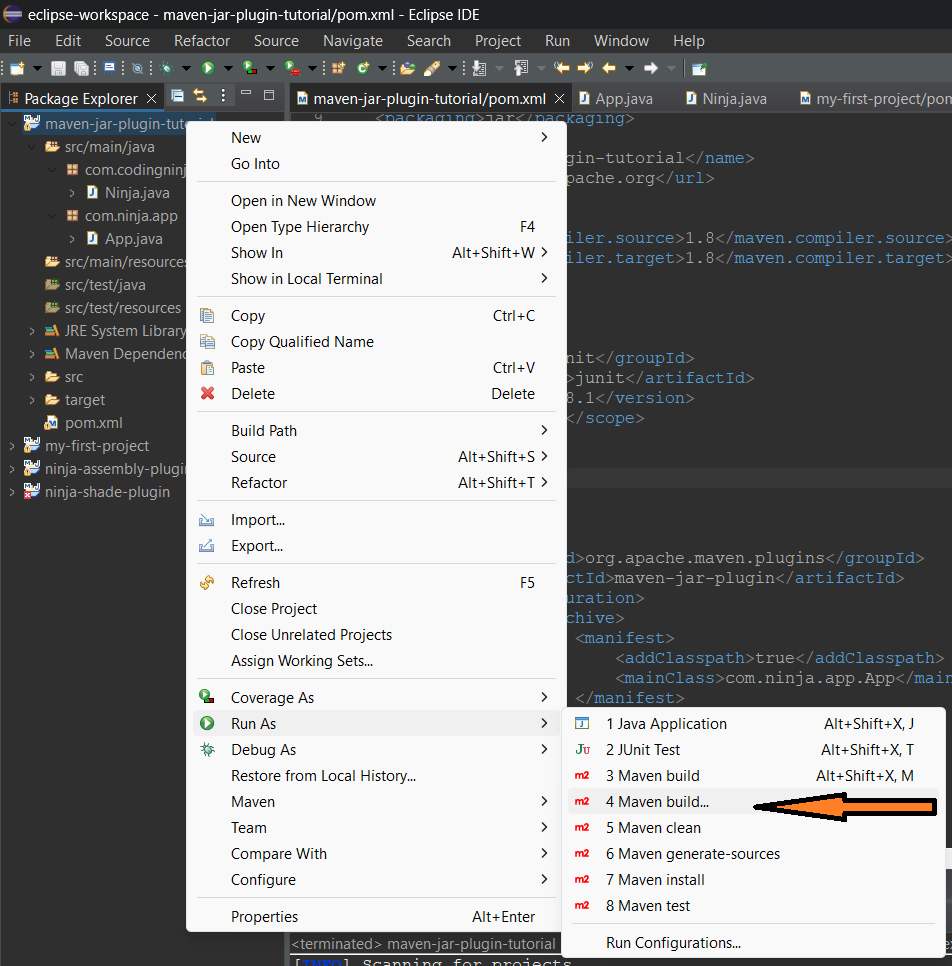
✨ Step 9: We are done with all the coding parts. Let's build the jar file now. Right-click on the project, select "Run As", and then "Maven build".
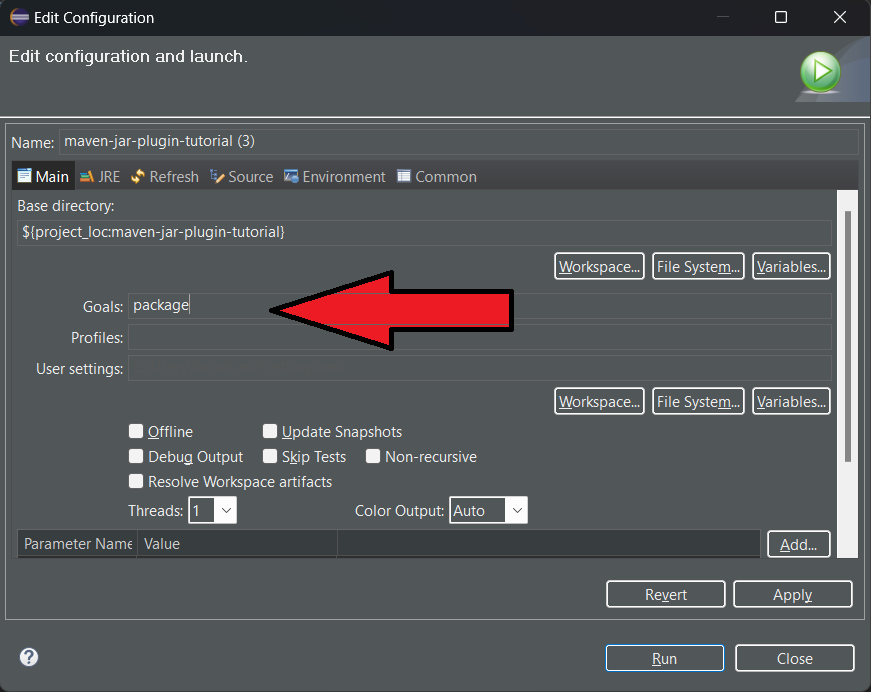
✨ Step 10: A new dialogue box opens named as "Edit Configuration" set the Goals as "package" and press the "Run" button.
✨ Step 11: The build process takes place, and if everything is correct, it will show the success message in the logs.
✨ Step 12: Now, if you go to the working directory, you can find the jar file. For the exact file path, see the build logs.
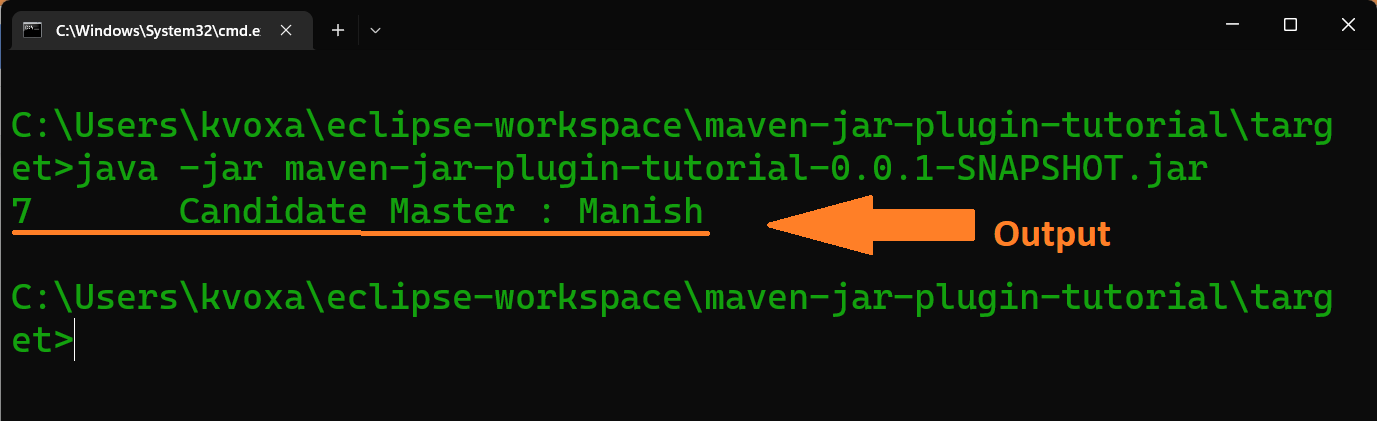
✨ Step 13: To run the jar file, open the command prompt at this location and type “java -jar filename” to run the file.
We have successfully built an executable jar file using the maven jar plugin. You can modify the discussed codes and settings and create your jar files.
It is a maven project templating toolkit. It gives the blueprint based on which other things of the same kind are made. These are packaged in jar files and contain the archetype metadata.
What are the Goals in maven build?
Goals are phase sequences responsible for a specific task. We can insert different goals and separate them with a space. In our example above, we used "package" as our goal to create the jar file. We can even use the "clean package" to erase any previous version and create a new one.
What are the Group ID and Artifact ID?
The group ID is the name of the company or individual who created the project. Usually, it is the company domain. The artifact id is the base package name used in the project.
Conclusion
We extensively discussed the maven jar plugin. We understood the working, purpose and goals of the maven jar plugin. We went through a sample project discussing the use of the jar plugin and saw the pom file to understand its working.
You can find more blogs on related topics on our platform: Coding Ninjas Studio.
To excel in the technical field, visit our platform Coding Ninjas Studio to learn more about JavaScript, DSA, Competitive Programming, System Design, etc. Enroll in our courses and refer to the mock test and problems available. To prepare for placements, follow our interview experiences and interview bundle curated especially for cracking technical jobs.
Happy Coding!
Live masterclass
Prompt Engineering: Must-have GenAI Skill for 30L+ Roles at Amazon
by Anubhav Sinha
16 Jul, 2026
12:30 PM
Using Netflix Data to Master Power BI
by Ashwin Goyal
13 Jul, 2026
12:30 PM
Top GenAI Skills to crack 30L+ CTC at Amazon & Google
by Sumit Shukla
14 Jul, 2026
11:30 AM
JioHotstar Sports Analytics using IPL Dataset
by Prerita Agarwal
15 Jul, 2026
12:30 PM
Prompt Engineering: Must-have GenAI Skill for 30L+ Roles at Amazon


 9+ registered

