Do you think IIT Guwahati certified course can help you in your career?
Introduction
NetBeans is an IDE (Integrated Development Environment) primarily for Java but also supports other programming languages like C++, JavaScript, PHP, etc. It consists of modules that help in Java development. Modules provide functionality to the IDE using well-defined functions.
Maven is a powerful tool project management and comprehension based on the POM (Project Object Model). It helps in the builds, dependencies, and documentation of a project. This article will teach you how to create and work with Java using Apache NetBeans based on the Maven build framework.
Maven and NetBeans
Maven is one of the critical features of NetBeans. It helps in project management because no plugins are needed to use Maven. Maven projects can be imported and opened.
In NetBeans IDE 6.7 and newer versions, the IDE includes Maven support. Whereas in the case of older versions, we need to install the Maven plugin from the Plugin Manager to open a project that uses Maven.
NetBeans can launch Maven builds, update Maven dependencies and run Maven goals.
For creating new Maven projects, pom.xml, NetBeans provides the wizards and automatically downloads the required dependencies and sources from the remote Maven repositories.
Based on pom.xml, NetBeans consequently manages the dependencies.
NetBeans also allows us to view the output of Maven commands inside its console and view the local repository and registered external Maven repository by providing a Maven Repository browser.
In the following example, we are using NetBeans 15, so there is in-built support for Maven.
Since you have learned the basics about Maven and Maven NetBeans, it is time to step up by learning how to build the Maven project on NetBeans.
Excited to learn how to build your first Maven project in NetBeans IDE?
Building the Maven NetBeans Project
Follow these steps to build the simple Java project:
Open your NetBeans IDE.
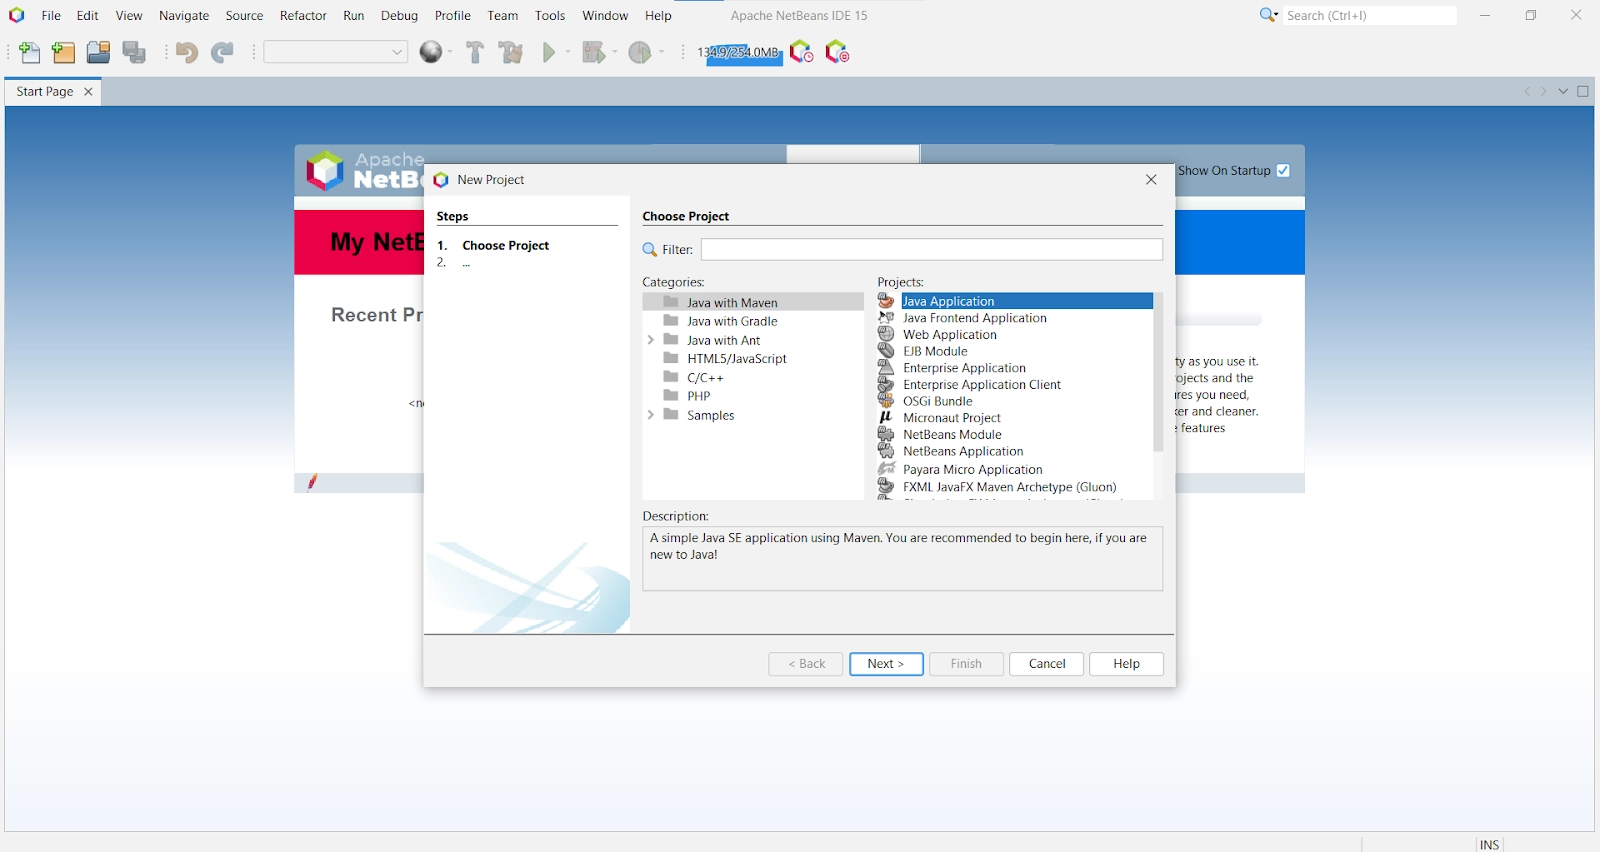
On the extreme top left corner of the panel, click on File → New Project.
Click on Java with Maven followed by Java Application (since we are making a Java project). Further on making specific changes, click Next.
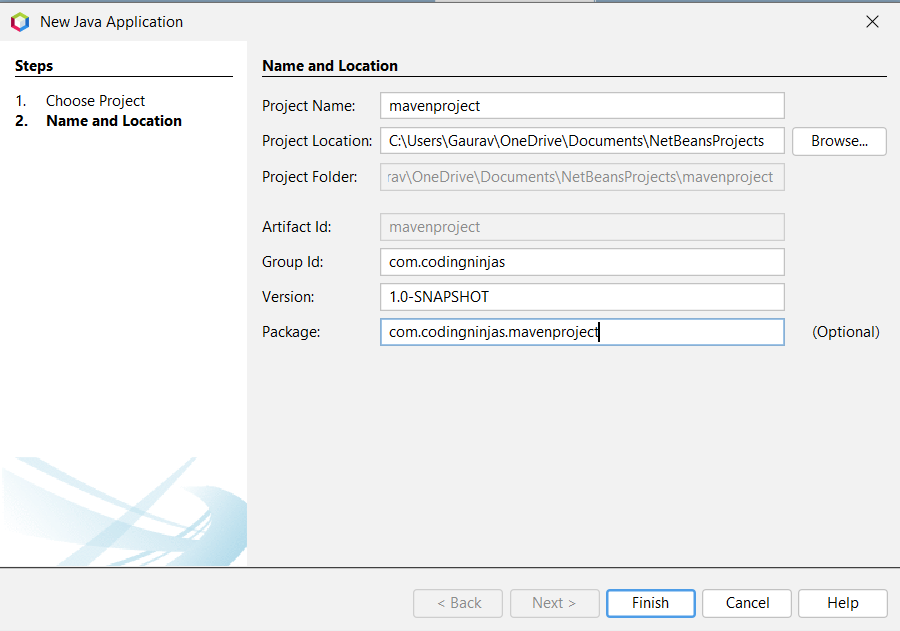
Choose the Project name, the location where you want to save the project, Group ID, Version, and Package (optional). After filling in all the sections, click Finish. Here,
Project Name - It is also the Artifact ID of the project, which is the project’s name.
Group ID - It creates the package for your project. It is the name of the company or organization in reverse order. Suppose you’re working on the website - abcdef.xyz of any company, then its group ID will be xyz.abcdef (reversed). Let it remain the default if you are not related to any company. Refer to Group Id to get in-depth knowledge.
Artifact ID - It gets automatically filled as we write the Project Name. Read more about it.
Version - This section comes pre-filled. The SNAPSHOT keyword shows that the project is in development mode. On completing the project, you may remove this SNAPSHOT keyword.
Package - This is optional. The package is by default, taken as the combination of the group id and the project name. In our case, it is com.codingninjas.mavenproject. Here, “com.codingninjas” is the Group ID, and “mavenproject” is the Project Name, as seen in the screenshot above.
After clicking on Finish, you’ll find that the Maven project is created in the left section with the name you kept (here, mavenproject). Yes, you did it. Created your first project (empty, though).
Also, you’ll find that specific Dependencies have been added. It is because of the Maven, but this dependencies section is empty for now.
On clicking the pom.xml option under Project Files, you’ll see that the pom.xml file contains all the properties set by you while creating the project. Now it’s time to work on your project.
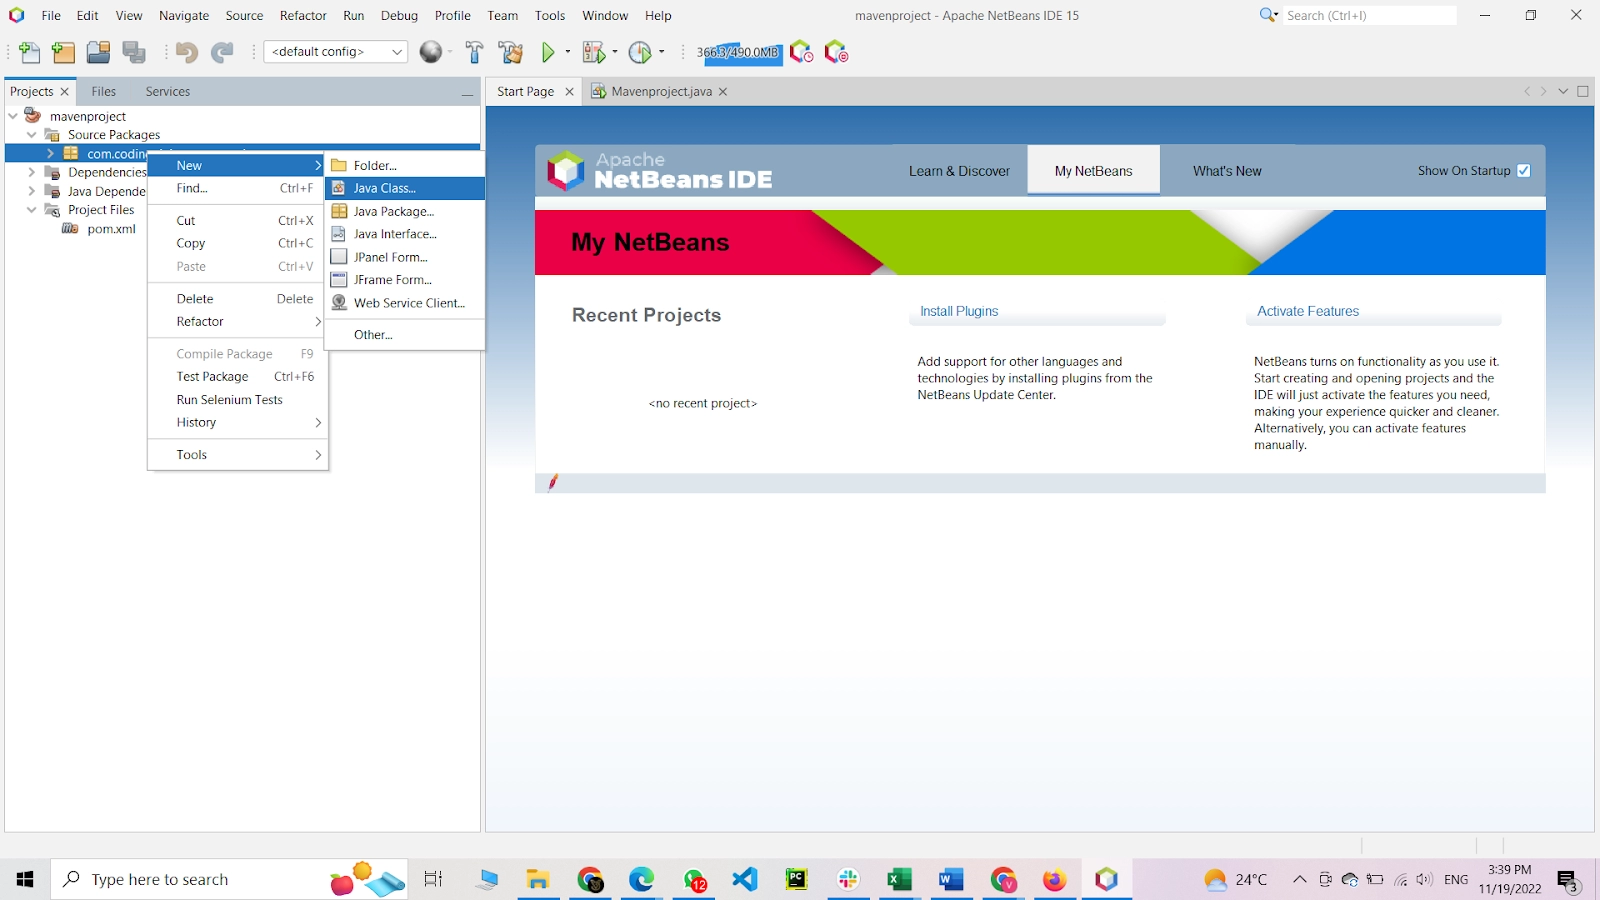
You’ll get a new MainClass build (in recent versions of NetBeans IDE). If the main class is not present, expand the Source Package. Right-click on the name of the package you created. Click New → Java Class as shown above.
Choose the Class Name you want to keep and can change the other settings accordingly (advised not to change the other sections if you just started learning using Maven NetBeans).
Click on Finish. It will create your class under Source Packages. As we are using NetBeans 15, the MainClass is pre-built. Therefore, we will work on the same for now and later will build a new class.
Create the project you wish to. Here, we are taking the example of the most straightforward program for printing something.
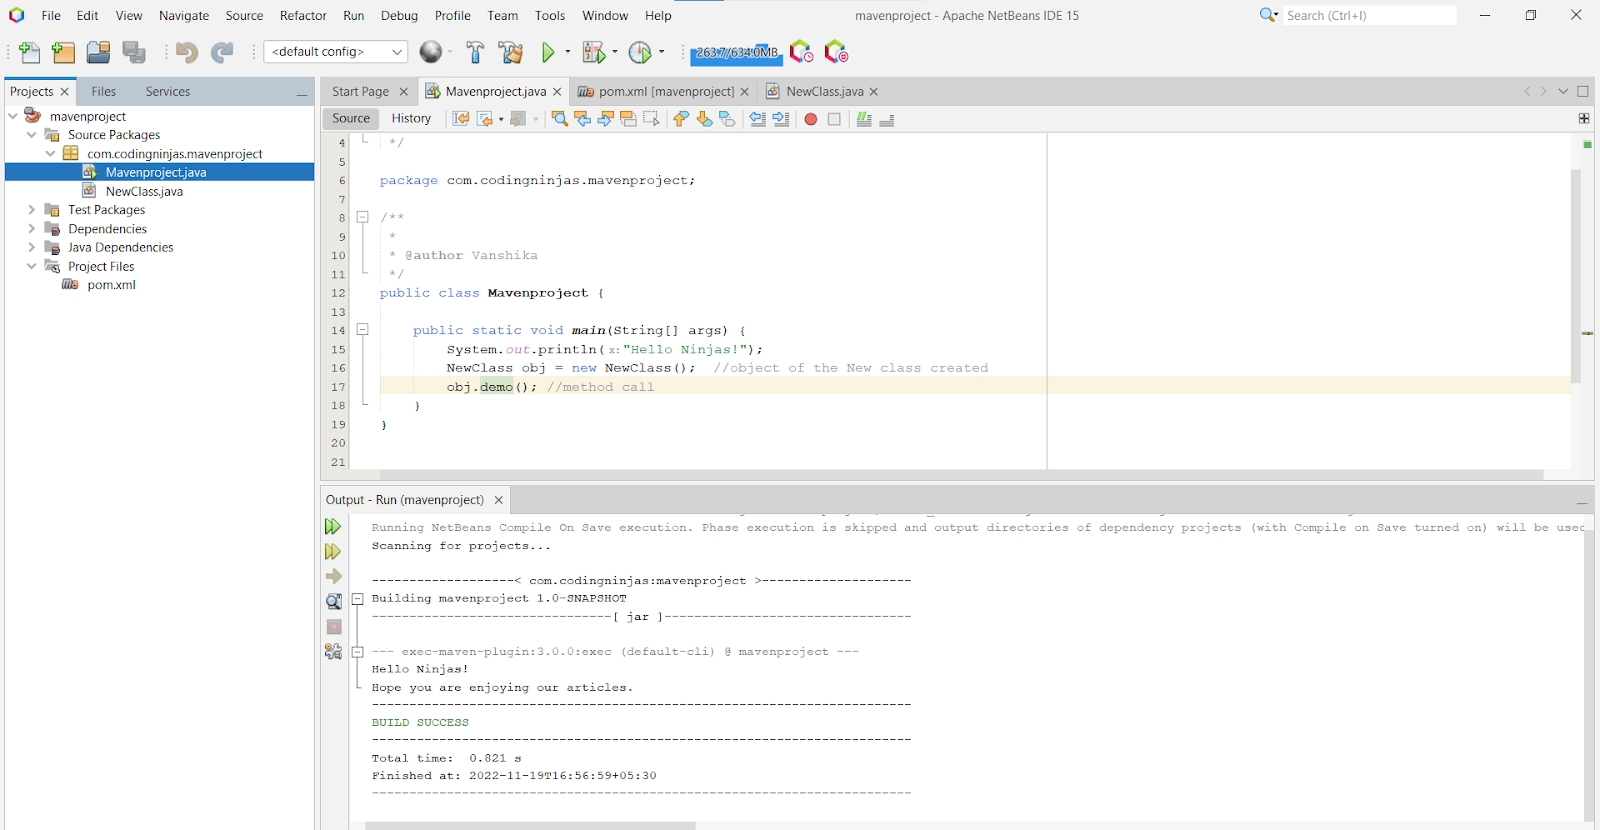
After writing the code, click on the save option (or Ctrl+Shift+S) and then click on Run (or F6).
It will take some time to run the program. You must have internet connectivity as it downloads the libraries and dependencies required. After downloading all the libraries, you’ll get the message BUILD SUCCESS in case there are no errors in the code. It shows that your project is working well.
Now we’ll create a new class using the same method mentioned above, Right-click on the Source Package→New→Java Class. Name your new Java class and click on Finish. It creates a new class named NewClass.
We’ll write some code per our needs and then call the methods from the Mavenproject class (main class). Save it.
Now we call this demo() method of NewClass from the Mavenproject class using obj as the object of the new class. Save and Run it.
If you expand everything in the Java Dependencies section, you’ll find many dependencies. Maven does this; it helps in building the builds and dependencies automatically.
Woohoo, you completed the creation of the whole project. It was just the simple one to show how to use Maven NetBeans.
Now that you have created the Maven project. If you wish to add to the existing Maven project, you must open it. Opt for the following method -
Opening a Maven NetBeans Project
The recently made mavenproject, can be opened in NetBeans by following the below mentioned steps.
Open NetBeans IDE.
Click on the File→Open Project.
Select the Maven project you want to open.
You will see that the specific project in NetBeans and Maven adds the dependencies to its build path.
The recently made mavenproject, can be opened in NetBeans by following the above steps.
Maven majorly helps with more significant projects. So, congratulations, Ninjas, you stepped up the first stair by creating this simple project; there are many more to step up. All the best.
How to install the plugin if the version of NetBeans is older?
In the case of Netbeans 6.5 and older versions, we need to install the plugins using the Plugin Manager to open a project that uses Maven. Using the Tools section of NetBeans IDE Plugin Manager can be opened.
Why use Maven?
Maven is a fully-fledged build management tool. It helps in making a project and adding JARs and other dependencies. It is beneficial for a project while updating the central repository of JARs and other dependencies. We can build output files without scripting.
What is POM, and why is it required?
POM (Project Object Model) files are the XML files. The pom.xml file is located under the Project Files node in the Projects window for all the Maven projects. It lists all the properties and modules of the parent project.
Is Maven NetBeans used only for Java projects?
No, NetBeans IDE supports many languages other than Java. If we create a new project in that module, it is evident that it makes web and enterprise applications.
Does NetBeans support Ant as well? How do Maven and Ant differ?
Like Maven, NetBeans supports Ant too. Maven and Ant are both the tools of Apache. The difference is that Ant is the build tool, and Maven is the build management tool. Maven is preferred more over Ant.
Conclusion
In this article, you learned the basics of Maven and Maven NetBeans. You know how to use the Maven tool in NetBeans IDE for creating projects. By following all the steps mentioned above, it seems easy to build a project.


 9+ registered

