Example on Moving Between Screens
We've already discussed quite a lot of theories now let's head toward an example discussing all the above methods. Now create a project with your desired name, if you want to learn how to create a project, read this article Basic App of React Native. Install all the navigation packages, you can use this official site as a reference.
In the previous article, React Navigation, we discussed an example with only two screens, and we used navigate() method to go to the screen. In this example, we will use all three methods to show their subtle behavior. We will use that same example, but here in the AboutScreen, we will create three buttons.
- Go to Home Screen: This button uses navigate() method to go to the home screen. Means there was a stack previously built it will destroy everything and takes us to the home screen.
- Go to About Screen Again: This button uses the push() method to add the new screen (here about screen) on the top of the previous screen.
- Go Back: This button uses the goBack() method to go to the previous screen from the stack.
App.js
Code:
import * as React from 'react';
import { Text, View, StyleSheet } from 'react-native';
import Constants from 'expo-constants';
import { createAppContainer } from "react-navigation";
import { createStackNavigator } from "react-navigation-stack";

import HomeScreen from './components/HomeScreen';
import AboutScreen from './components/AboutScreen';


export default class App extends React.Component {
  render() {
    return <AppContainer />;
  }
}

const AppNavigator = createStackNavigator({
  Home: {
    screen: HomeScreen
  },
  About: {
    screen: AboutScreen
  },
},{
  initialRouteName: "Home"

});

const AppContainer = createAppContainer(AppNavigator);

const styles = StyleSheet.create({
  container: {
    flex: 1,
    backgroundColor: '#fff',
    alignItems: 'center',
    justifyContent: 'center',
  },
});
HomeScreen.js
Code:
import React, { Component } from 'react';
import { Button, View, Text, StyleSheet } from 'react-native';
import { createStackNavigator, createAppContainer } from 'react-navigation';

export default class Homescreen extends Component {
  render() {
    return (
            <View style={styles.container}>
                <View
                  style={{
                    flex: 1,
                    justifyContent: "center",
                    alignItems: "center",
                  }}>
                  <Text style={styles.titleText}>Home Screen</Text>
                </View>
                <View style={styles.buttonContainer}>
                    <Button
                        onPress={() => this.props.navigation.navigate('About')}
                        title="Go To About Screen"
                        color="orange"
                    />
                </View>
                <View style={styles.bottomText}>
                  <Text>
                  <Text style={styles.bottomText1}>code</Text>
                  <Text style={styles.bottomText2}>studio</Text>
                  </Text>
                  <Text>Powered By</Text>
                  <Text style={styles.bottomText3}>Coding Ninjas</Text>
                </View>
            </View>
        );
  }
}

const styles = StyleSheet.create({
    container: {
        flex: 1,
        justifyContent: 'center',
        backgroundColor: 'teal'
    },
    buttonContainer: {
        flex: 1,
        margin: 30
    },
    titleText: {
      fontSize: 30,
      color: 'black',
      fontWeight: "bold"
  },
  bottomText: {
      marginBottom:30,
      textAlign: 'center',
      alignItems: "center",
    },
    bottomText1: {
      fontSize: 25,
      fontWeight: 'bold',
    },
    bottomText2: {
      fontSize: 25,
    },
    bottomText3: {
      fontWeight: 'bold',
      color: 'orange'
    }
})
AboutScreen.js
Code:
import React, { Component } from 'react';
import { Button, View, Text, StyleSheet, Image } from 'react-native';
import { createStackNavigator, createAppContainer } from 'react-navigation';

export default class Aboutscreen extends Component {

  render() {
    return (
     <View style={styles.container}>
                <View
                  style={{
                    flex: 1,
                    justifyContent: "center",
                    alignItems: "center",
                  }}>
                  <Text style={styles.titleText}>About Screen</Text>
                </View>
                <View style={styles.buttonContainer}>
                    <Button
                        onPress={() => this.props.navigation.navigate('Home')}
                        title="Go To Home Screen"
                        color="orange"
                    />
                </View>
                <View style={styles.buttonContainer}>
                    <Button
                        onPress={() => this.props.navigation.push('About')}
                        title="Go To About Screen Again"
                        color="orange"
                    />
                </View>
                <View style={styles.buttonContainer}>
                    <Button
                        onPress={() => this.props.navigation.goBack()}
                        title="Go Back"
                        color="orange"
                    />
                </View>
                <View style={styles.bottomText}>
                  <Text>
                  <Text style={styles.bottomText1}>code</Text>
                  <Text style={styles.bottomText2}>studio</Text>
                  </Text>
                  <Text>Powered By</Text>
                  <Text style={styles.bottomText3}>Coding Ninjas</Text>
                </View>
            </View>
        );
  }
}

const styles = StyleSheet.create({
    container: {
        flex: 1,
        justifyContent: 'center',
        backgroundColor: 'teal'
    },
    buttonContainer: {
        flex: 1,
        margin: 30
    },
    titleText: {
      fontSize: 30,
      color: 'black',
      fontWeight: "bold"
  },
  bottomText: {
      marginBottom:30,
      textAlign: 'center',
      alignItems: "center",
    },
    bottomText1: {
      fontSize: 25,
      fontWeight: 'bold',
    },
    bottomText2: {
      fontSize: 25,
    },
    bottomText3: {
      fontWeight: 'bold',
      color: 'orange'
    }
})
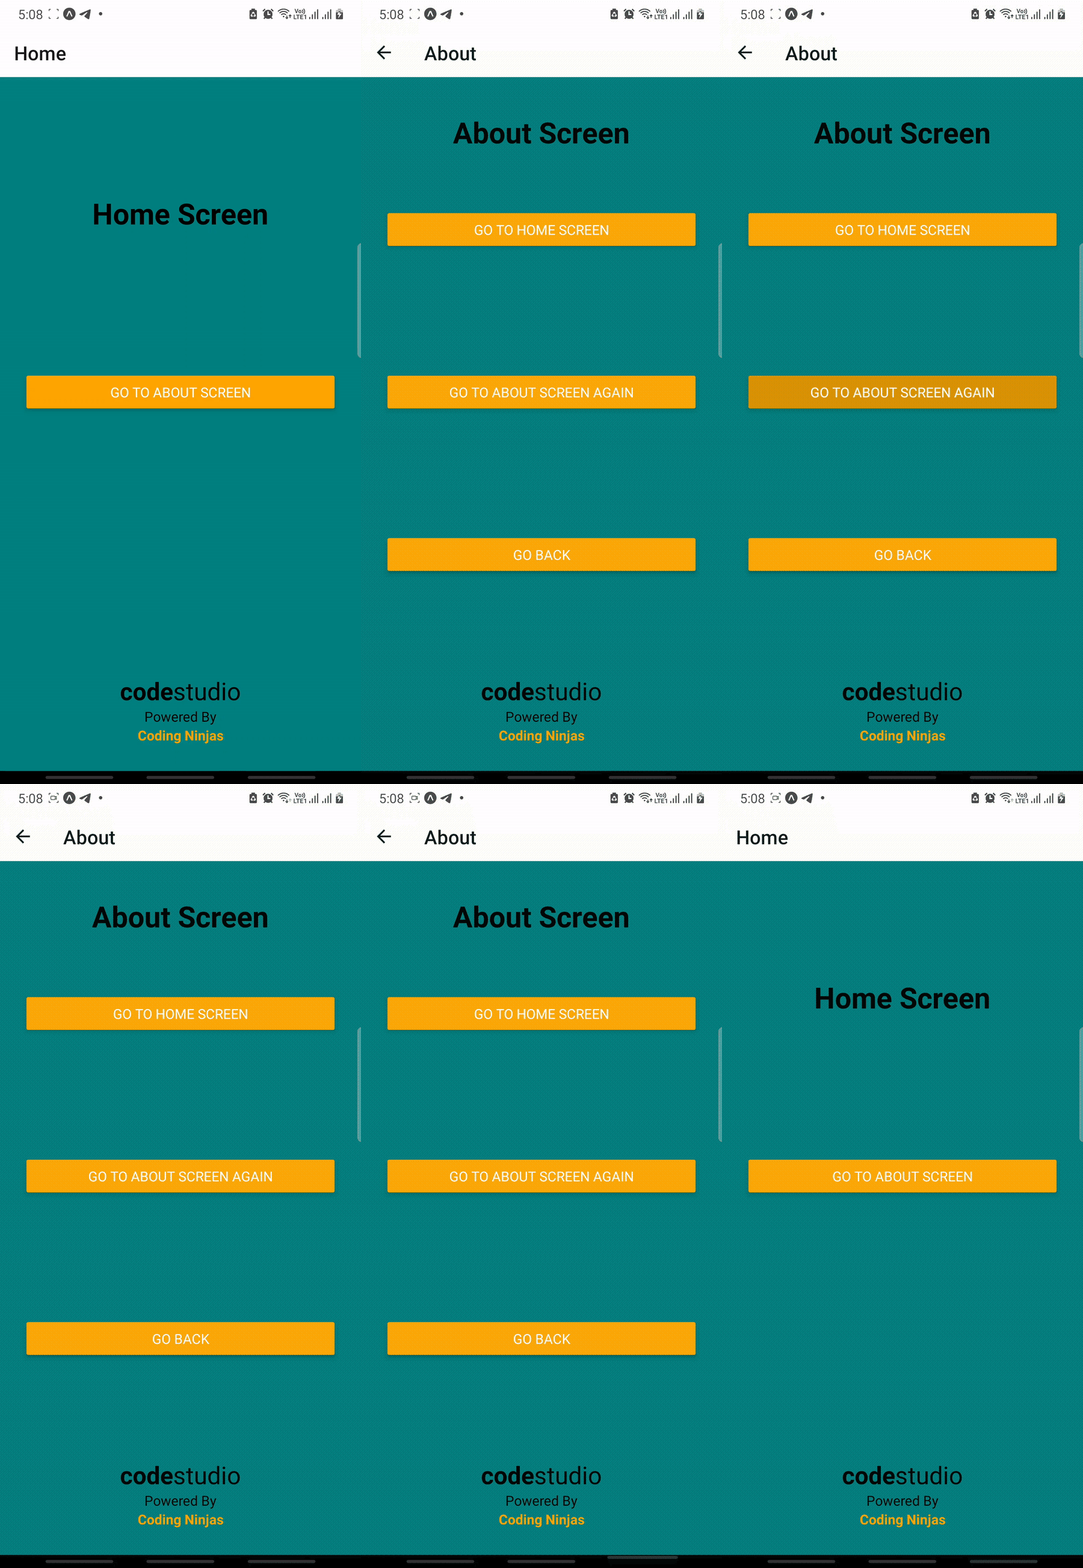
Explanation: Here, we have created the three buttons discussed above. In this example, we will show two outputs. In the first output, first, we will go to the about screen, then press the "Go to About Screen Again" three times and then we will come back to the home screen by using the back button of the phone by pressing it four times.
Output 1:

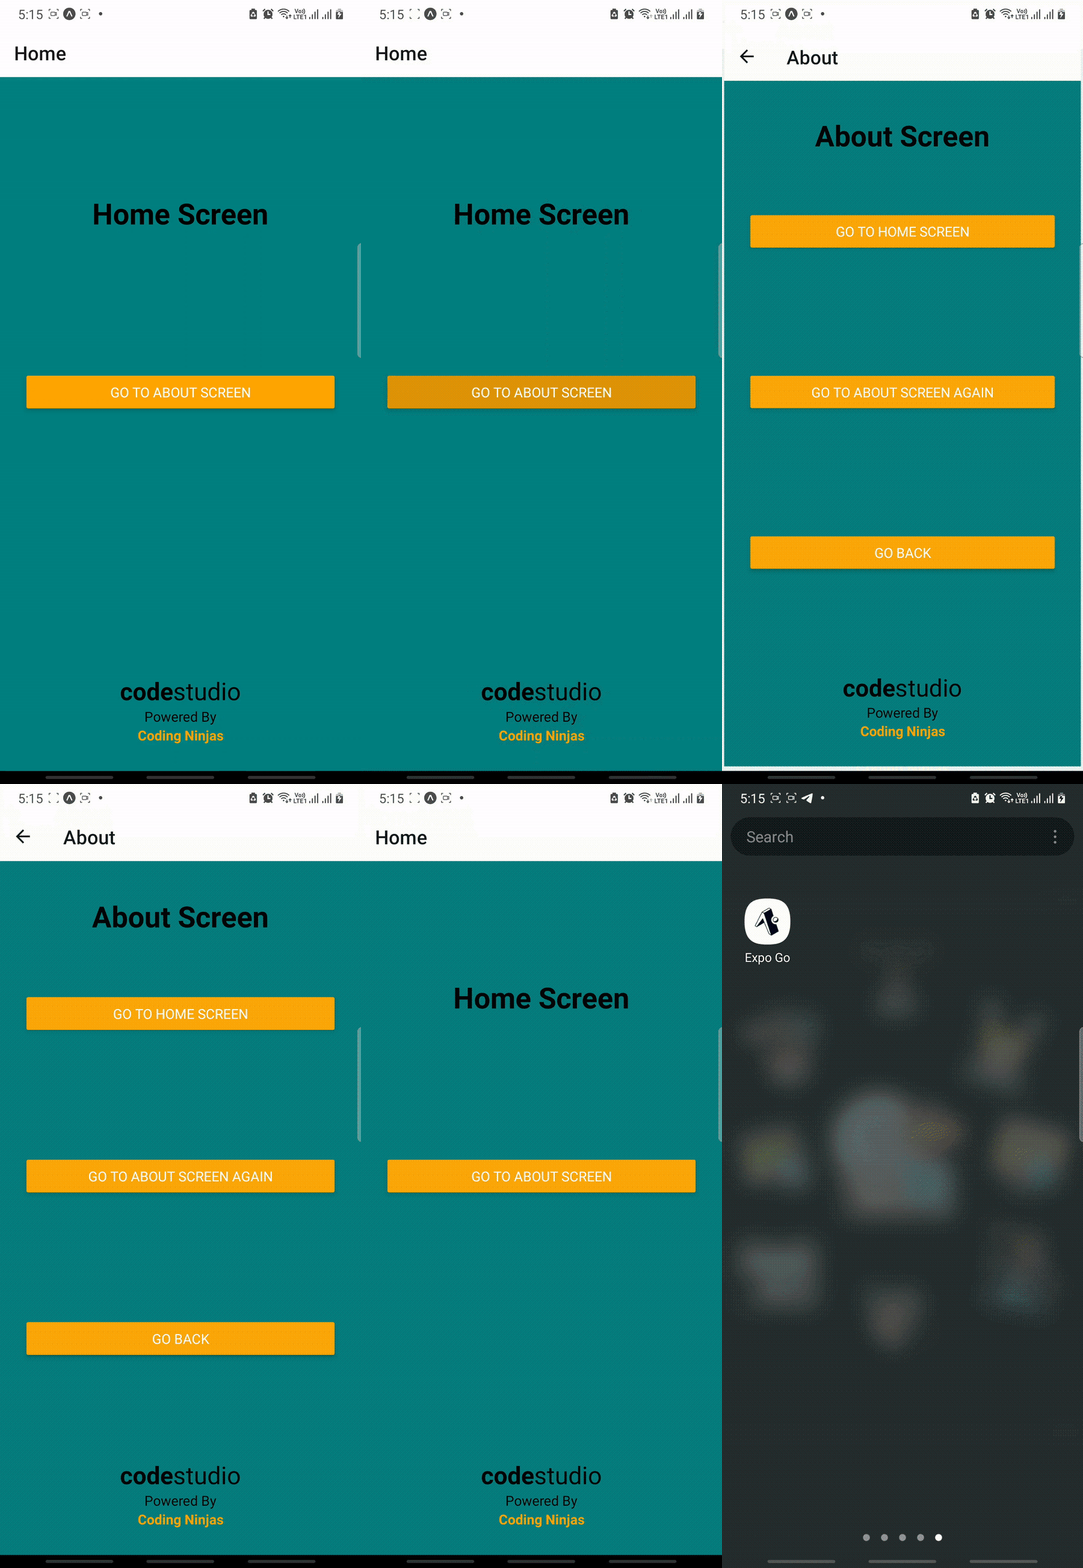
In the second output, first, we will go to the about the screen, then press the "Go to About Screen Again" button three times and then we will come back to the home screen again by pressing the "Go to Home Screen" button. After pressing this button, all the screens stored in the stack will get destroyed and the navigate() method takes us to the home screen.
Output 2:

Frequently Asked Questions
Is there any way to check the screens present in the stack?
If the screens are added to the other screen using the stack, any mobile app. Then the screen which you always see will be the top screen on the stack. By using the phone's back button, you can simply go through all the screens in the stack. It simply destroys the top screen.
What is the use of createStackNavigator?
It allows your app to transition between screens by stacking each new screen on the previous one. The stack navigation is set up to have the same appearance and feel as iOS and Android: fresh screens slide in from the right on iOS and fade in from the bottom on Android.
What is the use of createAppContainer?
In react-native, createAppContainer is a function that returns a React component that takes the React component created by createStackNavigator as a parameter and can be exported directly to be used as our App's root component from App.js.
Conclusion
In this article, we have extensively discussed the Moving Between Screens in React Native we discussed how the methods in the navigation package work and also one simple example to clear the concept.
We hope this blog has helped you enrich your knowledge regarding the Moving Between Screens. Do check out the awesome content on the Coding Ninjas Website. You can also consider our React Js Course to give your career an edge over others. Do not forget to upvote our blog to help other ninjas grow.
Happy Coding!


