


Introduction
In this blog, you will learn about the Navigation Drawer in Android development. We can achieve quick navigation between uncorrelated destinations with the help of navigation drawers. It can provide a lot of possible paths for the user to navigate to, therefore becoming a highly important UI component of our application. In the next section, we will begin by creating our first application with a Navigation Drawer.
Implementation
Creating a Navigation Drawer is a simple and straightforward process, especially when you have smart IDEs like Android Studio. Just follow the simple steps given in below to make your first application with a Navigation Drawer.
Creating an Android Studio Project
You need to first create an Android Studio project before actually creating your Android apps. To create a new project, open up Android Studio and press the New Project button, select Navigation Drawer Activity as the activity type and implementation language as Kotlin. Select a minimum SDK version as per your requirements.
Note: It is recommended to select Navigation Drawer Activity as the activity type because most of your work is done when you select this activity type.
Don't have Android Studio and environment already set up in your machine? No worries, we got you all covered. Refer to the blog Android Studio and Environment Setup on the Coding Ninjas Website to set up things for a smoother development process.
The Layouts
The layout folder is present under the subdirectory app/res. It contains the following set of files in it. Let us now discuss the contents of all these files in the subsequent section.

The activity_main.xml layout
This is the main layout of our application. In the code given below, notice that we make a reference to the @layout/app_bar_main in the include tag. Basically, this refers to the app_bar_main.xml layout, which is present in the same directory. Also, in this code, we make a reference to the @layout/nav_header_main and @menu/activity_main_drawer, which are discussed in the further sections of this blog.
Code:
<?xml version="1.0" encoding="utf-8"?>
<androidx.drawerlayout.widget.DrawerLayout
    xmlns:tools="http://schemas.android.com/tools"
    xmlns:android="http://schemas.android.com/apk/res/android"
    android:id="@+id/drawer_layout"
    xmlns:app="http://schemas.android.com/apk/res-auto"
    android:fitsSystemWindows="true"
    android:layout_width="match_parent"
    tools:openDrawer="start"
    android:layout_height="match_parent">

    <include
        android:id="@+id/app_bar_main"
        layout="@layout/app_bar_main"
        android:layout_width="match_parent"
        android:layout_height="match_parent" />

    <com.google.android.material.navigation.NavigationView
        android:id="@+id/nav_view"
        android:layout_width="wrap_content"
        android:layout_height="match_parent"
        android:layout_gravity="start"
        android:fitsSystemWindows="true"
        app:headerLayout="@layout/nav_header_main"
        app:menu="@menu/activity_main_drawer" />
</androidx.drawerlayout.widget.DrawerLayout>
The app_bar_main.xml layout
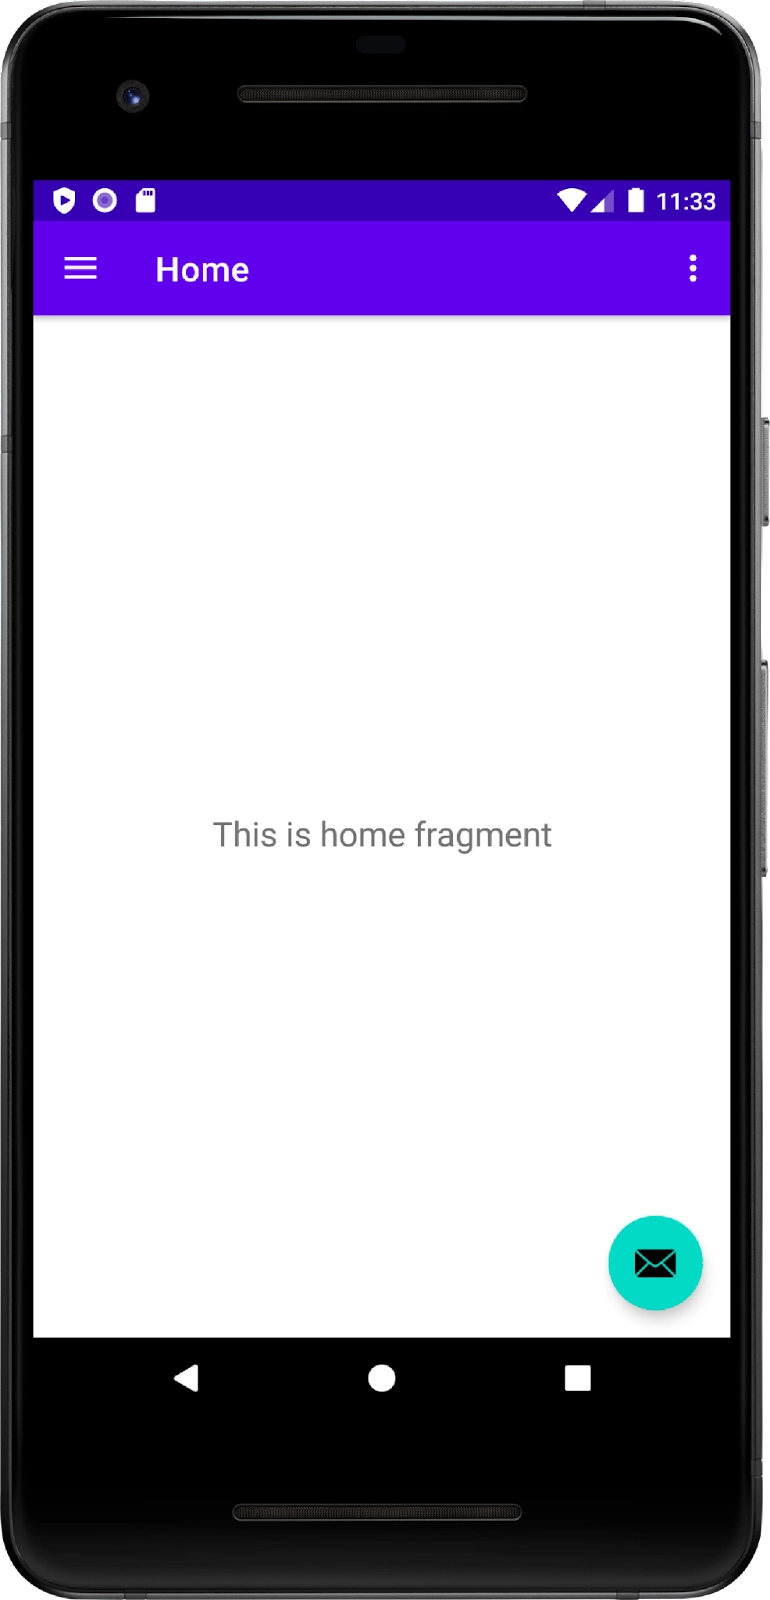
This layout is responsible for rendering the app bar of the application. There are three major components in this file. The first one is the AppBarLayout, the second is the include tag which includes the content_main.xml file and the third one is the FloatingActionButton. The code for this file is as follows.
Code:
<?xml version="1.0" encoding="utf-8"?>
<androidx.coordinatorlayout.widget.CoordinatorLayout
    xmlns:tools="http://schemas.android.com/tools"
    xmlns:android="http://schemas.android.com/apk/res/android"
    android:layout_width="match_parent"
    xmlns:app="http://schemas.android.com/apk/res-auto"
    tools:context=".MainActivity"
    android:layout_height="match_parent">

    <com.google.android.material.appbar.AppBarLayout
        android:layout_width="match_parent"
        android:layout_height="wrap_content"
        android:theme="@style/Theme.NavigationDrawerKotlin.AppBarOverlay">

        <androidx.appcompat.widget.Toolbar
            android:id="@+id/toolbar"
            android:layout_width="match_parent"
            android:layout_height="?attr/actionBarSize"
            android:background="?attr/colorPrimary"
            app:popupTheme="@style/Theme.NavigationDrawerKotlin.PopupOverlay" />

    </com.google.android.material.appbar.AppBarLayout>

    <include layout="@layout/content_main" />

    <com.google.android.material.floatingactionbutton.FloatingActionButton
        android:id="@+id/fab"
        android:layout_width="wrap_content"
        android:layout_height="wrap_content"
        android:layout_gravity="bottom|end"
        android:layout_marginEnd="@dimen/fab_margin"
        android:layout_marginBottom="16dp"
        app:srcCompat="@android:drawable/ic_dialog_email" />

</androidx.coordinatorlayout.widget.CoordinatorLayout>
The design for this file looks as follows:

The nav_header_main.xml layout
This file contains three views stacked one below the other. The first is an ImageView and which is followed by two TextViews. You can customize your app by changing the image inside the ImageView and also the text inside the two TextViews.
Code:
<?xml version="1.0" encoding="utf-8"?>
<LinearLayout
    android:background="@drawable/side_nav_bar"
    xmlns:android="http://schemas.android.com/apk/res/android"
    android:orientation="vertical"
    xmlns:app="http://schemas.android.com/apk/res-auto"
    android:gravity="bottom"
    android:layout_width="match_parent"
    android:layout_height="@dimen/nav_header_height"
    android:paddingLeft="@dimen/activity_horizontal_margin"
    android:paddingTop="@dimen/activity_vertical_margin"
    android:paddingRight="@dimen/activity_horizontal_margin"
    android:paddingBottom="@dimen/activity_vertical_margin"
    android:theme="@style/ThemeOverlay.AppCompat.Dark">

    <ImageView
        android:id="@+id/imageView"
        android:layout_width="wrap_content"
        android:layout_height="wrap_content"
        android:contentDescription="@string/nav_header_desc"
        android:paddingTop="@dimen/nav_header_vertical_spacing"
        app:srcCompat="@mipmap/ic_launcher_round" />

    <TextView
        android:layout_width="match_parent"
        android:layout_height="wrap_content"
        android:paddingTop="@dimen/nav_header_vertical_spacing"
        android:text="@string/nav_header_title"
        android:textAppearance="@style/TextAppearance.AppCompat.Body1" />

    <TextView
        android:id="@+id/textView"
        android:layout_width="wrap_content"
        android:layout_height="wrap_content"
        android:text="@string/nav_header_subtitle" />
</LinearLayout>
The design for this file looks as follows:

The content_main.xml file
This file contains a fragment tag. The id for the fragment is defined as nav_host_fragment_content_main. Additionally, properties like layout_width, layout_height, defaultNavHost, navGraph are also assigned some values. The code for this file looks as follows:
Code:
<?xml version="1.0" encoding="utf-8"?>
<androidx.constraintlayout.widget.ConstraintLayout
    android:layout_width="match_parent"
    android:layout_height="match_parent"
    xmlns:tools="http://schemas.android.com/tools"
    app:layout_behavior="@string/appbar_scrolling_view_behavior"
    xmlns:android="http://schemas.android.com/apk/res/android"
    tools:showIn="@layout/app_bar_main"
    xmlns:app="http://schemas.android.com/apk/res-auto">

    <fragment
        android:id="@+id/nav_host_fragment_content_main"
        android:name="androidx.navigation.fragment.NavHostFragment"
        android:layout_width="match_parent"
        android:layout_height="match_parent"
        app:defaultNavHost="true"
        app:layout_constraintLeft_toLeftOf="parent"
        app:layout_constraintRight_toRightOf="parent"
        app:layout_constraintTop_toTopOf="parent"
        app:navGraph="@navigation/mobile_navigation" />
</androidx.constraintlayout.widget.ConstraintLayout>
The home fragment XML
There are three fragments present inside the res/layout directory. They are namely fragment_home.xml, fragment_slideshow.xml and fragment_gallery.xml. All of them contain a single TextView inside them. Refer to the blog Text View on the Coding Ninjas Website to know more about TextViews in Android. The code for the fragment_home.xml is given below. The other two files are also written in a similar fashion.
Code:
<?xml version="1.0" encoding="utf-8"?>
<androidx.constraintlayout.widget.ConstraintLayout
    android:layout_height="match_parent"
    android:layout_width="match_parent"
    xmlns:tools="http://schemas.android.com/tools"
    xmlns:android="http://schemas.android.com/apk/res/android"
    tools:context=".ui.home.HomeFragment"
    xmlns:app="http://schemas.android.com/apk/res-auto">

    <TextView
        android:id="@+id/text_home"
        android:layout_width="match_parent"
        android:layout_height="wrap_content"
        android:layout_marginStart="8dp"
        android:layout_marginTop="8dp"
        android:layout_marginEnd="8dp"
        android:textAlignment="center"
        android:textSize="20sp"
        app:layout_constraintBottom_toBottomOf="parent"
        app:layout_constraintEnd_toEndOf="parent"
        app:layout_constraintStart_toStartOf="parent"
        app:layout_constraintTop_toTopOf="parent" />
</androidx.constraintlayout.widget.ConstraintLayout>
The Main Activity Kotlin file
This is the main file that gets your application running. This file contains the onCreate method, one of the first methods that get called after running our application. You can add the logic to connect Navigation Drawer events in this file. The code for MainActivity.kt file is given as below.
Code:
package com.example.navigationdrawerkotlin

import android.os.Bundle
import android.view.Menu
import com.google.android.material.snackbar.Snackbar
import com.google.android.material.navigation.NavigationView
import androidx.navigation.findNavController
import androidx.navigation.ui.AppBarConfiguration
import androidx.navigation.ui.navigateUp
import androidx.navigation.ui.setupActionBarWithNavController
import androidx.navigation.ui.setupWithNavController
import androidx.drawerlayout.widget.DrawerLayout
import androidx.appcompat.app.AppCompatActivity
import com.example.navigationdrawerkotlin.databinding.ActivityMainBinding

class MainActivity : AppCompatActivity() {

    private lateinit var appBarConfiguration: AppBarConfiguration
    private lateinit var binding: ActivityMainBinding

    override fun onCreate(savedInstanceState: Bundle?) {
        super.onCreate(savedInstanceState)

        binding = ActivityMainBinding.inflate(layoutInflater)
        setContentView(binding.root)

        setSupportActionBar(binding.appBarMain.toolbar)

        binding.appBarMain.fab.setOnClickListener { view ->
            Snackbar.make(view, "Action", Snackbar.LENGTH_LONG)
                .setAction("Action", null).show()
        }
        val drawerLayout: DrawerLayout = binding.drawerLayout
        val navView: NavigationView = binding.navView
        val navController = findNavController(R.id.nav_host_fragment_content_main)

        appBarConfiguration = AppBarConfiguration(
            setOf(
                R.id.nav_home, R.id.nav_gallery, R.id.nav_slideshow
            ), drawerLayout
        )
        setupActionBarWithNavController(navController, appBarConfiguration)
        navView.setupWithNavController(navController)
    }

    override fun onCreateOptionsMenu(menu: Menu): Boolean {
        menuInflater.inflate(R.menu.main, menu)
        return true
    }

    override fun onSupportNavigateUp(): Boolean {
        val navController = findNavController(R.id.nav_host_fragment_content_main)
        return navController.navigateUp(appBarConfiguration) || super.onSupportNavigateUp()
    }
}


 8+ registered

