Do you think IIT Guwahati certified course can help you in your career?
Introduction
Postman is an API development platform for designing, building and testing API (Application Programming Interface). It can create different HTTP requests (GET, POST, PUT), save environments for later use, and convert the API to code for various languages (like JavaScript, Python).
Authorizing requests will allow verifying the identity of the client who is requesting access to the protected resources. The client can be a user (individual user) or another service (third-party service). This is done to ensure that the data is secure. There are many types of Authorization like No Auth, Bearer Token, AWS signature, OAuth 1.0, OAuth 2.0, etc.
In this article, we will discuss OAuth 1.0 authorization technique. We will discuss what OAuth 1.0 is and how to implement it using Postman.
What is OAuth?
OAuth is a mechanism that allows services to give authorization to each other on behalf of a user. Keep in mind that the authorization is done only after taking the user’s permission.
Many services talk to each other over the internet so, there have to be some rules or standards that should be followed by the services to understand each other. OAuth sets a flow that these specifications follow so that the services can communicate with each other.
The authorization process is done by sharing an Authorization Token between the services and the user. This Authorization Token contains the key to all the permissions granted by the user.
Still confused❓ Worry not! Let’s look at an example to understand the working of OAuth.
Example to understand OAuth
You must have used a website that converts a pdf document into a word document. The website allows you to select a file from your computer or Google Drive. Suppose, you select the option to select a file from Google Drive.
The website will now request Google Drive to access the file but it will be rejected by Google Drive. Why? Because it does not have permission. So, if we give permission then can the website access the file? Well, sure!
When the website requests Google Drive for a file, google drive will ask the user whether the website can access the file, once the user agrees to share the file, access will be granted to the website.
This communication between the services (Website and Google drive) is done with the help of OAuth.
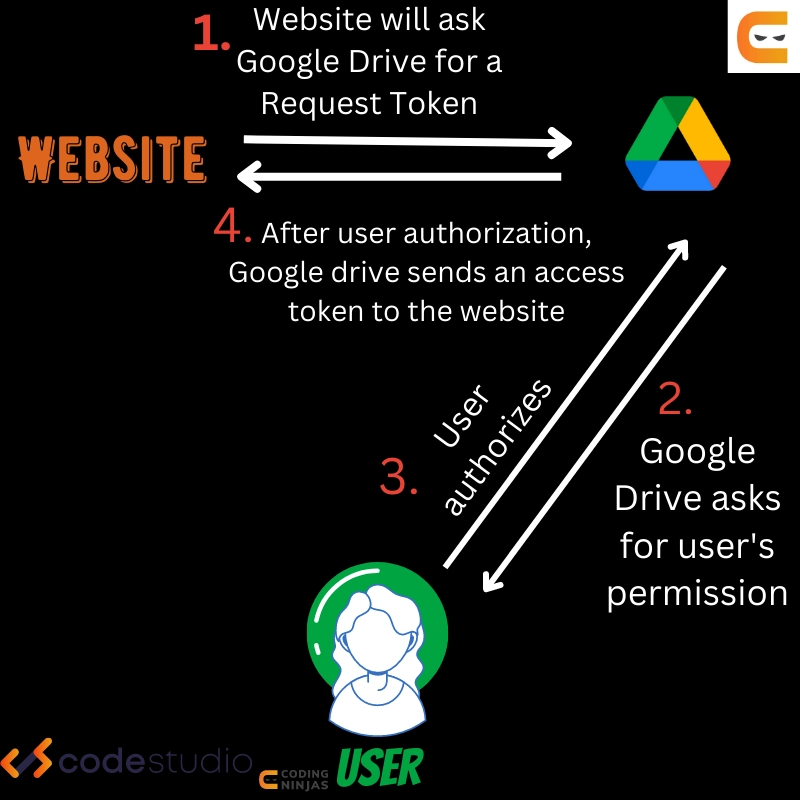
The flow of requests will be like this:
The website will contact Google Drive.
🔽
With OAuth implemented Google Drive will ask the user whether they want to give access to the files on the website. The user checks everything out and allows the access request.
🔽
Google Drive does not trust the website so it gives the website limited access and sends it an authorization key.
🔽
Everytime the website wants to access files from Google Drive it will send this authorization key to Google Drive and get the files.
With the help of OAuth, the two services are communicating with each other.
OAuth has two versions - OAuth 1.0 and OAuth 2.0. OAuth 1.0 is the initial version of OAuth. It is based on cryptographic programming and is more secure than OAuth2.0.
Now, that we have an understanding of OAuth. 🤩 Understanding what OAuth is and how it works will help you in implementing it. Let’s move on to learning how to use OAuth 1.0 in Postman. 🏁
How to use OAuth 1.0 in Postman?
We will demonstrate the use of OAuth by an example.
OAuth 1.0 is also called three-legged. It allows easy communication between two services and the user.
To demonstrate the example we will need two services and a user. You are the user. The first service is the Postman Application. What about the second service? For the second service, we will create an API using Twitter Authentication.
To create an API using Twitter Authentication, follow these steps:
1️⃣ Go to Twitter Authentication.
2️⃣ Sign in to your Twitter account. If you do not have one, create a new Twitter account.
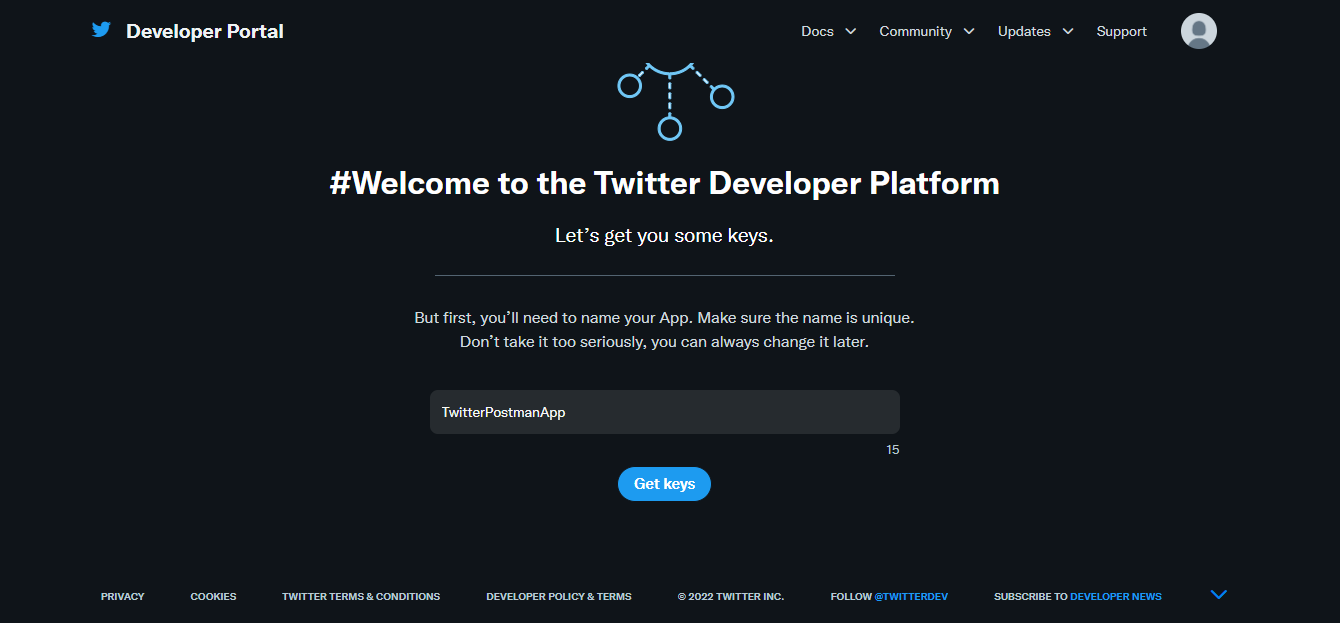
3️⃣ Switch to Developer Portal from the top right. Continue with your Twitter account.
4️⃣ A new page will appear which will look like the image below. Enter the name you want to give to your application. We have named it “TwitterPostmanApp”.
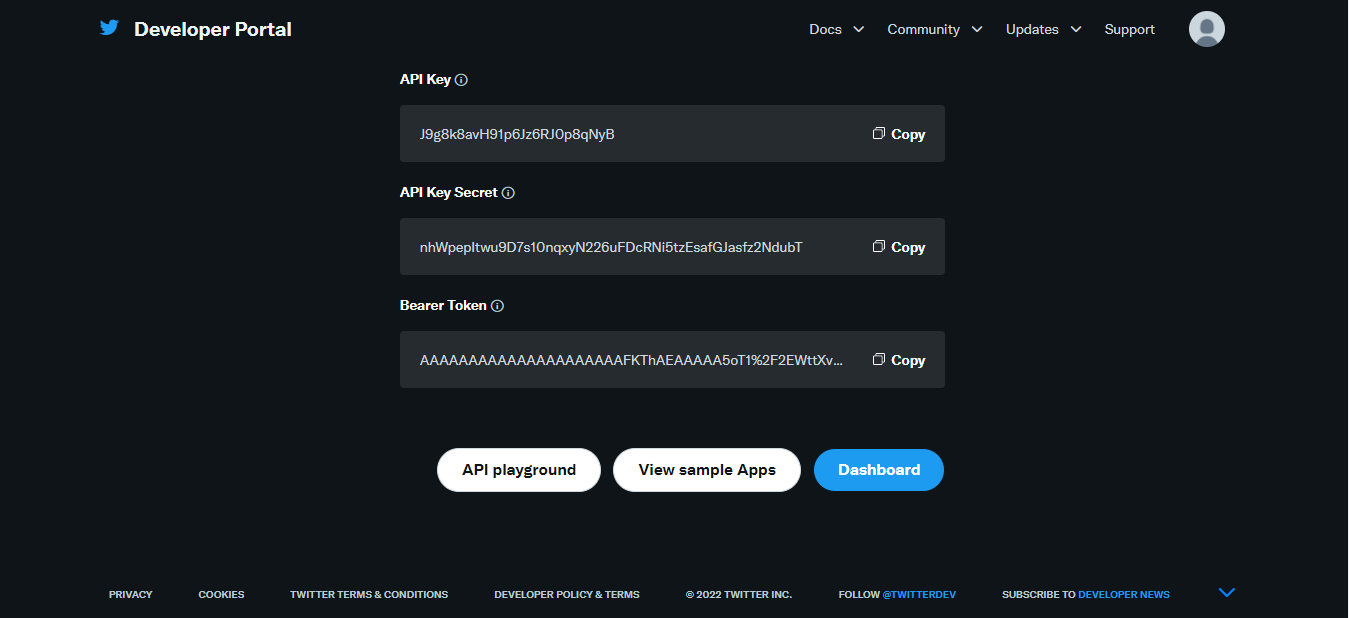
5️⃣ Avail the Keys for authorization by clicking on Get Keys. A new screen will appear which is shown by the below image.
Note: Save the API key, API Secret and the Bearer token.
There are three steps to complete Authorization using OAuth 1.0.
🥇Get a Request Token.
🥈Get User Authentication.
🥉Exchange the user token with the access token (authorization token).
STEP 1: Get a Request Token
In this step, we will request a Request Token from the consumer application (in this example it refers to the Postman Application) which will be exchanged with Access Token later on.
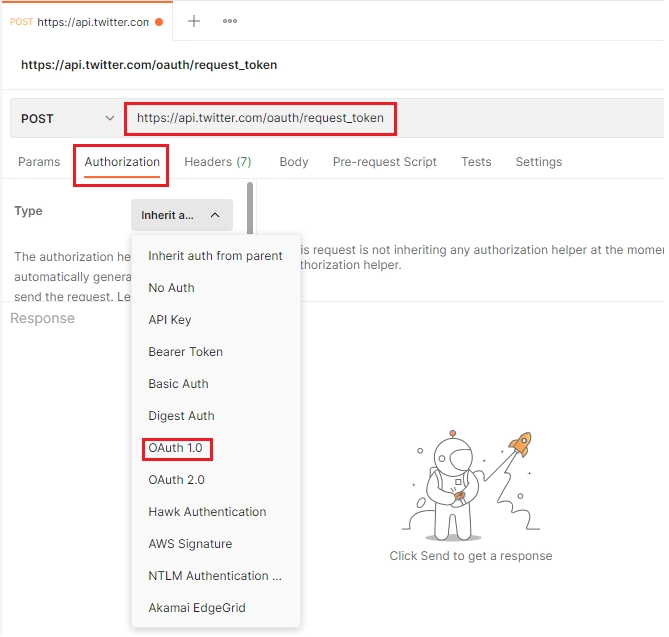
https://api.twitter.com/oauth/request_token is the endpoint for this request.
🚀 Open Postman Application.
🚀 Create a new ➕ request. Use the above end-point. Select POST verb.
🚀 Change to Authorization tab. Select OAuth 1.0 Authorization type from the drop-down list next to TYPE.
Remember we asked you to save the API key and API secret while creating the TwitterPostmanApp? We will use them here.
🚀 Enter the API key in the text box next to Consumer Key and the API secret in the text box next to Consumer Secret.
There are many OAuth Parameters. We will discuss about them later in the article.
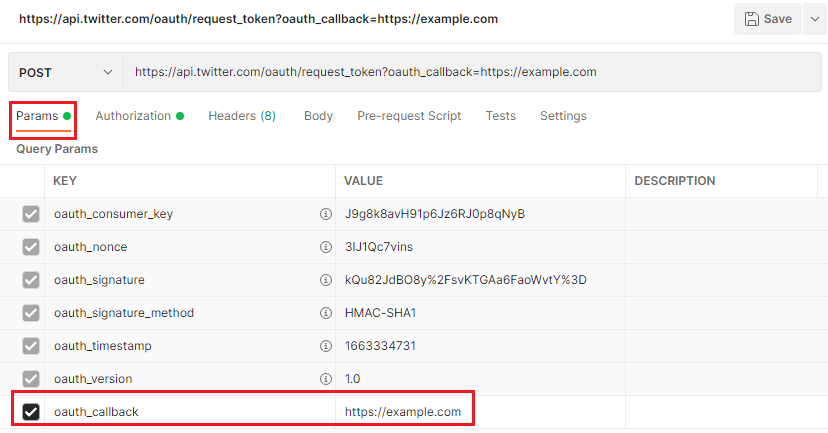
oauth_callback is a unique parameter that holds the API URL. Postman does not automatically include it so, we need to add it to the list of parameters manually.
🚀 Select the Params tab. Enter oauth_callback as the key and https://example.com as the value.
🚀 Hit! the Send button.
✅ You must have received a response status 200 OK with the following response body.
In the response body, there is an oauth_token. We will use this parameter to get authorization from the user in the next step.
Yay!🥳 You have successfully completed the first step and obtained a Request Token.
STEP 2: Get User Authentication
In this step, the user will authorize Postman to access their Twitter Account.
https://api.twitter.com/oauth/authorize is the end point used for this request.
🚀 Create a new ➕ request. Use the above end-point. Select GET verb.
🚀 Select the Params Tab.
🚀 Enter the oauth_token as the Key and the value of oauth_token as the Value.
We obtained the oauth_token in the first step.
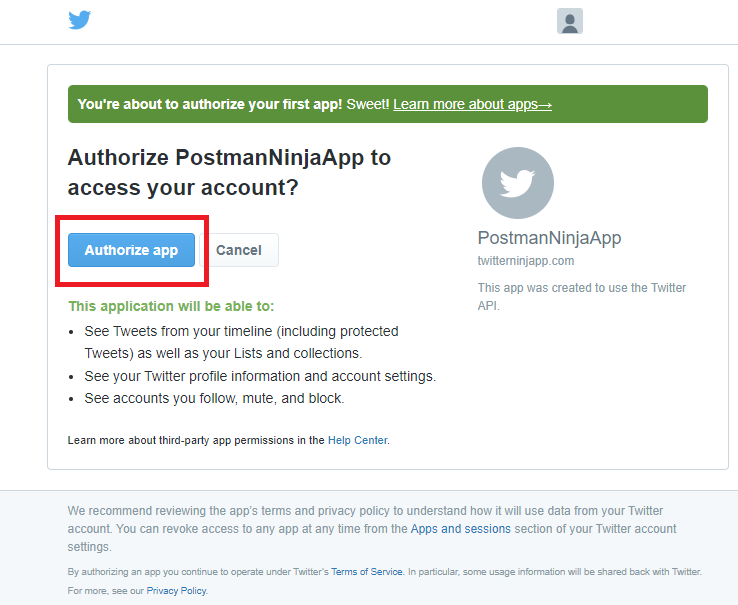
🚀 Copy the request (in our example it will be this - https://api.twitter.com/oauth/authorize?oauth_token=aBBK5gAAAAABhJNSAAABg0Z7qhE) and open it in a browser.
🚀 Authorize the request.
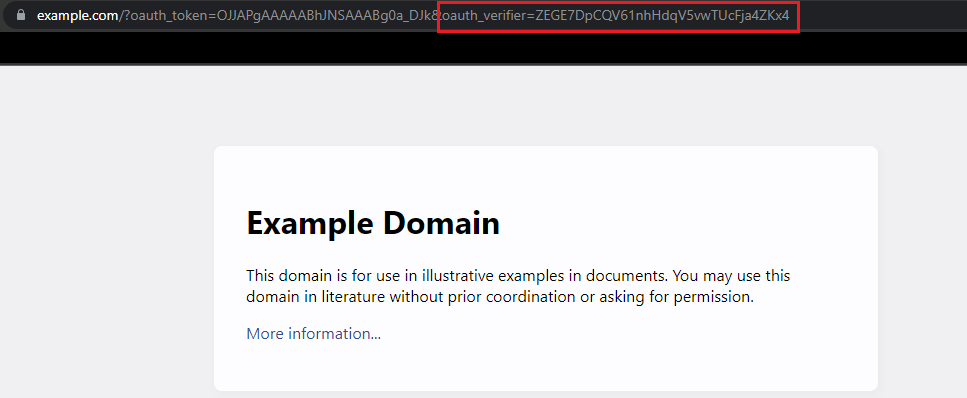
✅ You will see something like this:
In the URL you can see the oauth_verifier value. Save it for later use.
Woah!🤩 You just finished the second step.
Let’s look back on our journey so far:
Until now, we have sent a request via Postman to Twitter saying we will need access to the user’s Twitter account. To this request, Twitter responded with the oauth_token which is a Request Token.
After that Twitter sent an authorization request to the user saying - Hey! user, Do you want to authorize this request raised by the Postman Application? To which the user replied with a Yes!
STEP 3: Exchange the user token with the access token
In this step, we will exchange the request token for an access token that will allow the user to access the API.
https://api.twitter.com/oauth/access_tokenis the endpoint used for this request.
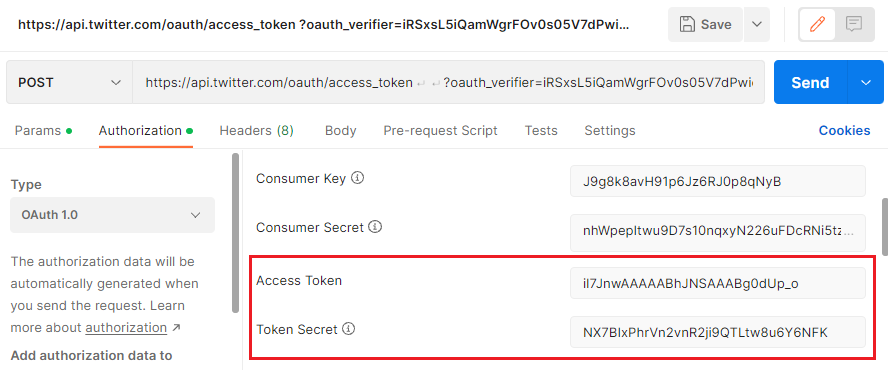
🚀 Create a new➕request with the above end-point. Select POST verb.
🚀 Select the Authorization tab. Enter the oauth_token obtained in the first step in the Access token field and oauth_token_secret in the Token Secret field.
From the Advanced options in the Authorization tab enter the CallbackURL https://example.com and the oauth_verifier in the Verifier text box.
🚀 Select the Params tab. Enter key as oauth_verifier and value as the oauth_verifier obtained while getting authorization from the user in the previous step.
🚀 Hit Send!
✅ You have successfully finished authorizing using Postman.
You can follow the above steps and generate authorization for any API which uses OAuth 1.0.
OAuth Parameters
oauth_consumer_key - client identifier used to identify the consumer by the service provider.
oauth_signature - a method used by the API to authenticate requests.
oauth_signature_method - there are many types of method authentication codes like PLAINTEXT, HMAC-SHA1, HMAC-SHA-1, HmacSHA1, HMAC-SHA-256, SHA-256, HMACSHA256, RSA-SHA1, SHA1withRSA, RSA-SHA256 and SHA256withRSA.
oauth_callback - An URI to which the server will redirect the resource owner.
oauth_timestamp - The timestamp the server uses to prevent replay attacks outside the time window.
oauth_token - The temporary credentials identifier, if applicable. Returned in the response to Step 1; used in request and response for Step 2, and sent in the request message for Step 3. oauth_verifier - A parameter verifying that the user has been authenticated and has granted the requested permission. Example: hfdp7dh39dks9884. Sent in the response to Step 2.
oauth_version - An optional parameter which, if present, must be set to 1.0.
Frequently Asked Questions
For what purpose is Postman used?
Postman is an API client that makes it easy for developers to create, share, test and document APIs. Users are allowed to create and save simple and complex HTTP/s requests, as well as read their responses.
What is OAuth?
OAuth is a mechanism that allows services to give authorization to each other on behalf of a user. Keep in mind - the authorization is done only after taking the user’s permission.
Why is it important to authorize requests?
Authorizing requests will allow verifying the identity of the client who is requesting access to the protected resources. The client can be a user (individual user) or another service (third-party service). This is done to ensure that the data is secure.
Conclusion
Congratulations🎉on finishing the article. We discussed what OAuth is. There are two versions of OAuth - OAuth 1.0 and OAuth 2.0. In this article, we discussed how to use OAuth 1.0 in Postman. We also discussed the parameters used for OAuth.
If you want to read more about Postman we recommend you read these articles:


 9+ registered

