Do you think IIT Guwahati certified course can help you in your career?
Introduction
The onChange event is one of the most commonly used javascript events. Javascript events are the actions that happen inside the browser. These events are detected as soon as it happens. These are used to implement side effects on the page or backend.
In this article, we will cover onchange javascript events in detail. We’ll also cover the different syntax of the onchange javascript event.
What is Onchange in JavaScript?
In JavaScript, the onchange event triggers when the value of an input element, such as a text field, dropdown list, or checkbox, changes and the element loses focus. This event allows you to execute a specific function or script in response to the change. For example, you can use onchange to validate input, update the display, or send data to the server when a user modifies a form field. It's commonly used in forms to enhance user interaction by providing immediate feedback or processing without needing a full page refresh.
Example usage in HTML:
<input type="text" onchange="myFunction()">
Here, myFunction runs whenever the input value changes.
onChange JavaScript Event
The onchange JavaScript event occurs when the value of an input field or a dropdown list is updated.
Here are some instances when onChange is fired:
While checking or unchecking the <input type=”checkbox”> element.
While checking a radio button <input type=”radio”>. It is important to note that the event does not triggers while unchecking the radio button.
The event also triggers with the rest of the input types when the user commits changes or when the element loses focus, like while picking a date from the date picker <input type=”date”>, while picking files using file picker <input type=”file”> etc.
You must specify the event handler function performed when the onchange event is triggered in JavaScript. The event handler function, written in Javascript, should define the actions to be executed when the onchange event happens.
When the changes are made on the select element, a custom function “function” is called through the onchange javascript attribute. This is handy when you want to reflect changes elsewhere in the code.
Syntax:
<select onchange=”function()” >
Onchange with HTML Element
This is how it is commonly used, i.e., inside a javascript file. Here we are simply selecting the target element and adding an event listener to it. Here, the eventlistener expects two parameters, i.e., event name and a callback function.
Syntax:
//selecting the element
var element = document.getElementById('id_name');

//attaching the event listener to the selected element
element.addEventListener('change', function(event) {
    //definition of the function
    // The execution will be done as soon as the element changes
});
Attaching function to Onchange
This version is much shorter and cleaner than the previous ones. Here we are directly attaching the onchange javascript attribute to the element variable.
Syntax:
var element = document.getElementById("id_name");
element.onchange=myFunction;
How does Onchange event in JavaScript work?
The onchange event in JavaScript works by selecting the specific HTML element to which you want to attach the onchange event. It is typically done through JavaScript using attributes like ID or class. Once the element is selected, you bind the onchange event to it by either setting the onchange attribute directly in the HTML or by using JavaScript to assign a function or code block to be executed when the event occurs.
When a user interacts with the form element, such as by entering a new value or selecting a different option, the onchange event is triggered. At this point, the associated JavaScript code is executed. It allows you to perform various actions or tasks in response to the change. These actions can include updating other parts of the web page, validating input, or sending data to a server. Once the event handler code completes its tasks, the event is considered finished.
Example
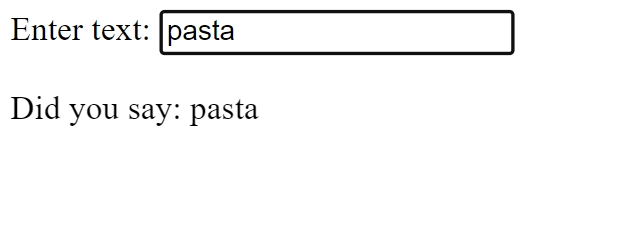
Here’s an example of an onchange javascript event. It is a basic example of simply printing the entered text.
Onchange as Event Attribute
<!DOCTYPE html>
<html>
	<head>
	<script>
		function print() {
		var input = document.getElementById("inpElement");
		var output = document.getElementById("outElement");
		output.innerHTML = input.value;
		}
	</script>
	</head>
<body>
	<label for="inpElement">Enter text:</label>
	<input type="text" id="inpElement" onchange="print()">
	<p>Did you say: <span id="outElement"></span></p>
	</body>
</html>
Output
In the script tag, we have two element variable named input and output. Inside the body, we are using onchange as an event attribute, which triggers as soon as there are any changes inside the input element. In the print() function, we are getting the text from the input element with inpElement id and printing it in the span element with the id outElement.
In the script tag, we have two element variables named button and output. We are listening onchange event attribute, which triggers as soon as the button is clicked. The second parameter accepts an anonymous function where we are printing clicked using innerHTML.
It is exactly the same as the above, except here we have a named function called click. We passed the reference of the click function in the second parameter.
Output
Browser Support
The reason why it is important to know whether something will work on different browsers or not is because different browsers use different rendering engines. Each browser might interpret the same thing differently.
Here is a table listing versions that support the onchange event on the desktop:
Browsers
Chrome
Edge
Firefox
Opera
Safari
Change event
1
12
1
9
3
On mobile:
Browsers
Chrome
Samsung Internet
Firefox
Opera
Safari
WebView Android
Change event
1
12
1
9
3
4.4
Frequently Asked Questions
What is Onchange in JavaScript?
In JavaScript, onchange is an event handler or event attribute that is used to detect when the value of an HTML form element, such as an input field or a select dropdown, changes.
How is the onchange event used in JavaScript?
An onchange event is used to implement side effects in case of changes made in the target element. It is used in response to the changes made in an input field or select dropdown list.
What are some elements that can trigger the onchange event?
Elements like input fields, select dropdown lists, and checkboxes are some examples of the elements that can trigger the onchange javascript event. Side effects can be implemented using this element.
What is difference between Onchange and onclick?
onchange in JavaScript is an event triggered when a form element's value changes, often used with input fields and dropdowns. onclick, on the other hand, is an event triggered when an HTML element, like a button, is clicked or activated and used for various interactions.
Conclusion
This article covered the onChange Javascript event in detail, including different ways to use the element. We also saw working of onchange event and browser support as well.
After reading this blog, you will understand the onChange javascript event well.


 6+ registered

