Code360 powered by Coding Ninjas X Naukri.com. Code360 powered by Coding Ninjas X Naukri.com
Table of contents
1.
Introduction
2.
Creating a code repository in Cloud Source Repositories
2.1.
Before you start
2.2.
Create a Repository
2.3.
Clone a Repository
2.4.
Create a "Hello, World!" script
2.5.
Create an app.yaml file
2.6.
Push to Cloud Source Repositories
2.7.
View files in the repository
2.8.
Clean up
3.
Automate App Engine Deployments with Cloud Build
3.1.
Before you start
3.2.
Grant App Engine access to the Cloud Build service account
3.3.
Deploy your App
3.4.
Create a cloudbuild.yaml file
3.5.
Add the cloudbuild.yaml file to your repository
3.6.
Create a build trigger
3.7.
Push a change to your app
3.8.
View your build in progress
3.9.
Re-test your app
3.10.
Clean Up
4.
Setting up local authentication
5.
Working with repositories
5.1.
Mirroring a GitHub repository 
5.2.
Pushing code from an existing repository 
5.3.
Creating an empty repository 
5.4.
Mirroring a Bitbucket repository
5.4.1.
Create a mirrored repository
6.
Frequently Asked Questions
6.1.
What is a non-bare repository?
6.2.
What is a local repository?
6.3.
What is a repository, and how does it work?
7.
Conclusion
Last Updated: Mar 27, 2024
Easy

Overview of Cloud Source Repositories

Author Sagar Mishra
1 upvote

Introduction

Private Git storage is known as Cloud Source Repositories and is hosted on Google Cloud. These repositories enable the creation and deployment of apps. Also, provide services in an environment that supports code collaboration and version control.
 

Google Cloud Platform


This article will discuss the Overview of Cloud Source Repositories. It includes creating a code repository in the Cloud Source Repositories, App Engine Deployment, and many more.

Creating a code repository in Cloud Source Repositories

In the series of "Overview of Cloud Source Repositories," our first topic is to create a code repository in the Cloud Source Repositories.

Before you start

  1. Create an account if you are totally new to Google Cloud.
     
  2. Go to the Project Selector page and click on Create a Google Cloud Project.
     
  3. Ensure if the billing is enabled in your project or not.
     
  4. Install and initialize Google Cloud CLI.
     
  5. Verify if you are using the latest version.
     
  6. Enable the Cloud Source Repositories.

Create a Repository

Create a Google Cloud repository called hello-world in a terminal window using the gcloud source repos create command:

gcloud source repos create hello-world

Clone a Repository

The Google Cloud repository's contents can be cloned into a local Git repository using the gcloud source repos clone command:

gcloud source repos clone hello-world

Create a "Hello, World!" script

In a browser window, print Hello, World! using a Python script.

Step 1: Go to the hello-world repository.
 

Step 2: Create a file named main.py using a text editor, then paste the following code:

#!/usr/bin/env python
import webapp2
class MainHandler(webapp2.RequestHandler):
    def get(self):
        self.response.write('Hello, World!')
app = webapp2.WSGIApplication([
    ('/', MainHandler)
], debug=True)
You can also try this code with Online Python Compiler
Run Code

Create an app.yaml file

Build an app.yaml file with the configuration details needed to deploy your code to App Engine.

Step 1: Go to the hello-world repository.


Step 2: Create a file called app.yaml in a text editor, and then paste the following configuration details into it:

runtime: python27
api_version: 1
threadsafe: yes
handlers:
- url: .*
  script: main.app
libraries:
- name: webapp2
  version: "2.5.2"
You can also try this code with Online Python Compiler
Run Code

Push to Cloud Source Repositories

Upload your recently created files to cloud source repositories.

Step 1: Go to your hello-world directory in a terminal window.

cd hello-world


Step 2: Add the files

git add .


Step 3: Files should be added to the repository along with a comment outlining the history of this action:

git commit -m "Add Hello World app to Cloud Source Repositories"


Step 4: Add the local Git repository's contents to cloud source repositories by using the git push command:

git push origin master


Step 5: The files from the master branch are pushed by Git to the remote origin. The output looks like this:

Counting objects: 21, done.
Delta compression using up to 6 threads.
Compressing objects: 100% (20/20), done.
Writing objects: 100% (21/21), 9.76 KiB | 0 bytes/s, done.
Total 21 (delta 5), reused 0 (delta 0)
remote: Storing objects: 100% (21/21), done.
remote: Processing commits: 100% (6/6), done.
To https://source.developers.google.com/p/example-project-1244/r/repo-name
* [new branch]      master -> master

View files in the repository

  1. Open Cloud Source Repositories in the Google Cloud console.
     
  2. Select the repository you created called hello-world by clicking its name.
     
  3. Go to the files you uploaded to the repository.

    The master branch files as the most recent commit are displayed in the GCP Console.
     
  4.  Click a file to view its contents in the Files list.
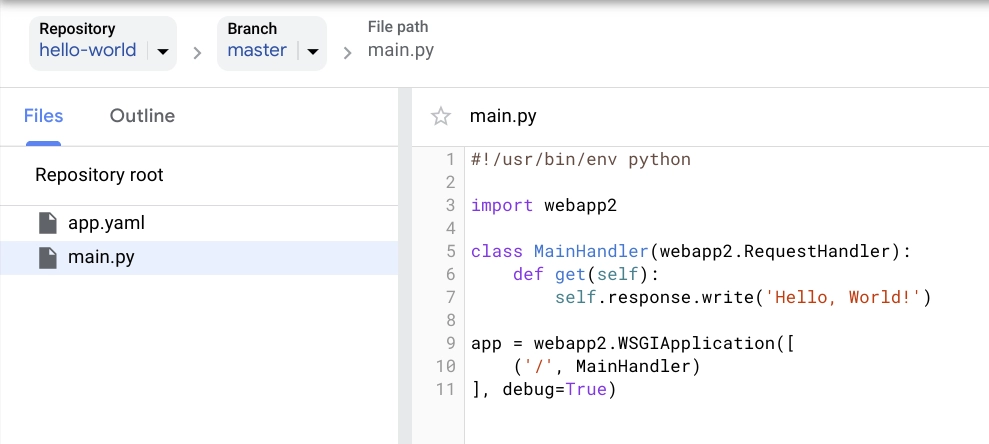
    GCP Console
    Using Cloud Shell, you can view the files also.

Clean up

You can also delete all these after finishing by following the below steps:

  1. Open the All repositories page for Cloud Source Repositories in the GCP Console.
     
  2. Hold the cursor over the repository you want to remove/delete and click Settings.

    The General setting will open after this step.
     
  3. Click on Delete this repository.

    After this step, the Remove repository will open.
     
  4. Type the repository name that you want to delete.
     
  5. Click on Delete.

Automate App Engine Deployments with Cloud Build

In the series of "Overview of Cloud Source Repositories," our next topic is to automate app engine deployments with the Cloud Build.

Before you start

  1. Complete all the steps given in the Cloud Source Repositories to create a code repository.
     
  2. Enable both Cloud APIs and App Engine Admin.

Grant App Engine access to the Cloud Build service account

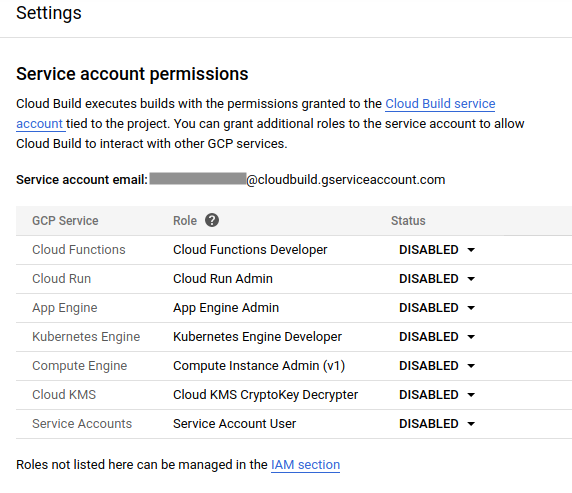
Your code is deployed using a service account by Cloud Build. The account's default permissions restrict some actions, such as deploying to App Engine.


  1. Open the Cloud Build Settings page in the Google Cloud Console.
    You will see the Service account permissions page below:

    Service account Permissions

     
  2. Enable the status of App Engine Admin.

Deploy your App

Step 1: Go to the directory containing the repository In a terminal window.

cd hello-world


Step 2: Now, deploy the sample app:

gcloud app deploy app.yaml


Step 3: Verify if your app is running:

gcloud app browse


The browser will show the message Hello, World! If your app is running.

Create a cloudbuild.yaml file

Step 1: Go to the directory containing the repository in a terminal window.

cd hello-world


Step 2: Create a file named cloudbuild.yaml using a text editor, then paste the below give configuration information:

steps:
- name: "gcr.io/cloud-builders/gcloud"
  args: ["app", "deploy"]
timeout: "1600s"

Add the cloudbuild.yaml file to your repository

Step 1: Add the cloudbuild.yaml to the repository:

git add .


Step 2: Commit the file with a comment explaining the history of this action:

git commit -m "Add cloudbuild.yaml file"


Step 3: Add the local Git repository's contents to cloud source repositories by using the git push command:

git push origin master

Create a build trigger

  1. Open the Cloud Build Triggers page in the GCP Console.
     
  2. Click on Select a project, then click the name of your Google Cloud project if it isn't already selected.
     
  3. Click Create Trigger.

    The Create trigger page will open.
     
  4. Fill out the options given below:

    1. Type app-engine-test in the Name field.
       
    2. Select Push to a branch Under Event.
       
    3. Select hello-world as your Repository under Source and then ^master$ as your Branch.
       
    4. Select the Cloud Build configuration file under Configuration.
       
    5. Type cloudbuild.yaml after the / in the Cloud Build configuration file location field.
       
  5. Click Create to save your build trigger.

Push a change to your app

Step 1: Use a text editor to update the main.py file by pasting the below code In a terminal window.

#!/usr/bin/env python
import webapp2
class MainHandler(webapp2.RequestHandler):
    def get(self):
        self.response.write('I update automatically!')
app = webapp2.WSGIApplication([
    ('/', MainHandler)
], debug=True)
You can also try this code with Online Python Compiler
Run Code


Step 2: Add the file to Git:

git add .


Step 3: Commit the file with a comment explaining the history of this action:

git commit -m "Update app to demonstrate build triggers"


Step 4: Add the local Git repository's contents to cloud source repositories by using the git push command:

git push origin master

View your build in progress

  1. Open the Cloud Build Triggers page in the GCP Console.
     
  2. Click on Select a project, then click the name of your Google Cloud project if it isn't already selected.
     
  3. Click on History.
     

A list of all builds will open. A new entry at the top shows the build that started after you pushed your change to cloud source repositories. When it is ready, a green check mark appears next to the building entry.

Re-test your app

Open your app in a terminal window.

gcloud app browse


Now, the message I update automatically! is displayed by the browser.

Clean Up

There are two ways to avoid incurring charges to your Google Cloud account.

  • Delete the build user
  • Delete the repository

Setting up local authentication

In the series of "Overview of Cloud Source Repositories," now we will discuss setting up local authentication.

You must set up local authentication in your environment before using your system to access or interact with hosted repositories.

Cloud Source Repositories support the below types of authentication:

  • SSH
  • Google Cloud CLI
  • Manually generated credentials 

Working with repositories

In the series of "Overview of Cloud Source Repositories," our next topic is Working with repositories. 

Mirroring a GitHub repository 

Self-hosted Bitbucket and GitHub mirroring is not supported; only Bitbucket Cloud and GitHub Cloud repositories can be mirrored to Cloud Source Repositories.

Pushing code from an existing repository 

In the series of "Overview of Cloud Source Repositories," now we will discuss how to push code from an existing repository.

Step 1: Make sure you have set up local authentication with SSH. 


Step 2: Add the local repository as a remote.

git remote add google ssh://[EMAIL]@source.developers.google.com:2022/p/[PROJECT_ID]/r/[REPO_NAME]


Step 3: In Cloud Source Repositories, push your code:

git push --all google

Creating an empty repository 

Step 1: Call gcloud init from the command line:

gcloud init
gcloud source repos create [REPO_NAME]


Here, the name of the repository is REPO_NAME.

Mirroring a Bitbucket repository

In the series of "Overview of Cloud Source Repositories," our last topic is Mirroring a Bitbucket repository.

You must give your Bitbucket authentication credentials when you mirror a repository. These credentials allow Cloud Source Repositories to access the Bitbucket repository's contents.

Create a mirrored repository

You must have your Bitbucket machine user credentials to complete this process, and grant Google Cloud read access to the Bitbucket repository.

  1. Open Cloud Source Repositories in the Google Cloud console.
     
  2. Click on Add repository Connect external repositoryContinue.
     
  3. Select the Google Cloud project that the mirrored repository is a part of from the Project drop-down list.
     
  4. Select Bitbucket in the Git provider drop-down list.
     
  5. Select the checkbox to store your credentials to authorize the Cloud Source Repositories.
     
  6. Click on Connect to Bitbucket and sign in using your user credentials.
     
  7. Click on Authorize GoogleCloudPlatform, and select the repository you want to mirror from the list of repositories.
     
  8. Click on Connect Selected Repository.


Check out most important Git Interview Questions here.

Frequently Asked Questions

What is a non-bare repository?

A non-bare repository includes ". git/" and the working tree, which is a snapshot of your tracked files that you can modify directly (the actual files you can edit). This is where we commit changes and edit.

What is a local repository?

You can deploy assets into physical, locally managed repositories called local repositories. Artifactory gives you a central location to keep your internal binaries using local repositories.

What is a repository, and how does it work?

A central location where information is stored and also kept, often in computer storage, is called an information technology repository (or repo). A repository can perform a variety of tasks.

Conclusion

We have discussed the topic of Overview of Cloud Source Repositories. We have seen how to create a code repository in the Cloud Source Repositories, such as creating a repository, adding a task, and many more.

We hope this blog has helped you enhance your knowledge of "Overview of Cloud Source Repositories." If you want to learn more, check out our articles Fog ComputingDaas in Cloud ComputingCloud Server, and many more on our platform Coding Ninjas Studio.

But suppose you have just started your learning process and are looking for questions from tech giants like Amazon, Microsoft, Uber, etc. In that case, you must look at the problemsinterview experiences, and interview bundle for placement preparations.

However, you may consider our paid courses to give your career an edge over others!

Happy Learning!

Live masterclass