Do you think IIT Guwahati certified course can help you in your career?
Introduction
It is an integrated development environment from Microsoft that is used to develop websites, computer programs, web services, etc. It can be used to produce native code as well as managed code. It includes a code editor which supports IntelliSense as well as code refracting. It supports 36 different programming languages. It also supports the use of plug-ins that expand the functionality at every level. In this blog, we will discuss the various tools which Visual Studio provides.
Deploy an ASP.NET app
This section will explain how to configure Microsoft Visual Studio and create and deploy an ASP.NET application on Google Cloud.
Install Cloud Tools for Visual Studio
To install the cloud tools for Visual Studio from the Extensions and Updates section available in Visual Studio, follow these steps:
From the Extensions and Updates section, select Tools.
Choose the Online facet from the left pane.
Look for Google Cloud Tools for Visual Studio.
Click on download, and follow the instructions.
To load the extensions, restart Visual Studio.
Signing in to Google
To sign in to the google account from which you want to deploy your project to App Engine, follow the below steps:
Open the Visual Studio application.
Click on Tools > Google Cloud Tools > Show Google Cloud Explorer, and then launch Cloud Explorer.
Click on Select or Create an account.
Click on Add account.
Choose the account you want to use for this application.
Click on Allow and close the window.
Selecting a project
Follow the below steps to select a google cloud project to deploy your application to:
Click on select project from the Cloud Explorer.
Choose a project from the list.
Click on OK.
Create an ASP.NET app
For creating a new ASP.NET project and running it locally, follow these steps:
To open a new project dialog, click on File > New > Project.
Using the left panel, navigate to Installed > Visual C# > Google Cloud Platform.
Choose ASP.NET on the Google Cloud Platform.
Enter a name for the project and click on OK.
Choose a Template type and click on OK.
Build the solution and run it locally.
Deploy an ASP.NET app
For deploying your ASP.NET app onto a Windows VM running on Compute Engine, follow the below steps:
Choose the newly created project from Cloud Explorer.
Right-click on the VM instance that you have created above with the Cloud Marketplace.
Choose Manage Windows credentials.
Click on Add Credentials
Enter a username of choice.
Make sure that Create a password for me is selected and click on Save.
When prompted with the question about resetting the password, click on Reset.
Click on Close to close the password window.
Now, click on Close to close the Windows Credentials window.
Right-click on your application in the Visual Studio Solution Explorer pane.
Click on Publish to Google Cloud from the context menu.
Choose Compute Engine from the Publish dialog box.
Click on Publish to build and deploy the application.
Visual Studio Deployment Wizard
Deploying ASP.NET 4.x Apps
Follow the below-mentioned steps to deploy your ASP.NET 4.x apps on the compute engine:
Click on Tools > Google Cloud Tools > Publish [ProjectName] to Google Cloud to open the deployment wizard.
Click on Compute Engine.
Choose the Windows VM instance and deployment credentials.
The windows VM must be running IIS and must be capable of running ASP.NET 4.x apps like ASP.NET created by the Deployment Manager.
Choose the credentials for the deployment. Click on Manage Credentials to create windows credentials.
To build and deploy the app to the selected VM, click on Publish.
Deploying ASP.NET Core Apps
To deploy on a flexible environment, follow the below steps:
By clicking on Tools > Google Cloud Tools > Publish [ProjectName], open the deployment wizard.
Select the App Engine Flex.
Specify the app's version name and traffic management choice.
The user can specify a name of their choice, by default, the version name is based on the current system time.
To build and deploy the app to the App Engine flexible environment, click on Publish.
Managing Windows Credentials
Creating Windows Credentials
In order to create credentials, access the Manage Windows Credentials dialog by following the below-mentioned steps:
Inside the cloud explorer, select the VM and right-click on it for which you want to create the credentials.
Click on Manage Windows Credentials.
Click on Add credentials.
Enter a username
Either enter a password or let visual studio create one.
Click on Save.
Deleting the Windows Credentials
In order to delete existing credentials, access the Manage Windows Credentials dialog by following the below-mentioned steps:
Inside the cloud explorer, choose the VM and right-click on the VM whose credentials you want to delete.
Click on Manage Windows Credentials.
Select a user and click on Delete Credentials.
Click on Delete.
Using stored Windows Credentials
The stored windows credentials can be used when creating a .publishsettings file for publishing to a VM.
Saving .publishsettings files
In order to create a .publishsettings file to deploy the ASP.NET app to the VM, follow the below-mentioned steps:
From the cloud explorer, choose a VM and right-click on the VM where you want to deploy.
Click on Save publishing settings.
Choose the credentials you want to use while creating .publishsettings file.
If, in case, you don't see the credentials you want to use, click on Manage Windows Credentials to create new credentials.
Finding a Google API Library
The .NET developers can use all the Google APIs which are available in the NuGet package manager. If you wish to add the google APIs to your project in Visual Studio, follow the below-mentioned steps:
Right-click on the Project references.
Click on Manage NuGet Packages.
Select the Browse tab.
Make sure that Include prerelease is checked before searching to show all the Google Cloud libraries.
Enter a search string.
The search returns two types of results:
The results which have Google cloud in their prefix are the Cloud Client Libraries and are the recommended way to access the Google Cloud APIs programmatically.
The results which have Google.Apis in their prefix are the Google API Client Libraries available for all the Google APIs. These libraries are preferred if the Cloud Client Library isn't available for your API.
Managing Cloud Source Repositories
Create or Clone a repository
You can create or clone a repository by opening the Clone Google Cloud Source repository menu and following the below-mentioned steps:
To create a new repository:
Click on Clone or Create link.
Choose a Google Cloud project from the Project drop-down menu.
Click on Add new. The menu for Add a new repository will open.
Specify a Repository Name.
Click on OK.
To clone an existing repository:
Click on the clone or create link.
Choose a Google Cloud project from the Project drop-down menu.
Choose a repository from the Repository drop-down menu.
In the clone to field, specify the location where you want to clone the source code too.
Click on Clone.
Attaching the remote debugger
If you want to attach the remote debugger, follow the below-mentioned steps:
To launch the Cloud Explorer, go to Tools > Google Cloud Tools > Show Google Cloud Explorer.
Select the compute engine VM instance to which you want to attach the remote debugger, right-click on it and click on Attach debugger.
When prompted to add firewall rules to allow traffic to the required ports, click on OK.
Choose the process to debug and click OK.
Opening firewall ports
If you want to enable remote debugging, then you need to add firewall rules to allow traffic to the target machine and enable the connection to the debugging remote tools. By default, port: 4022 is used in Visual Studio 2017.
Using a remote PowerShell connection, the cloud tools for the visual studio can install as well as start remote tools for you. For this, the user must enable remote PowerShell HTTPs port 5986.
Once the debugging process is complete, remove the firewall rules using the following steps:
To launch the Cloud Explorer, go to Tools > Google Cloud Tools > Show Google Cloud Explorer.
Right-click on the Compute Engine VM instance and select the firewall options.
Allow the remote PowerShell HTTPs traffic to the instance firewall rules and clear the checkboxes for Allow Visual Studio Debugger connections to the instance.
To remove the firewall rules, click on Save.
Browsing App Engine resources
Service operations
The following options will appear on the menu when you right-click on an App engine service in Cloud Explorer:
Open on Cloud Platform Console- this will open the selected service in the console in your local web browser.
Properties- this will make the properties window visible for the selected service.
Open Running Service- this will open the web browser and load the running app.
Split traffic- this manages the traffic allocation for the various versions that are running on a service.
Filtering options- this will filter the versions you are seeing by:
Show only flexible version- this will display versions running on the App engine flex environment.
Show only .NET runtimes- this will display versions running code on the aspnetcore App engine flexible runtime.
Show only versions with traffic- this will display versions that have traffic allocated to them.
Version Operations
The following options will appear on the menu when you right-click on an App version in Cloud Explorer:
Open on Cloud Platform Console- this will open the selected version in the console in your local web browser.
Properties- this will make the properties window visible for the selected version.
Open Running Service- this will open the web browser and load the selected version of the running app.
Migrate all traffic- this ensures that the selected version receives all of the traffic.
Start/Stop version- this will start or stop the version of the app.
Delete version- if the app version stops, you can delete it using this.
Reviewing logs with the Cloud Logging Logs Explorer
Accessing the Logs explorer
Go to Tools -> Google Cloud Tools -> Show Stackdriver logs Explorer to access the cloud logging logs explorer. Then the Google Stackdriver logging tab opens up.
Getting around the interface
The following are the major components of the logs explorer:
Search bar for either filtering log entries by label or text search.
Drop down menus for filtering the list by resources, logs, and severity levels.
Jump to the time drop-down menu to view a specific date and time in the logs.
Refresh button for retrieving the latest logs in the descending order.
Auto load log stream for controlling whether or not to display the new log entries as and when they arrive.
The table of log for summarizing that you can view to get the full details on individual log entries.
If available, a source link to locate the source code that generates the log entry.
Viewing the logs
The user can filter the log entries or search for a specific log to display in the Logs Explorer Interface.
Filtering the logs
The user can filter the log entries to see logs in which the user is interested.
You can select the instances of a particular resource type that you wish to see or view a specific instance using the resource type and instance drop-down menu.
Choose the named logs you want to view or select All logs from the log drop-down menu. The menu will show only those logs that the selected resource generates.
Choose the severity level you want to view in the log severity drop-down menu. Selecting all log levels includes log entries that do not have any severity level.
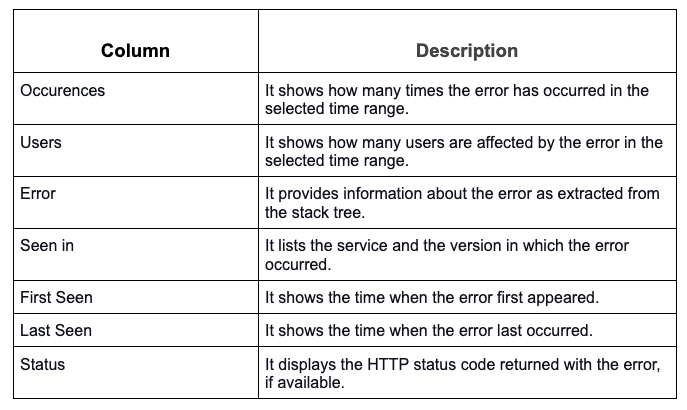
Viewing error reports in Error Reporting
Information about the error reports
To remove the duplicate errors and to group the errors according to the common frameworks used by the application, error reporting analyze the stack traces. You can select a time-range button to display only those errors that occur within that specified time frame.
Frequently Asked Questions
Which package provides all the Google APIs to .NET developers?
The NuGet package manager provides all the Google APIs to the .NET developer.
What is the prefix for Google API Client Libraries that are available for all the Google APIs?
Google.Apis is the prefix for Google API Client Libraries that are available for all Google APIs.
What is the port number for firewall ports?
The default port number is 4022 for firewall ports.
Conclusion
In this article, we have extensively discussed about the tools offered by the Visual Studio.
After reading about the tools the Visual Studio offers, are you not feeling excited to read/explore more articles on Google Cloud? Don't worry; Coding Ninjas has you covered. To learn about GCP certification: Google Cloud Platform, the difference between AWS, Azure & Google Cloud, and which platform is best: AWS vs. Google Cloud.
If you wish to enhance your skills in Data Structures and Algorithms, Competitive Programming, JavaScript, etc., you should check out our Guided path column at Coding Ninjas Studio. We at Coding Ninjas Studio organize many contests in which you can participate. You can also prepare for the contests and test your coding skills by giving the mock test series available. In case you have just started the learning process, and your dream is to crack major tech giants like Amazon, Microsoft, etc., then you should check out the most frequently asked problems and the interview experiences of your seniors that will surely help you in landing a job in your dream company.


 9+ registered

