Snap Menu
Shift+S brings up the snap menu, also known as the 3D cursor pie menu. On this menu, we have eight choices. Four of them assist us in moving the 3D Cursor, while the remaining four assist us in moving our selection.
- Selection to cursor
- Selection to cursor(Keep Offset)
- Selection to grid
- Selection to active
- Cursor to selected
- Cursor to active
- Cursor to world origin
-
Cursor to grid
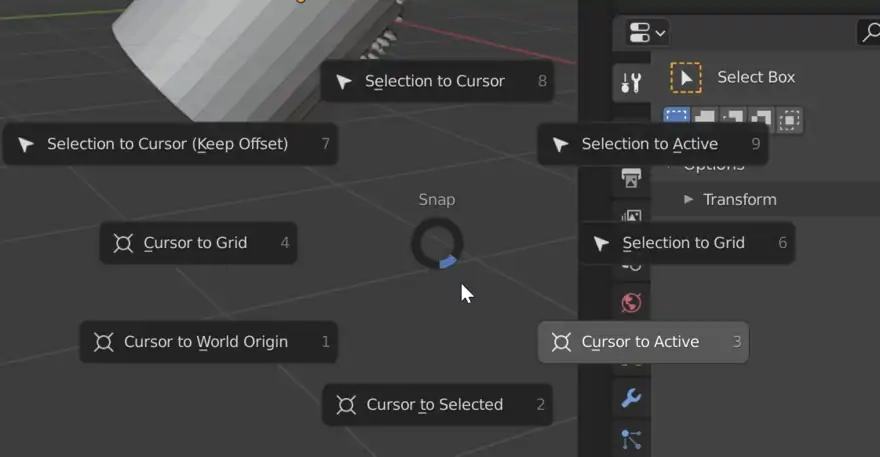
Source: Artisticrender
Extrude to 3D Cursor
Extrusion tools replicate vertices while maintaining a connection between the new geometry and the original vertices. Edges are formed from vertices, and faces are formed from edges.
Creating Vertices
The essential element, a vertex, can be inserted with a Ctrl-LMB click when no additional vertices are chosen. You can add a vertex and then execute further Ctrl-LMB operations with the last vertex selected to construct interconnected vertices. If you keep repeating this process, it will connect the previous vertex chosen with the vertex formed at the mouse pointer with an edge, and it will continue to build and connect additional vertices.
Source: Blender docs
Creating Faces
Ctrl-LMB click will construct a planar face, commonly known as a quad if two vertices are selected and previously connected with an edge. The Blender will create those quads by following your mouse pointer and using the planar view from your viewport.
Suppose you press Ctrl-LMB and have at least one face formed. In that case, Blender will automatically rotate the last selected Edge (the source) for the subsequent operations, splitting the angles created between the newly created Edge and the last two edges and generating a smooth angle between them. The previous positive and negative positions of the previous X and Y coordinates, as well as the previous connected unselected Edge, will be used by Blender to determine this angle. If this angle exceeds a negative limit (following a quadrant rule), it will wrap the faces between the newly formed Edge and the previous two. However, if you do not want Blender to rotate and smooth edges while extruding from Ctrl-LMB automatically, you may disable it by pressing Shift-Ctrl-LMB. When constructing a face in this situation, Blender will not turn the source to divide the angle between those edges.
If you choose three or more vertices and press Ctrl-LMB, you will also construct planar faces, but along the vertices, you have selected and in the direction of the pointer.

Source: Blender Docs
FAQs
How to reset the 3D cursor?
Using Shift+S, open the snap menu and choose Cursor to global origin. One method is to use Shift+C. This will return the 3D pointer to the center and focus the camera on our scene.
How to move 3D cursor to selection?
Make a selection in object or edit mode first, then Press Shift+S, and finally, select Cursor to make a selection.
What is Snap Menu?
Snap Menu, also known as the 3D cursor pie menu. On this menu, we have eight choices. Four of them assist us in moving the 3D Cursor, while the remaining four assist us in moving our selection.
What if 3D cursor is not working?
If you can't move the 3D Cursor, change the Transform pivot point option from 3D Cursor to anything else, such as the median point. If the 3D pointer isn't visible, use Shift+C to try to center it or Shift+Right-click anywhere to relocate it to that location.
Conclusion
This article extensively discussed pivoting points in 3D Cursor, snap menu, and extrude with their implementation in Blender. For more such articles, visit our curated roadmaps here.
We hope that this blog has helped you enhance your knowledge regarding Pivot points on 3D Cursor in Blender and if you would like to learn more, check out our articles here. Do upvote our blog to help other ninjas grow.
For peeps out there who want to learn more about Data Structures, Algorithms, Power programming, JavaScript, or any other upskilling, please refer to guided paths on Coding Ninjas Studio. Enroll in our courses, go for mock tests and solve problems available and interview puzzles. Also, you can put your attention towards interview stuff- interview experiences and an interview bundle for placement preparations.
Happy Coding!


 9+ registered

