Get a skill gap analysis, personalised roadmap, and AI-powered resume optimisation.
Introduction
Python is a powerful programming language used by many developers around the globe due to its easy syntax and readability. Now the problem is as the Python codebase grows, then optimising the performance becomes an important factor in ensuring fast and effective execution.
The solution to this is the Python Timeit module which offers an easy way to measure the execution time taken by the code snippets. This allows developers to identify difficulties and make performance improvements.
In this article, we will discuss the Python Timeit Module and explain its syntax, working and methods with the help of examples.
What is Python Timeit Module?
The Python Timeit module is a built-in module in the Python library which helps in measuring the execution time taken by the given code statements. This is very useful for comparing different code snippets and finding the part where the code can be improved in order to increase its performance.
Working of Python Timeit Module
The Python Timeit module uses several techniques to make accurate measurements.
First, it runs the code statement 1 million times which is by default. After that, it provides the minimum time taken from the given code statement. This helps reduce the impact of variations in the system load.
Second, the Python Timeit module turns off the garbage collection during its measurement, as this can also affect the execution time.
Syntax
The general syntax of Python timeit is represented below:
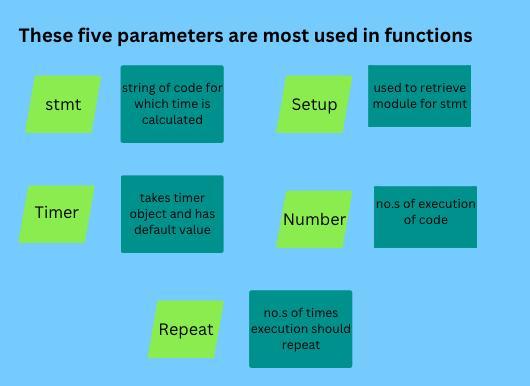
timeit.timeit(stmt, setup, timer, number)
Below is the definition of each parameter:
stmt: code snippet for which execution time is measured
setup (optional): prepares the environment for the code statement in stmt, like importing modules or defining functions
timer: holds the timer object and is set automatically, and holds a default value.
number: number of times the code snippet in stmt will execute during the process of comparison between multiple code snippets
Let's discuss an example of using the Python timeit module using the above four parameters.
Python
Pyhton
import timeit
def my_function():
  for i in range(1000000):
    pass

# setup code
setup = "import timeit"

# timer function
timer = timeit.default_timer

# number of times to run the code
number = 1000

# Measuring execution time
execution_time = timeit.timeit(stmt=my_function, setup=setup, timer=timer, number=number)

print(execution_time)
Output:
13.192759338002361
The above output shows that the my_function() function took 13.19 seconds to be exact to execute 1000 times.
The setup code was executed before the my_function() was timed. This is done to make the measurement more accurate. The timer function measures the execution time, and the number argument specifies the number of times we need to run the code.
Timing Multiple Lines of Python Code
Python timeit module allows to time multiple lines of code by enclosing them in triple quotes. This helps to measure more complex code snippets very accurately.
Below is the code example:
Python
Pyhton
import timeit

# String of code
codeStatement = '''
power = [math.pow(i,3) for i in range(100)]
'''
# timer function
timer = timeit.default_timer

# timeit function
execution_time = timeit.timeit(stmt=codeStatement, setup='import math', timer=timer, number=10000)
print(f"Execution Time: {execution_time}")
Output:
Execution Time: 0.24470458799623884
We have set up a codeStatement which calculates the powers of numbers from 1 to 100.
The output shows that the code statement took 0.24470458799623884 seconds to execute 10000 times, and Each code statement took an average of 0.0000244 approx. seconds.
Python timeit Methods
1. timeit.timeit(stmt, number)
It is used to measure the execution time of a single-line statement.
See the below example:
Python
Pyhton
import timeit

# Single-line statement to measure

code_snippet = 'sum(range(1000))'

# Measuring the execution time of the single-line statement

execution_time = timeit.timeit(stmt=code_snippet, number=10000)

print(f"Execution Time (timeit.timeit): {execution_time:.6f} seconds")
Output:
Execution Time (timeit.timeit): 0.046907 seconds
The above code uses the `timeit` module and measure the execution time of code_snippet executed 10000 times. The output shows that it takes 0.046907 seconds approx on average to execute the statement 10000 times.
2. timeit.repeat(stmt, number, repeat)
It repeats the timing process multiple times and returns a list of execution times. This is useful for calculating the mean and standard deviation.
See the below example:
Python
Pyhton
import timeit

# Multi-line statement to measure

code_snippet = '''

def factorial(n):

    if n <= 1:

        return 1

    else:

        return n * factorial(n-1)

factorial(10)

'''

# Repeating the timing process multiple times

execution_times = timeit.repeat(stmt=code_snippet, number=1000, repeat=5)

# Mean and standard deviation calculation

mean_time = sum(execution_times) / len(execution_times)

std_deviation = (sum((x - mean_time) ** 2 for x in execution_times) / len(execution_times)) ** 0.5


print(f"Execution Times (timeit.repeat): {execution_times}")

print(f"Mean Execution Time: {mean_time:.6f} seconds")

print(f"Standard Deviation: {std_deviation:.6f}")
Output
Execution Times (timeit.repeat): [0.002799040001264075, 0.0027063970010203775, 0.002737898999839672, 0.0028958489983779145, 0.002760403000138467]

Mean Execution Time: 0.002780 seconds

Standard Deviation: 0.000065
The above code measures the execution time of the factorial() 5 times. The timeit.repeat() method is used to repeat the timing process multiple times. The mean_time and std_deviation variables are calculated to find out the mean and standard deviation of the execution times.
At last, the output displayed the execution times, the mean execution time, and the standard deviation.
3. default_timer()
It returns the waiting time, including the time that the operating system spends waiting for other processes to finish. It is platform dependent.
See the below example:
Python
Pyhton
import timeit

def my_function():

  for i in range(1000000):

    pass

start_time = timeit.default_timer()

my_function()

end_time = timeit.default_timer()

execution_time = end_time - start_time

print(f"Execution Time: {execution_time}")
Output
Execution Time: 0.01884750000135682
The above code measures the execution time of the my_function().
The start_time variable stores the system's default time at the beginning and the end_time variable stores the system's default time at the end of the my_function(), respectively.
The execution_time variable stores the difference between the start_time and end_time variables and is displayed as output.
Command-Line Interface
The command-line interface (CLI) is used to measure the execution time of Python code statements, modules, or entire scripts directly from the terminal or command prompt.
Parameters
Below is the list of parameters it has:
-n: tells the number of executions for each timing, and the default value is 7
-r: sets the number of repetitions for the timing process, and the default value is 3
-s: used to provide setup code before executing the statement
-t: measures the time taken in seconds instead of using the default timeit Timer class
Advantages of Python Timeit Module
Accurate Measurement: Timeit runs the code multiple times to find out the average time. This ensures the results are accurate
Isolated environment: It creates an isolated environment during the code execution so that there is no external interference and results are consistent
Repeated Tests: tests can be repeated multiple times to ensure that results are consistent
Easy to Use: it does not require a complicated setup
Frequently Asked Questions
Can Python Timeit Module be used to compare performance between Versions of Python?
Yes, the Python Timeit module can be used to compare the execution times between different Python versions. This helps to identify performance improvements or regressions.
Why is the code statement run multiple times using Python Timeit?
code statement runs multiple times because it helps in reducing the impact of variations in the system load. This keeps the measurement more accurate.
Is Python timeit affects the actual code's performance?
Python Timeito does not affect the actual code’s performance at all because it runs the code in a controlled environment which ensures no external factors influence the results and preserves the actual code’s performance.
Conclusion
Congratulations, you did a fantastic job!!. This article has gone through a comprehensive guide to Python Timeit Module and explained its syntax, methods, working and different examples. At last, some frequently asked questions have been discussed.


 9+ registered

