


Introduction
In this blog, we will learn to set up the React Native Development environment. React Native is a fast-growing Javascript framework that is used to develop beautiful and efficient mobile applications that can run on both Android and iOS Android operating systems. To read more about React Native, refer to the blog Introduction to React Native on the Coding Ninjas website.
Click on the following link to read further: Hooks in React JS
Steps to Setup the React Native Environment
This setup is based on the Windows operating system. It is good to have git installed on your system beforehand. Follow the steps in this section to complete your React Native Development Environment setup.
Step1: Installing NodeJS and NPM Package Manager
The first and foremost step is to install Node.js on your system. To download it, go to the official website. The following screen will open up.

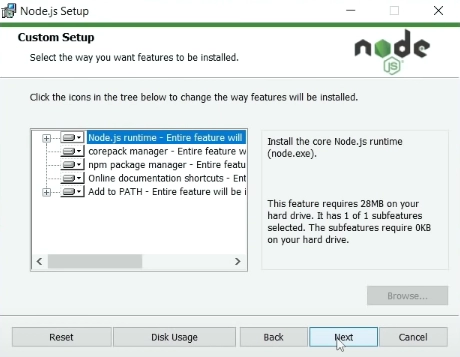
Select the version that is recommended for most users (given on the left in the above image). The version having the latest features (shown on the right in the above image) may have some unfixed bugs. Don't worry if the version number displayed on your screen is different from the one shown above. This is because Node.js is developing technology, and various updates are released from time to time. Run the setup file, and the following window will appear.

Click on the Next button.

Again click on the Next button after reading the agreement.

Set the path of the destination folder and click on the Next button.
Click on the Next button.

Click on the Install button.

Click on the Finish button. To verify whether Node.js has been properly installed or not, open up a command prompt and type the following command into it.
Command: node -v

If you get a version number like this, it means that Node.js has been successfully installed on your system. Also, check the version of npm on your system by typing the following command in the command prompt.
Command: npm -v

Step2: Installing Editor/IDE
You can use your favourite IDE to develop your applications. Two of the most commonly used IDEs are Android Studio and VS Code. Refer to the blog Android Studio setup on the Coding Ninjas Website to see the procedure to install Android Studio on your system. Installing VS code is also fairly simple and only a matter of a few clicks. Download the latest version from the official website.
Step3: Installing and Setting up the Command Line Interface
CLI stands for Command Line Interface. There are two different CLIs that can be used for React Native development. The first one is Expo CLI which is more friendly for beginners, and the other one is React Native CLI, which is used by experienced developers.
To install Expo CLI globally, run the following command in cmd.
npm install -g expo-cliNote: Alternatively, to install React Native CLI run the following command.
npm install -g react-native-cliIn this demo, we proceed with Expo CLI.
To create a new project, open up cmd and type the following command into it. Note that you can replace demo_project with the name you want to give to this project.
expo init demo_project
After running the above command, it will ask you to select an option out of the list of the above options. Select the first option as of now. The following messages will appear on the terminal once you hit the Enter button.

As we can see above, it will create a directory name demo_project and throw all the application code into that directory. As the message suggests, first change the directory to the demo_project directory using the below command.
cd demo_projectAfter that, to start the development server, run the following command.
npm start
As we can see in the above picture, the server runs on https://localhost:19002. So open up your favourite browser and go to this URL. The following screen will open up when you navigate to this link.

Click on “run in web browser” to run the application in the web browser. You can select other options as well to run the application on your phone.

You can open up App.js and change the code in that file. You will notice that the application that opens here will update dynamically as long as the server is running.
To close the server, press Ctrl + C in the terminal window where the server is running.
Congratulations if you reached here. If you followed all the steps carefully, you have successfully set up the development environment for React Native.
Also see, React Native Reanimated
Must Read, React Native Paper, React devtools


 8+ registered

