Table of contents
1.
Introduction
2.
Touchables
3.
Code Implementation
4.
Frequently Asked Questions
4.1.
What is React Native used for?
4.2.
What is the difference between TouchableOpacity and TouchableHighlight?
4.3.
Why do we use TouchableOpacity in React Native?
4.4.
Why do we use TouchableWithoutFeedback in React Native?
5.
Conclusion
Last Updated: Mar 27, 2024

React Native Touchables

Author soham Medewar
0 upvote
Career growth poll
Do you think IIT Guwahati certified course can help you in your career?

Introduction

Touch is the primary means by which users interact with mobile apps. They can employ a variety of movements, such as clicking a button, scrolling through a list, or zooming in on a map. React Native has components for handling a wide range of common gestures, as well as a comprehensive gesture responder system for more advanced gesture identification.

Also See, Hooks in React JS

Touchables

If the basic button does not suit your project, you can create your own by combining it with any of the "Touchable" components given by React Native. The "Touchable" components allow for the capturing of tapping motions and the presentation of feedback when a gesture is recognized. These components, however, do not have any default styling, so you will need to do some effort to get them to appear great in your app.

The "Touchable" component you employ will be determined by the type of feedback you want to provide:

  • TouchableHighlight: TouchableHighlight can be used anywhere a button or link on the web would be. When the user touches the button, the background of the display darkens.
  • TouchableNativeFeedback: On Android, you might utilize TouchableNativeFeedback to display ink surface reaction ripples that respond to the user's touch.
  • TouchableOpacity: TouchableOpacity can be used to provide feedback by lowering the opacity of the button, allowing the user to see through the background while pressing down.
  • TouchableWithoutFeedback: Use TouchableWithoutFeedback if you need to handle a tap gesture but don't want any feedback provided.

Let us implement all of the above touchables.

Before going on to the implementation part, I will tell you about the setup. I will be writing code in the expo platform, which makes debugging code easier. You just need to sign up to the site and create a random project.
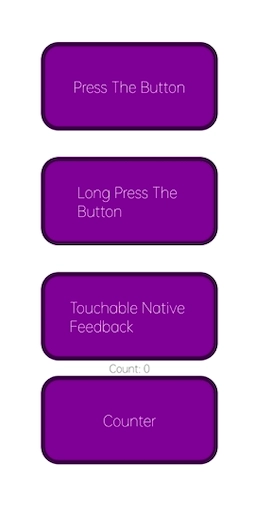
Code Implementation

In the code implementation part, we have implemented all four touchables.

import React, { useState } from "react";
import { StyleSheet, View , TouchableHighlight , TouchableOpacity , Text , Alert, TouchableNativeFeedback,  StatusBar, TouchableWithoutFeedback } from 'react-native';

export default function App() {

  const [rippleColor, setRippleColor] = useState(randomHexColor());

  const [rippleOverflow, setRippleOverflow] = useState(false);

  const pressAlert = (text) => {
    Alert.alert(text+" The Button");
  }

  const [count, setCount] = useState(0);

  const onPress = () => {
    setCount(count + 1);
  };

  return (
    <View style={styles.container}>

        {/* Using TouchableHighlight */}
        <TouchableHighlight style={styles.Touch} 
            onPress={() => pressAlert("Pressed")}>
            <View style={styles.view}>
              <Text style={styles.text}>Press The Button</Text>
            </View>
        </TouchableHighlight>

        {/* Using TouchableOpacity */}
        <TouchableOpacity  style={styles.Touch}
            onLongPress={() => 
              pressAlert("Long Pressed")} >
            <View style={styles.view}>
              <Text style={styles.text}>Long Press The Button</Text>
            </View>
        </TouchableOpacity>

        {/* Using TouchableNativeFeedback */}
        <TouchableNativeFeedback style={styles.Touch}
            onPress={() => {
              setRippleColor(randomHexColor());
              setRippleOverflow(!rippleOverflow);
            }}
            background={TouchableNativeFeedback.Ripple(rippleColor, rippleOverflow)}>
            <View style={styles.view}>
              <Text style={styles.text}>Touchable Native Feedback</Text>
            </View>
      </TouchableNativeFeedback>

      {/* Using TouchableWithoutFeedback */}
      <View style={styles.countContainer}>
        <Text style={styles.countText}>Count: {count}</Text>
      </View>
      <TouchableWithoutFeedback style={styles.Touch}
        onPress={onPress}>
        <View style={styles.view}>
          <Text style={styles.text}>Counter</Text>
        </View>
      </TouchableWithoutFeedback>

    </View>
  );
}
  
const randomHexColor = () => {
  return "#000000".replace(/0/g, function() {
    return (~~(Math.random() * 16)).toString(16);
  });
};

const styles = StyleSheet.create({
  container: {
    flex: 1,
    alignItems: 'center',
    justifyContent: 'center',
  },
  view : {
    width:200,
    height: 100,
    backgroundColor : "#731A92",
    alignItems : "center",
    justifyContent : "center",
    borderColor : "#350E43",
    borderWidth : 5,
    borderRadius : 20,
    padding: 20
  },
  text : {
    fontSize : 20,
    color : "white"
  },
  Touch : {
    marginBottom : 30
  }
});
You can also try this code with Online Javascript Compiler
Run Code

Output

Also see,  React Native Reanimated

Frequently Asked Questions

What is React Native used for?

React Native combines the greatest aspects of native programming with React, a world-class JavaScript toolkit for creating user interfaces. You may utilize React Native in your existing Android and iOS apps right now, or you can start from scratch.

What is the difference between TouchableOpacity and TouchableHighlight?

When a button is touched, TouchableOpacity increases its brightness, whereas TouchableHighlight decreases its brightness.

Why do we use TouchableOpacity in React Native?

A wrapper for making views respond to touches properly. When you press down, the opacity of the wrapped view decreases, making it darker. The children's opacity is regulated by wrapping them with an Animated.

Why do we use TouchableWithoutFeedback in React Native?

If you wish to have several child components, wrap them in a View. Importantly, TouchableWithoutFeedback works by cloning its child and applying responder props to it. It is therefore required that any intermediary components pass through those props to the underlying React Native component.

Conclusion

In this article, we have discussed the need for touchables and also the use of different types of touchables in react-native along with their code implementation.


Want to learn more about web development or android development? Here is an amazing course for both by coding ninjas.

Happy Learning!

Live masterclass