Do you think IIT Guwahati certified course can help you in your career?
Introduction
Blender's work revolves around rendering. It's helpful to know how things work when you're first starting so you can show and use some results.
To render a still image or animation in Blender, press F12 or Ctrl + F12. You can also render an image or an animation from the render menu.
There's a lot more to the story, of course. We'll go over the fundamentals of rendering and what goes into it in this article. I'll also point you in the direction of some additional resources that will help you learn more about rendering.
Getting Started
Rendering is the process of converting a three-dimensional scene into a two-dimensional image. The blender comes with three render engines, each with its own set of capabilities:
Eevee is a real-time renderer that is physically based.
Cycles is a path tracer that is based on physical principles.
Layout, modelling, and previews are all done on the Workbench.
As add-ons, more renderers from third-party developers are available. Each render has its render settings to control render quality and performance.
Cameras, lights, and materials determine the appearance of the render. Although Eevee and Cycles share these, some features are only available in one or the other.
Renders can be divided into layers and passes, which can then be composited together for creative control or to incorporate real-world footage. Non-photorealistic line rendering can be added to Freestyle.
For quick iteration on lighting and shading, Blender supports interactive 3D viewport rendering for all render engines. After that, you can render and output the final high-quality image or animation.
Rendering in Blender
When the computer calculates the light in our scene to create the final image or animation, this is known as rendering. The render engine requires information from our scene to calculate lighting. This includes items such as:
Geometry
Materials
Light setup
Textures
World background
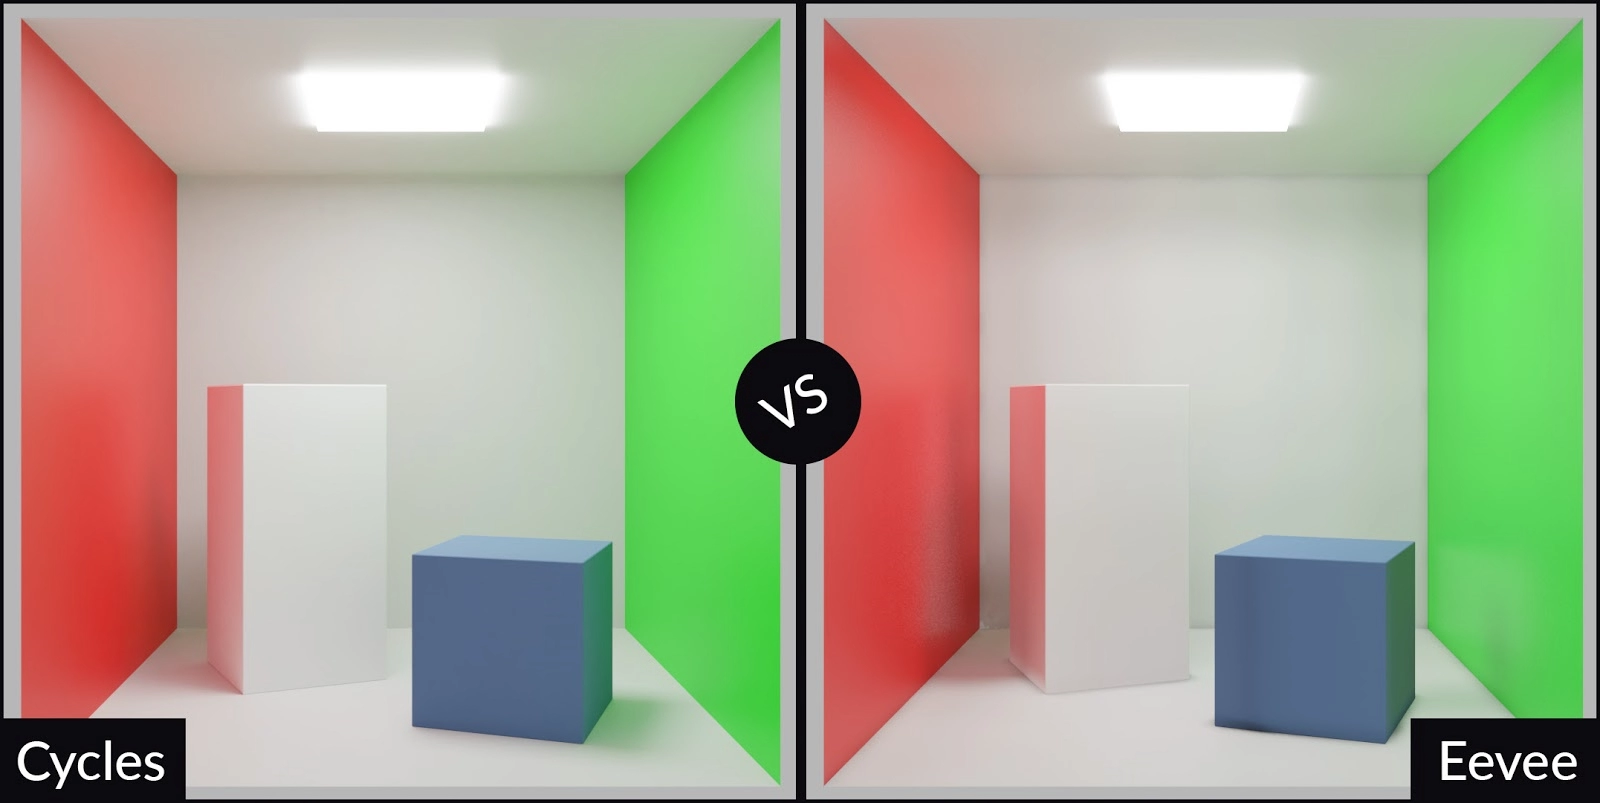
There's more to it, but these are the fundamental elements that the renderer in our scene employs to keep going. The blender comes with two render engines. Cycles and Eevee These two render engines aim to have a similar appearance but work in very different ways.
Eevee is a rasterized render engine, which means speed is its primary goal. This render engine is well suited to real-time or near-real-time performance. The ray-traced render engine Cycles, on the other hand, is a ray-traced render engine. This is a much slower render engine. It can be much more accurate and produce an image based on how light bounces in the real world. Both engines can produce a stunning image, but the resulting image is created vastly differently.
Shading Differences between Eevee and Cycle
Ambient Occlusion
Ambient occlusion in Cycles is determined by the distance between surfaces in 3D space. Eevee AO is based on the distance between characters from the screen's 2D image. Because it uses a depth pass to determine where to fade out the AO so that it doesn't cast on things far behind it (as shown in 2.79's viewport AO), it still looks excellent. However, occlusion will frequently 'attach' itself to objects before the depth cutoff.
Eevee can only occlude an object from a certain distance away. Notice how the box sides have high gradients while the surfaces where the monkey heads sit have minor gradients in the first Cycle rendered above. Both sharp and broad light-to-dark transitions appear to be quite natural. Both gradient sections are the same size in Eevee, making the sides of the box appear flat, and the occlusion beneath the monkeys appear too dark.
Both render engines support transparent materials, but no rendering engine enjoys dealing with them. The number of bounces determines how transparent a cycle is, after which the material becomes completely black.
The Alpha Blend material setting on Eevee works by layering materials on top of each other from back to front, and it requires a limit to avoid slowing down to a halt. If you have too many layers, it will stop drawing faces once it reaches that limit, resulting in a mushy render.
On the other hand, Eevee's Alpha Clip layers materials from front to back and looks nice and crisp. The trade-off is that the material is either completely opaque or transparent, with no ability to blend the two. As you move away from them, they also become more transparent. The back tree in the example above has its branches visible through the leaves, although it should be almost completely obscured.
Reflections
Any element of Cycles, at this point, can be assumed to work by bouncing light rays; therefore, significant reflections are unsurprising. Eevee uses a few tactics to try to imitate this, but it's still a long way from being accurate. Screen space reflections function by flipping the generated image from the camera around. This is quick and looks fantastic in most situations, but it won't work with anything that isn't visible to the camera, like the backs or bottoms of objects.
Eevee can also use reflection probes, which are virtual cameras made up of planes, cubes, or spheres. They render their surroundings before mapping that image onto the object. Planes can be updated in real-time because they are simple, but cube and sphere maps must be baked, and the objects they are getting data for will not look right when animated. The mapping will introduce some flaws because it's rare for a thing to be a perfect cube or sphere.
Global Illumination
Cycles have global illumination (a.k.a indirect lighting, radiosity, etc.) baked deep into how it works. Light paths pick up data (like what color has already been absorbed) from each bounce and use that information to determine what to do when it hits the next surface.
Eevee uses light probes to approximate it. Light probes collect photographs of the scene from their vantage point in space, then project the right colors onto nearby objects. Baking is the process of storing data rather than updating it every frame. As a result, animated things with baked indirect lighting should be avoided.
Many light probes would produce a scene similar to Cycles, but it would take an eternity to bake. Because there are a limited number of light probes, the space between them must be estimated, which might cause artifacts. Notice the faint dark spot on the blue cube in the render above and the uneven occlusion where it hits the ground.
To approximate light scattering beneath the surface, Eevee uses the thickness of an object and its normals. It looks pretty clean when used in small amounts, exactly what you want for the skin. Thin surfaces and sharp details, mainly when using the Random Walk SSS method, are where it falls short of Cycles. Notice how the chin and roof of the mouth aren't defined in the render above. On the other hand, the tail appears to be nearly accurate.
In Eevee, refraction is achieved by warping what is seen behind the object or from a cube map according to its normals and thickness. This means the light isn't bouncing around inside the object as it does in Cycles, and the thing isn't aware of light coming in from all sides. This can produce a fantastic-looking glass ball, bubble, or puddle of water, but it falls short when dealing with complex objects. Like the ones we had in Blender Internal, even ray traced refractions pale compared to the results we get from Cycles' full path tracing.
Shadows
Eevee's shadows are created by capturing an image of what each light sees and determining whether or not each pixel is included in that light. The more pixels they have to compare the shadows to, the more accurate the result. Soft shades and contact shadows help to compensate for shadow mapping's usual visual limitations, but without Cycles' light bounces, it can be challenging to achieve a natural-looking result.
Cycles aren't constrained by resolution or mapping techniques, and the difference that a few bounces can make in VFX compositing is crucial.
The rendering of 'god rays,' in which light is projected through a volume, is where Eevee kicks Cycles' butt. While Eevee is less accurate, it appears to be good enough in most cases and is noise-free. You can even use 3D textures to spice things up.
Volumes that are difficult to read, on the other hand, are a different story. Actually, ray scattering is required for dense-looking smoke, light emission, and casting shadows from the volume onto other objects
Eevee currently only supports camera motion blur, whereas Cycles supports motion blur from most sources. Moving objects or deforming armatures will have no effect. It also lacks unique products such as rolling shutters. However, because this is not a rasterization limitation, it will almost certainly be updated in the future. Cycles started the same way and have steadily improved their motion blur over time. It's not a simple problem to solve, and it can take longer.
Eevee is capable of handling some extremely complicated node configurations! Kent's entirely hardwood shader pack is shown in the image above. Remember that Eevee has a strict texture limit of 24 per material. Although you're unlikely to encounter this in a typical PBR workflow, it's something to be aware of because it's possible to do so while mixing new materials.
In Eevee, you won't be able to use True or Vector displacement, though this may change in the future.
Complex bump details are also difficult to render. Notice the wood grain on the spoon in the image above. Cycles look much more detailed than the real-time version, which uses few screen space reflection samples because it averages many instances.
Polygon Count
Eevee will always be faster at rendering than Cycles, but in a race to see how many polygons they can render without crashing, Cycles will win by a large margin. This is due to its use of instance, and that path tracers and rasterization engines handle polygons differently.
Eevee's hair is better-looking than real-life hair should be, and it can handle a ridiculous amount of strands. Take a look at Daniel Bystedt's tiger demo to see what's possible!
When looking at the shadows that Eevee hair casts and the lack of scattering through groups of strands that we would get if we used the Cycles Principled Hair BSDF, the limitations of Eevee hair become apparent. Look at the gradation of color and the hair across the side of the head, the shadow on the forehead, and where the hair meets the neck and shoulder in the example above.
Eevee supports depth of field, and it looks great! However, it is still approximated, whereas Cycles are physically correct. The only difference is the lack of bells and whistles like polygon shapes and anamorphic distortion and the transition between sharp and blurred areas (notice the spikes along the chin in the example above). However, it will work perfectly in most cases and be significantly faster. Blender 2.81 or 2.82 will significantly improve Eevee DOF, making it more comparable to Cycles.
Light Ray Data
Path tracing provides us with fascinating information about how light moves around, allowing us to create cool but unnatural effects such as over-the-top caustics or objects that are invisible to certain passes. Eevee simply does not have access to this information.
When it comes to VFX work, this last point is crucial. The major ones, such as Mist, Normal, and AO, are present in Eevee, but essential features such as Vector, Object and Material Index, Shadow, Emission, and Cryptomatte are still missing. These may improve over time, but due to the lack of ray information, they will never allow the same level of fine-tuning.
Workbench is the software's original engine, optimized for the fastest, most graphically simplistic rendering during the modelling and test animation process. Initially known as Blender Render, it was not intended to be a rendering engine.
We don't recommend using it as a final rendering engine, but you can use it to show off your work in the 3D viewport. When you need to give your client a quick update on the status of a scene, animation, or rig setup, Workbench is a great tool to use.
Workbench, like 3D sculpting programs like Zbrush, allows you to assign colors and primary material captures (or MatCap) to specified shapes and objects at random or individually to make your model stand out for test animations or scenes compositions. For added distinction, vertex and texture painting are also options. It also has viewport rendering options such as see-through or x-ray shading, cavity and simple shadow shading, and cavity and simple shadow shading.
FAQs
Is Blender good for rendering?
Blender includes a powerful, unbiased rendering engine that produces stunning, ultra-realistic results.
Do professionals use blenders?
Blender is increasingly being used by professionals across various fields. However, larger companies, such as Bethesda and Rockstar, do not use Blender because they already use other software tools in their pipeline (such as Maya) and see no benefit in switching.
Is Blender powerful?
Blender is arguably the most powerful open-source application currently available, and it is one of the most powerful creative applications on the web. It's a jack-of-all-trades application that lets you do almost anything to a professional level.
Conclusion
We hope that this article has helped you enhance your knowledge regarding the subject of Rendering. The article’s goal in making these comparisons isn't to dampen your enthusiasm for Eevee but to help you decide which renderer to use for each project. Third-party developers have created several other compatible (and free) renderers that can be integrated into Blender.


 9+ registered

