


Introduction
Remote Method Invocation(RMI) allows remote communication between Java programs, and you can use it for a distributed object reference system. An object which issues its interface on other machines is a distributed object, whereas a Remote Object is a distributed object whose state encapsulates.
When we work with an RMI application in Java, running the application is a process that you need to understand to get the implementation correct adequately. We have already learned about an RMI application's concept, usage, and functionality in our previous article, Remote Method Invocation In Java, so be sure to check that out before going further in this article. Through this article, we will learn how we can run an RMI Application in Java step by step with the help of an example.
Running Java RMI Application
One of the key advantages of working with a Java RMI application is the ease of implementation. You can run such an application by following a few steps in order. Here we will go through the steps one by one with the help of an example.
Setting Up The Example Project
Before running the application, we must create some classes and interfaces for our example.
Firstly, We will create an interface that describes the methods that remote clients can invoke. The interface should extend the Remote interface, and the method prototype in the interface should throw the RemoteException.
Program
import java.rmi.*;
public interface Adder extends Remote{


//service to perform simple addition of two integers
public int add(int x,int y)throws RemoteException;
}

Next, we will implement the remote interface. For that, the class should extend to UnicastRemoteObject class of java.rmi package. We also need to make a default constructor throw the java.rmi.RemoteException from its parent constructor in the class.
Program
import java.rmi.*;
import java.rmi.server.*;


//implementing the adder service
public class AdderRemote extends UnicastRemoteObject implements Adder{


AdderRemote()throws RemoteException{
super();
}


public int add(int x,int y){return x+y;}


}
Finally, we need two classes, Server and Client, for our application.
We create the Server class for hosting a service. In the Server class, we use the rebind method of the Naming class(java.rmi.Naming.rebind()) to bind the remote object to the new name. The method takes an object reference (service name) and an instances reference as its two arguments. Here we are using 5000 as our port number.
Program
import java.rmi.*;


public class MyServer{


public static void main(String args[]){
try{


Adder stub=new AdderRemote();


//we are binding the remote object by the name sonoo
Naming.rebind("rmi://localhost:5000/sonoo",stub);


}catch(Exception e){System.out.println(e);}
}


}
We will also create the Client application program, which will invoke the lookup method of the Naming class(java.rmi.Naming.lookup()) method for RMI URL and return an instance of object type (Factorial Interface) for the stub. All RMI occurs on this object.
Program
import java.rmi.*;


public class MyClient{


public static void main(String args[]){
try{


Adder stub=(Adder)Naming.lookup("rmi://localhost:5000/sonoo");
System.out.println(stub.add(34,4));


}catch(Exception e){System.out.println(e);}
}


}2. Executing The Application
After saving all of the java files above into a standard directory, you can start to execute the application by following a few simple steps.
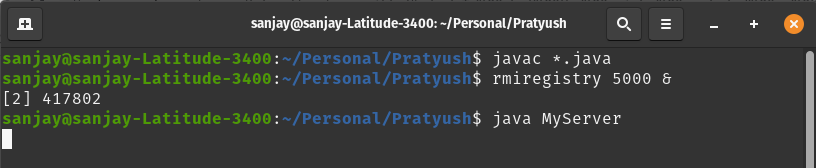
Firstly, we will compile all of the java files that we saved in our directory.

Next, we will start the RMI registry with the rmiregistry command with the port number that we are using(5000) on the same terminal.

Now we can run our Server file(MyServer).
Finally, we will run the Client file(MyClient) on a separate terminal and obtain the expected
output from our application.

Also see, Duck Number in Java and Hashcode Method in Java


 9+ registered

