Setup Procedure
We will look into detailed steps to setup a basic REST Assured Maven Project in Eclipse IDE.
We will start with creating our first project for Rest Assured.
In the above section, we have already seen the pre-requisites, so we can assume that we should have Java on our system and we should have our required IDE, i.e., Eclipse. Maven will already be present if we have Eclipse.
Note: We can run our project from Eclipse, but if we want to run outside of Eclipse, for e.g., CL(Command Line), then we will need Maven on the system as well, which needs to be downloaded separately.
Let us now start with the setup process.
Open Eclipse
First, we will open our Eclipse IDE.

After this, one window pops up like the one below:

Click on "Launch" to launch your Eclipse workspace.
Create a Maven Project
Now, after our workspace opens, we will click on the following icon, i.e., "File", to create a maven project.

When you click on the above icon, a new text box pops up like the following:

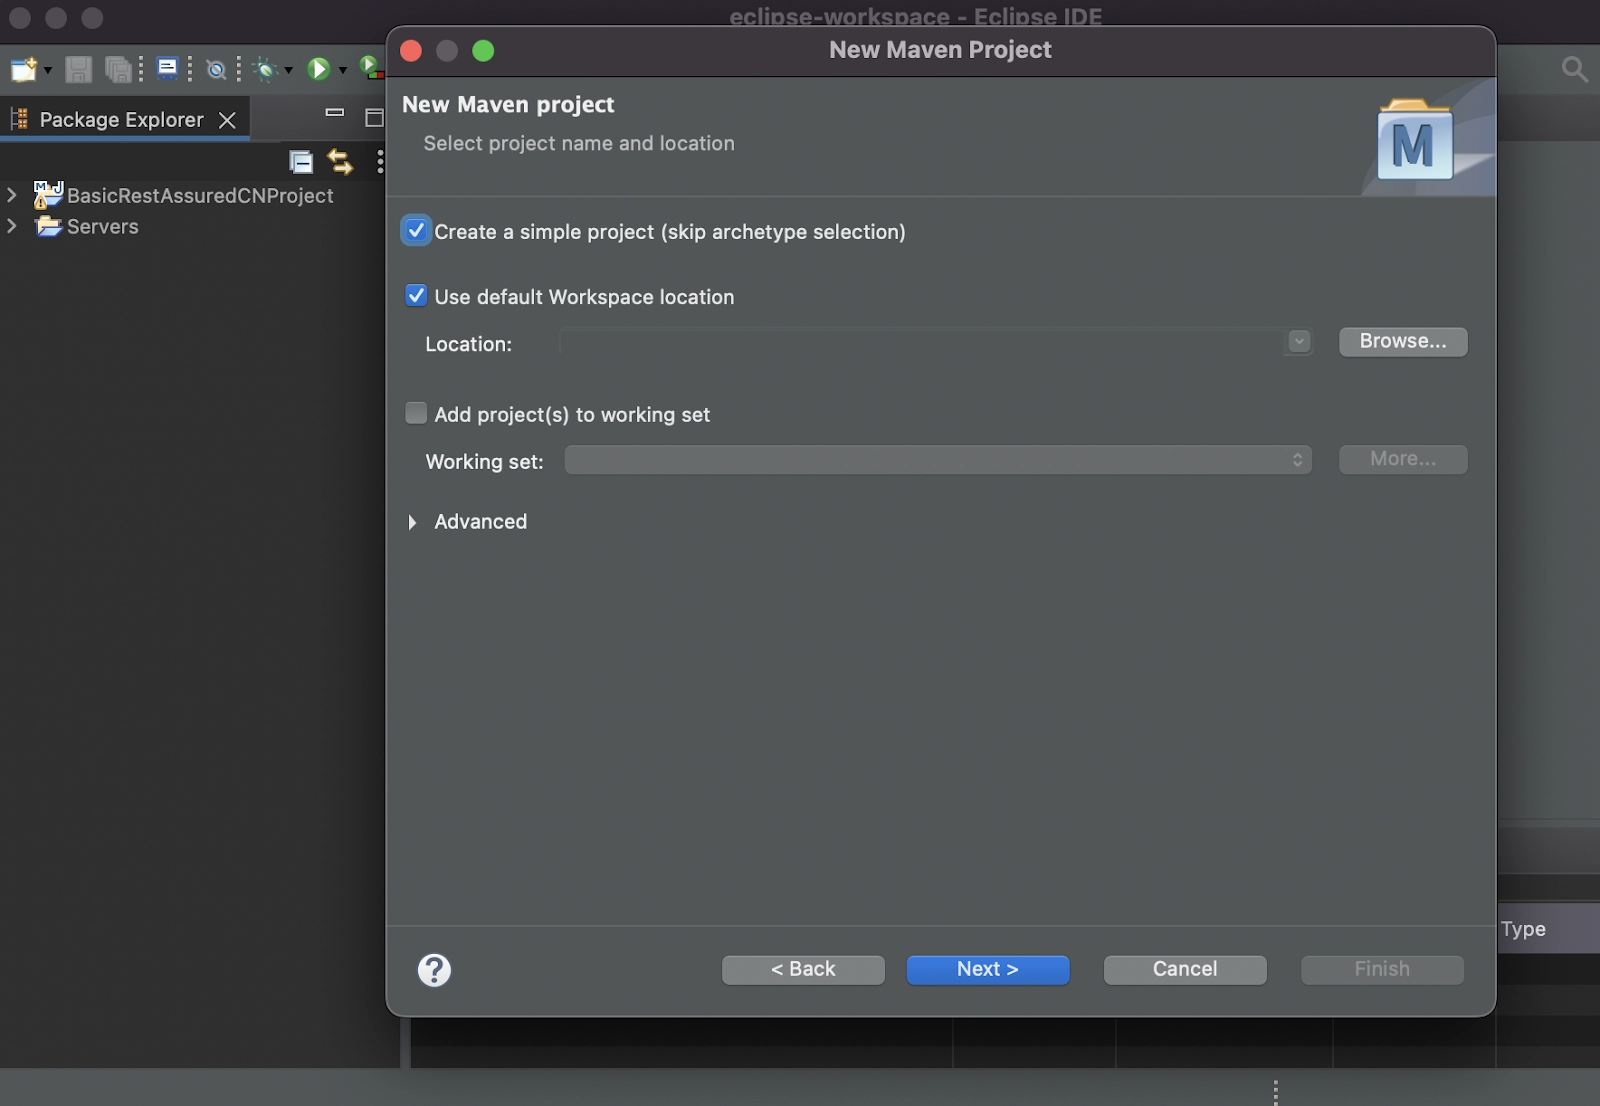
Here we will select the 'Maven Project'> 'Next', which will redirect us to a new text box pop-up like the one below. Here we will be selecting the checkbox for "Create a simple project (skip archetype selection)". Then leave the rest of the fields as it is. Click on 'Next'.
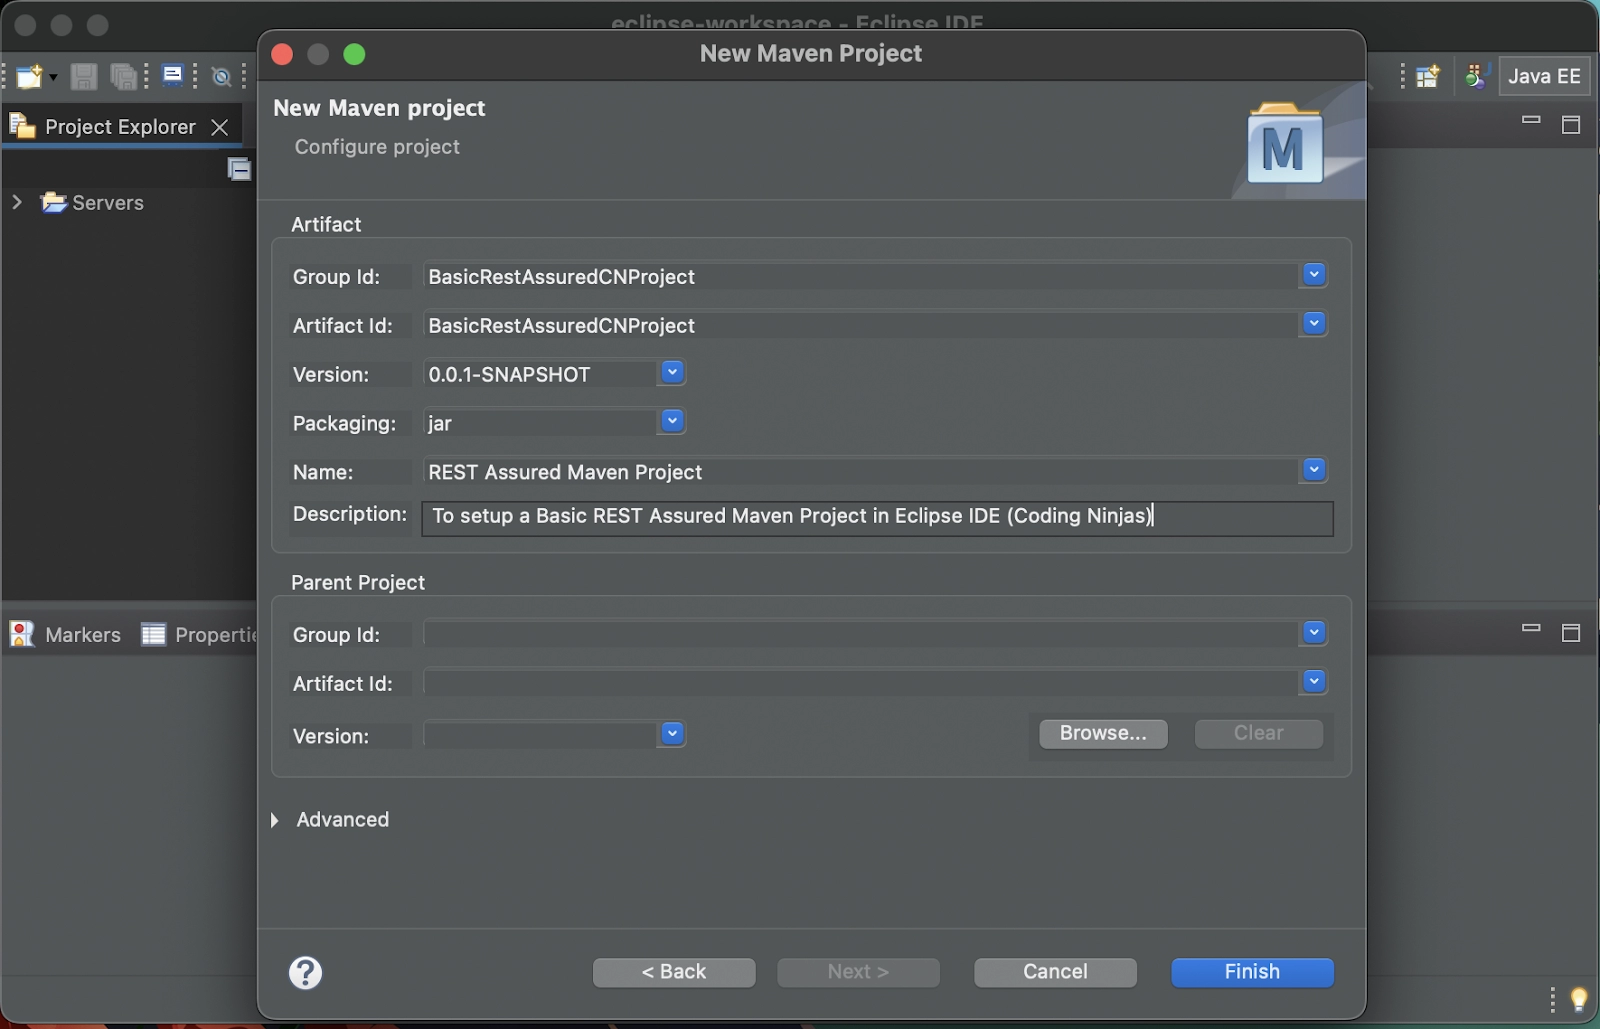
The next text box then pops up where we can give "Group Id", "Artifact Id", "Name", and "Description" for the artifact.
You can fill it up like the below image:
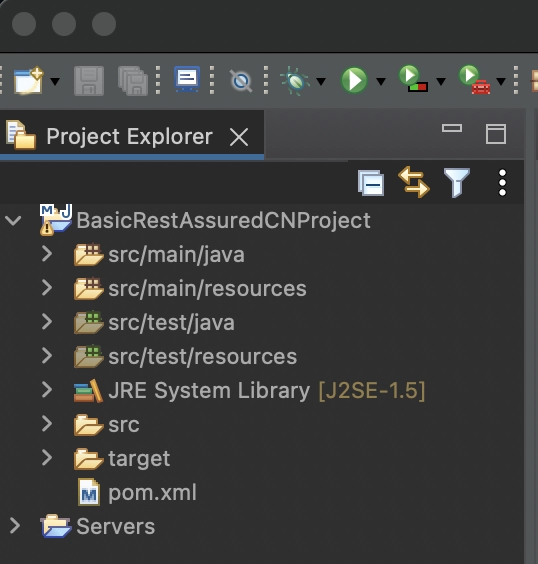
Click on the 'Finish' button after giving the details. Now we can see a Maven project built in our Eclipse workspace with the name given in the 'Artifact Id'.
Adding Dependencies in Pom.xml
Now we will move on to our project's 'Pom.xml' file to add on some maven dependencies.

Now, we will add some dependencies as required in the project inside the <dependencies></dependencies> tag.
Go to the maven central repository. Here we can search for our dependencies.
After adding our dependencies, the pom.xml in the project explorer will look like this:
‘pom.xml’ File:
<project xmlns="http://maven.apache.org/POM/4.0.0" xmlns:xsi="http://www.w3.org/2001/XMLSchema-instance" xsi:schemaLocation="http://maven.apache.org/POM/4.0.0 https://maven.apache.org/xsd/maven-4.0.0.xsd">
  <modelVersion>4.0.0</modelVersion>
  <groupId>BasicRestAssuredCNProject</groupId>
  <artifactId>BasicRestAssuredCNProject</artifactId>
  <version>0.0.1-SNAPSHOT</version>
  <name>REST Assured Maven Project</name>
  <description>To setup a Basic REST Assured Maven Project in Eclipse IDE (Coding Ninjas)</description>

  <dependencies>
	<!-- https://mvnrepository.com/artifact/io.rest-assured/rest-assured -->
	<dependency>
     	<groupId>io.rest-assured</groupId>
     	<artifactId>rest-assured</artifactId>
     	<version>5.2.0</version>
     	<scope>test</scope>
	</dependency>

	<!-- https://mvnrepository.com/artifact/io.rest-assured/json-schema-validator -->
	<dependency>
     	<groupId>io.rest-assured</groupId>
     	<artifactId>json-schema-validator</artifactId>
     	<version>5.2.0</version>
     	<scope>test</scope>
	</dependency>

	<!-- https://mvnrepository.com/artifact/org.testng/testng -->
	<dependency>
     	<groupId>org.testng</groupId>
     	<artifactId>testng</artifactId>
     	<version>7.6.1</version>
     	<scope>test</scope>
	</dependency>

	<!-- https://mvnrepository.com/artifact/javax.xml.bind/jaxb-api -->
	<dependency>
     	<groupId>javax.xml.bind</groupId>
     	<artifactId>jaxb-api</artifactId>
     	<version>2.4.0-b180830.0359</version>
	</dependency>

	<!-- https://mvnrepository.com/artifact/junit/junit -->
	<dependency>
     	<groupId>junit</groupId>
     	<artifactId>junit</artifactId>
     	<version>4.13.2</version>
     	<scope>test</scope>
	</dependency>

	<!-- https://mvnrepository.com/artifact/com.fasterxml.jackson.core/jackson-databind -->
	<dependency>
     	<groupId>com.fasterxml.jackson.core</groupId>
     	<artifactId>jackson-databind</artifactId>
     	<version>2.14.0-rc2</version>
	</dependency>

	<!-- https://mvnrepository.com/artifact/com.github.fge/json-schema-validator -->
	<dependency>
     	<groupId>com.github.fge</groupId>
     	<artifactId>json-schema-validator</artifactId>
     	<version>2.2.6</version>
	</dependency>
  </dependencies>
</project>
Save the pom.xml file.
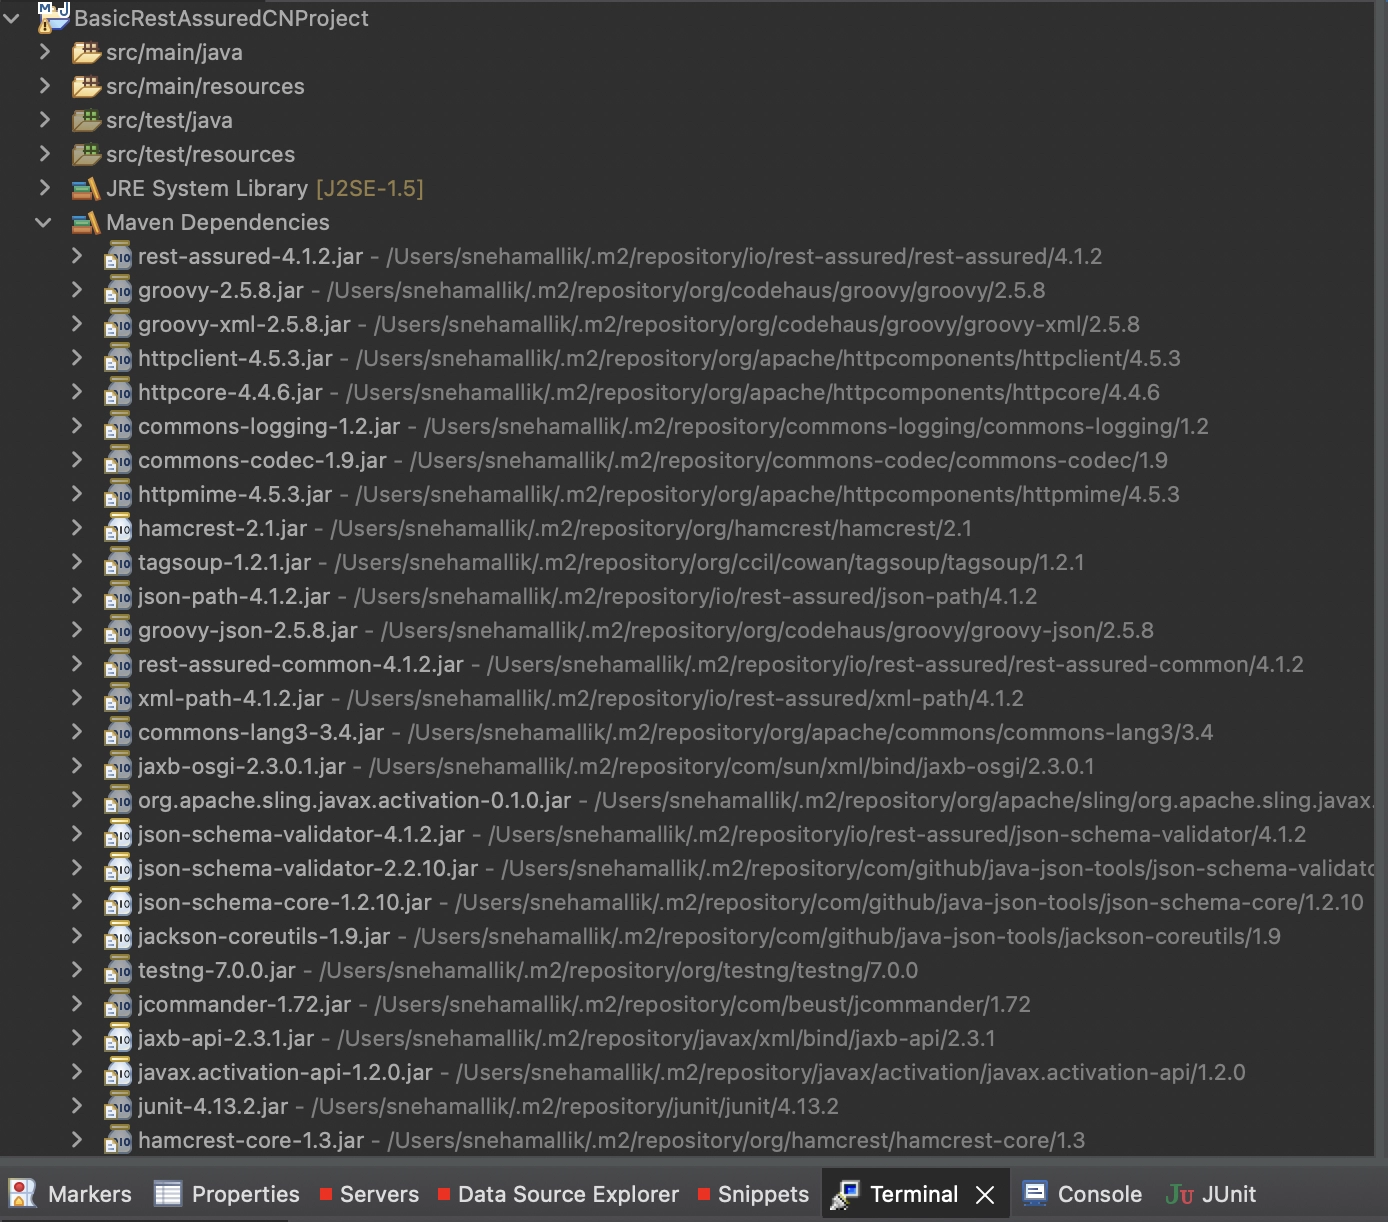
Now we can go to the left panel of 'Project Explorer' to see the dependencies downloaded by Maven.

Check the Libraries Added
Click on 'Maven Dependencies', and we can see the various dependencies that got downloaded after adding dependencies to the 'pom.xml' file.
With this, we got the required dependencies downloaded for our project. We also learned how to setup a basic Rest Assured maven project in Eclipse IDE.
Now let's move on to the FAQs section.
Must Read Apache Server
Frequently Asked Questions
What is Rest Assured?
REST Assured is a Java DSL, or Domain-Specific Language, that allows you to write powerful, readable, and maintainable tests in Java for your RESTful APIs. It is an open-source Java-based framework.
Why is Maven used in projects?
Maven primarily assists in the download of dependencies, which are libraries or JAR files, for Java-based applications. Due to the possibility of various versions of individual packages, the tool aids in obtaining the appropriate JAR files for each project.
Where is REST assured used?
Rest Assured is used to validate REST APIs using the Java library. The Java library acts as a headless client to interact with Rest web services. It is based on the Rest Assured library and can validate the server's HTTP responses.
What are the different dependencies required for REST Assured testing?
The various dependencies required for testing REST assured are: Rest assured, Rest Assured Common, Rest Assured All, testNG, and JSON-path.
How can Eclipse or another IDE be configured to use Rest-Assured?
Step 1: In Eclipse, create a basic Maven project.
Step 2: Get the most recent stable version of the dependency "rest-assured".
Step 3: Include the mentioned Dependency in the project's "pom.xml" file in the directory.
Step 4: Create a new class and package as per need and include the TestNG library.
Conclusion
In this article, we learned to setup a basic REST assured Maven Project in Eclipse IDE. We discussed this topic in detail, along with its practical implementation.
If you would like to learn more similar to this topic, check out our related articles on-
Refer to our guided paths on Coding Ninjas Studio to learn more about DSA, JavaScript, System Design, DBMS, Java, etc. Enroll in our courses and refer to the mock test and problems available. Take a look at the interview experiences and interview bundle for placement preparations.
Happy Learning, Ninja!🥷✨


 6+ registered

