Code360 powered by Coding Ninjas X Naukri.com. Code360 powered by Coding Ninjas X Naukri.com
Table of contents
1.
Introduction
2.
Setup, TearDown, and Report Scripts
2.1.
Setup and TearDown scripts
2.2.
Report script
3.
Requirements Compliance
3.1.
Manage requirements
3.2.
Import and export requirements
4.
User Interface Reference
5.
Frequently Asked Questions
5.1.
What is Ready API?
5.2.
What is a Report script?
5.3.
What are Setup and TearDown scripts?
6.
Conclusion
Last Updated: Mar 27, 2024

Setup, requirements, and UI References in ReadyAPI

Author Sonu Deo
0 upvote

Introduction

ReadyAPI is an automation testing tool used by developers and testers to validate the backend application. ReadyAPI allows us to manage, create, and execute automated performance, functional, and security, tests in one centralized interface. It is a no-code API testing platform that is designed to simplify your testing workflows.

In this article, we will be going through the setup, requirements, and UI references in ReadyApi. Also, we will explore the various pages and editors available under the ReadyAPI Functional Tests node. 
Setup, requirements, and UI References in ReadyAPI

So, let's get started with the article to cover the setup, requirements, and UI references in ReadyApi.

Setup, TearDown, and Report Scripts

Setup is the first and important part among all the three Setup, requirements, and UI References in ReadyAPI. We can use the Setup, TearDown, and Report scripts for enhancing the test items’ functionality for the ReadyAPI. In this section, we will learn about all three scripts in detail.

Setup and TearDown scripts

Setup and Teardown scripts are available in all test items, including projectstest suites, and test cases. The test engine runs its Setup script before performing each test item. When the test item run is over, the test engine executes its TearDown script.

For setup and teardown scripts we have the following scripting objects:

  • virtRunner:–  It is the object used for controlling virtual services.
  • log:– This object is used for interaction with the log.
  • context:– The context object contains various data from the current test. For example, properties.
  • testRunner:– It is the interface of the test runner.
     

We can edit the setup and Teardown scripts for the project, test suite, and test case in the editor in the Setup and TearDown tabs.
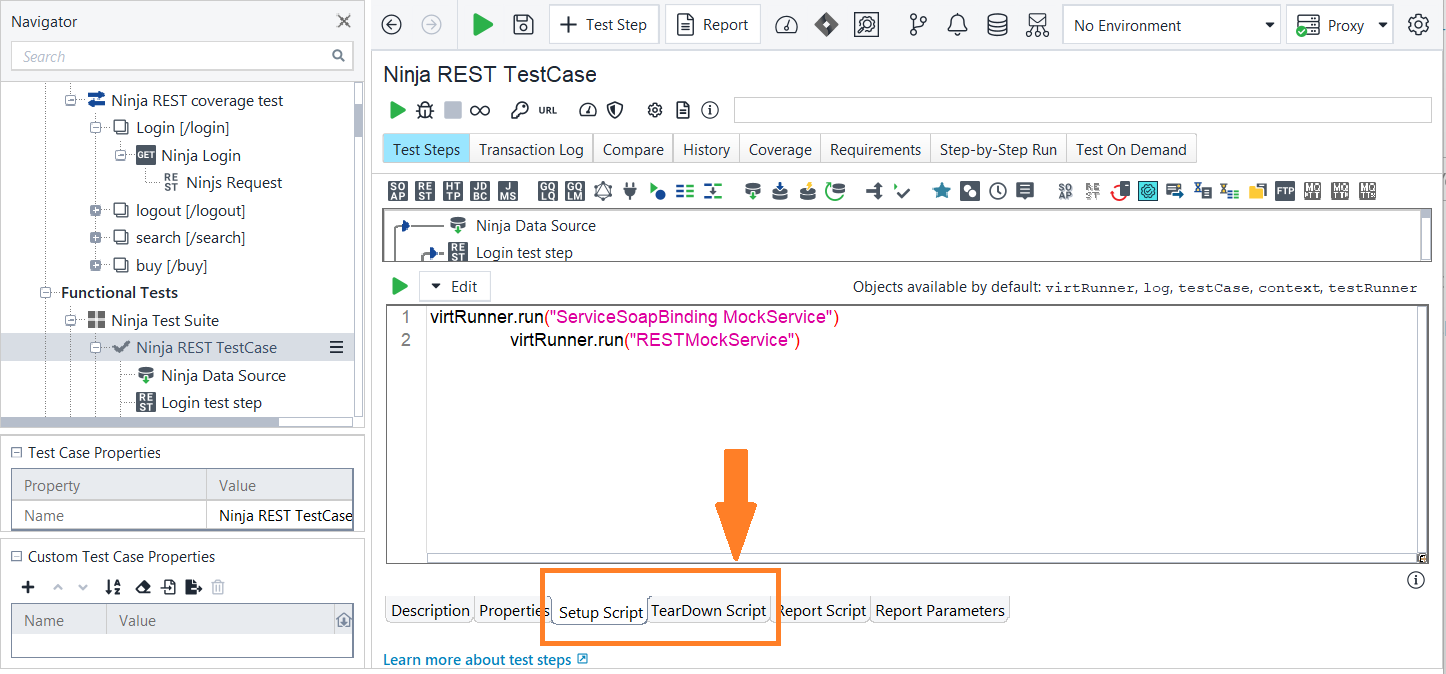
Setup and TearDown scripts

Let’s see an example of editing the script for a test case run to understand better. In this example, we will learn how to reset properties at test run start.

// To get the default value from the project property
def value = testRunner.testCase.testSuite.project.getPropertyValue("defaultValue")

// To set the test case property to the default value
testRunner.testCase.setPropertyValue("my property", defValue)

// Clear the property value
testRunner.testCase.setPropertyValue("empty property", "");


The above groovy code is a setup script which resets the project properties to the default value fro a test case run.

Report script

The Report script is available for test cases and test suites. The test engine performs the Report script of a test item when we generate a report for it.

For the report script we have the following scripting objects:

  • log:– This object is used for interaction with the log.
  • report:– It is the object that contains all of the data that is utilised to populate the report. Its members enable us to add or modify data and subreport data used by the report engine to populate the report template.
  • params:– It is the object that contains all the defined report parameters with their values.
     

We can edit the script for the test case and test suit in the Report tab as shown in the image below.
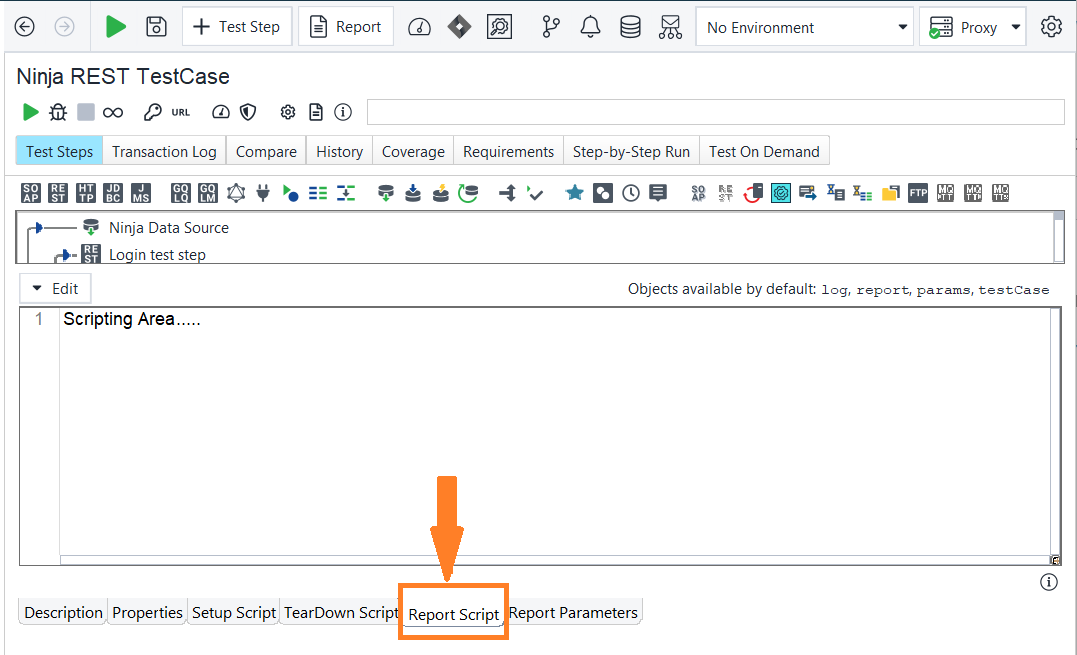
Report script

Requirements Compliance

ReadyAPI includes the management of basic requirements that allow us to add product requirements to our projects and test cases.

Manage requirements

To manage our requirements we can work with requirements generally on the project level and on the test case level.

  • On the project level: To open the Requirements dialogue, right-click our project in the Navigator, and select the Requirements.
    We can also select a project by clicking on it, and open the Requirements dialogue by selecting the Project -> Requirements option on the ReadyAPI toolbar.
  • On the test case level: We can double-click the test case in the Navigator, and directly switch to the Requirements page.
Manage requirements

Both the Requirements dialogue and page consist of the following two parts:

  1. The list of requirements.
  2. The tabs contain the connected test cases, links, and descriptions for every requirement.

The list of requirements is as follows:

Column

Description

ID It is the requirement identifier.
Name It is the requirement name or title.
Short Description It is the requirement description.
Status

The scoping status.

It can be blank, In Scope, or Out of Scope.

Test Cases It is the number of connected test cases.

We can use the toolbar to work with the list of requirements:

  1. :– Used to add a requirement.
  2. :– Used for cloning a requirement.
  3. :– It removes a requirement.
  4. :– It links a requirement to a test case.

All requirements we add to the list will appear as results in test case reports.

Import and export requirements

On the project level, we can import and export the requirements in CSV format.

The importing CSV file we plan to use should include at least one row for each requirement. It can have the following columns:

ID Name Short Description Status Test Cases Links Description
Mandatory for import. Mandatory for import. Mandatory for import. Mandatory for import. Optional Optional Optional

User Interface Reference

This section describes various pages and editors available under the ReadyAPI Functional Tests node.

  • Project Editor:- Our work in ReadyAPI is grouped into projects, which are displayed in the workspace Navigator under the root node. A project can include as many functional tests, load tests, and service simulators as we need for testing. This all can be achieved in the Project Editor.
  • Test Suite Editor:- A test suite is a group of test cases that can be used to organize functional tests into logical components. Our project can contain an unlimited number of test suites, which we can view and execute sequentially or concurrently in the Test Suite Editor.
  • Test Case Editor:- To manage test cases, use the test case editor to customize their behaviour, analyze the test run history, troubleshoot tests, and so on.


With this section now we have reached the end of our topic Setup, requirements, and UI References in ReadyAPI. We hope that this article was really helpful.

Frequently Asked Questions

What is Ready API?

ReadyAPI is a no-code API testing platform that is designed to simplify your testing workflows. End-to-end tests can be automated and scaled across multiple API types. Run load tests that are compatible with your functional tests.

What is a Report script?

The Report script is available for test cases and test suites. The test engine performs the Report script of a test item when we generate a report for it.

What are Setup and TearDown scripts?

Setup and Teardown scripts are available in all test items, including projects, test suites, and test cases. The test engine runs its Setup script before performing each test item. When the test item run is over, the test engine executes its TearDown script.

Conclusion

In this article, we have discussed the setup, requirements, and UI references in ReadyApi with an example of the setup script. In the topic of Setup, requirements, and UI References in ReadyAPI we first learned about the setup scripts followed by the requirement compliances and finally the UI references.

Check out these articles for more clear understanding of Ready API and its features:


Visit our website to read more such blogs. Make sure you enroll in the courses we provide, take mock tests, solve problems, and interview puzzles. Also, you can pay attention to interview stuff- interview experiences and an interview bundle for placement preparations.

Happy Learning!

Live masterclass