Do you think IIT Guwahati certified course can help you in your career?
Introduction
With augmented reality, "anchors" serve as a common reference point to enable users to place digital content at the same physical location so that it can be seen on different devices from the same position and orientation. The Azure Spatial Anchors service and developer platform enable multi-user, spatially aware mixed reality experiences for HoloLens, iOS, and Android. Azure Spatial Anchors provides developers with essential capabilities to build spatially-aware mixed reality applications. This is what we are going to learn about in this blog. Let us dive deeper into the topic.
Azure Spatial Anchors overview
As we read in the previous section, Azure Spatial anchors enable users to build spatially-aware mixed reality applications by providing some capabilities. These applications may support Microsoft HoloLens, Android-based devices supporting ARCore, and iOS-based devices supporting ARKit. Azure Spatial Anchors facilitate developers to work with mixed reality platforms to perceive spaces, specify precise points of interest, and recognize those points of interest, also referred to as Spatial Anchors from supported devices.
Examples
Some example use cases enabled by Spatial Anchors are:
Multi-user experiences: It is easy for people in the same location to participate in multi-user mixed reality applications with Azure Spatial Anchors.
Way-finding: Developers can connect Spatial Anchors, creating relationships between them.
Persisting virtual content in the real world: Using a smartphone app or HoloLens device, a user can display a virtual calendar on a conference room wall. A user could receive contextual information in an industrial setting about a machine by pointing a supported device camera at it.
Azure Spatial Anchors comprises a managed service and client SDKs for supported device platforms. The following sections provide information about building apps using Azure Spatial Anchors.
Running the Azure Spatial Anchors sample app using Unity(C#)
For Hololens devices
Pre-requisites
A HoloLens device with developer mode enabled is needed. You must install Windows 10 May 2020 Update or later on the device. After opening the Settings app, go to Update & Security, and select Check for updates to update to the latest release on HoloLens.
A computer with Visual Studio 2019 or later is required. Your Visual Studio installation must comprise the Universal Windows Platform development workload and the Windows 10 SDK or newercomponent. Git for Windows and Git LFS should be installed.
Unity must be installed.
Step 1: Create a Spatial Anchors resource
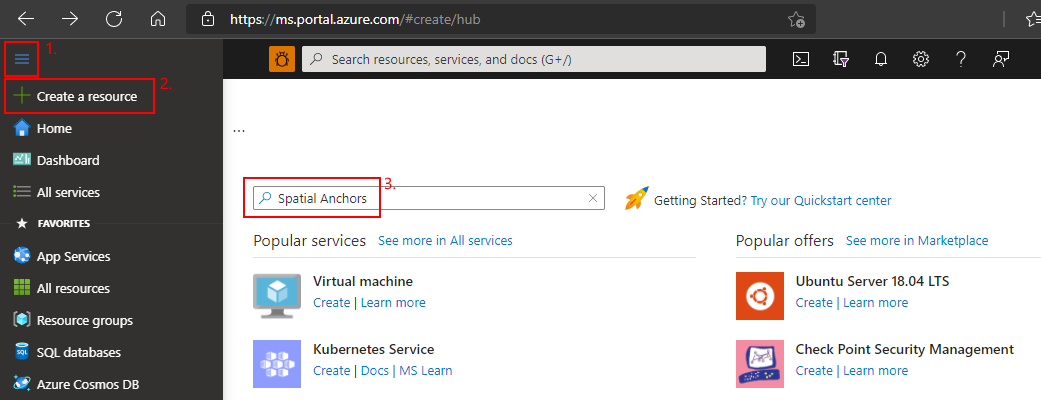
Go to the Azure portal and select Create a resource on the left pane.
Using the search box, search for Spatial Anchors.
Select Spatial Anchors, and then select Create.
On the Spatial Anchors Account pane,
Enter a unique resource name by using regular alphanumeric characters.
Select the subscription you want the resource to be attached to.
Then, create a resource group by selecting Create new. Name it myResourceGroup, and then select OK.
Azure resource groups are logical containers for deploying and managing Azure resources like web apps, databases, and storage accounts. You can, for example, delete the entire document.
Select a location in which you want to place the resource.
Select Create.
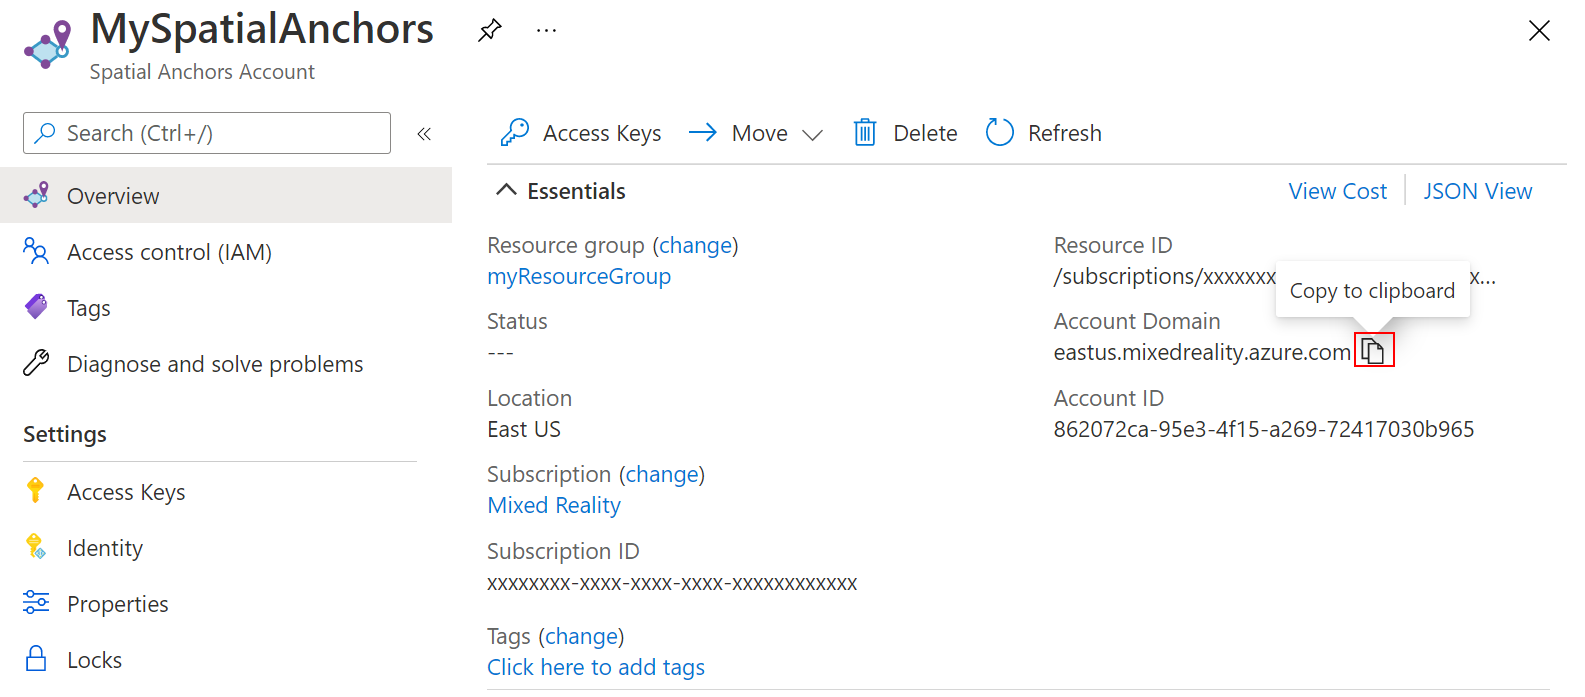
After the creation of the resource, the Azure portal shows that your deployment is complete.
Select Go to resource option. Copy the resource's Account ID value into a text editor to be used later.
Copy the resource's Account Domain value into a text editor to be used later.
Select Access Key under Settings. Copy the Primary key value, Account Key, into a text editor to be used later.
Step 2: Download the sample project and import SDK
Clone the samples repository by running the following commands:
git clone https://github.com/Azure/azure-spatial-anchors-samples.git
cd ./azure-spatial-anchors-samples
Import ASA SDK
Follow the instructions to download and import the ASA SDK packages required for the HoloLens platform.
Step 3: Configure Unity
Open the project in the Unity folder. It might prompt you about a difference between the project version and the version installed on your machine. This warning is okay, as long as your version of Unity Editor is newer than the one that you created the project with. Suppose your version is newer; select Continue. If your version is older than the project's needs, select Quit and upgrade your Unity Editor.
Select File > Build Settings.
Select Universal Windows Platform in the Platform section. Change the Target Device to HoloLens. Change the platform to Universal Windows Platform by selecting Switch Platform. Unity might prompt you to install UWP support components if they're missing.
Close the Build Settings window.
Step 4: Configure the account information
The subsequent step is configuring the app to use your account information. Copy the Account Key, Account ID, and Account Domain values to a text editor in the "Create a Spatial Anchors resource" section beforehand. On the Project pane, Go to Assets\AzureSpatialAnchors on the project pane. SDK\Resources.
Select SpatialAnchorConfig and enter the Account Key as the value for Spatial Anchors Account Key, the Account ID as the value for Spatial Anchors Account Id, and the Account Domain as the value for Spatial Anchors Account Domain.
Step 5: Export the HoloLens Visual Studio project
Select File > Build Settings. Ensure all the scenes have a checkmark under Scenes In Build. Select Build. Select a folder in which you want to export the HoloLens Visual Studio project in the dialog box. A folder containing the exported HoloLens project will appear when the export is complete.
Step 6: Deploy the HoloLens application
Double-click on HelloAR U3D.sln and open the project in Visual Studio. Change the Solution Configuration to Release and change the Solution Platform to x86. Select a device from the deployment target options. Using HoloLens 2, instead of x86, use ARM64 as the Solution Platform.
Turning on the HoloLens device, sign in, and connect the device to the PC by using a USB cable.
Open Debug > Start debugging to deploy your app and start debugging.
Select BasicDemo using the arrows in the app, then press Go! button to run the demo. Follow the instructions to place and recall an anchor.
For Android devices
The first four steps are the same as that for hololens devices. The next steps are:
Step 5: Export the Android Studio project
Select File > Build Settings. Ensure all the scenes have a checkmark under Scenes In Build. Select your device in Run Device. Select Build And Run. When you'll be asked to save an .apk file, pick a name. Select BasicDemo using the arrows in the app, then press Go! button to run the demo.
For ios devices
The first four steps are the same as that for hololens devices. The next steps are:
Step 5: Export the Xcode project
Select File > Build Settings. Ensure all the scenes have a checkmark under Scenes In Build. Select Build. Select a folder to export the Xcode project to on the open pane. After the export is complete, a folder that contains the exported Xcode project appears.
Step 6: Open the Xcode project.
Open your Unity-iPhone.xcodeproj project in Xcode. Either launch Xcode and open the exported Unity-iPhone.xcodeproj project or launch the project in Xcode by running the following command from the location where you exported the project:
open ./Unity-iPhone.xcodeproj
Select the root Unity-iPhone node to view the project settings, and then select the General tab. Under Deployment Info, ensure the deployment target is set to iOS 11.0. Select the Signing & Capabilities tab and ensure that Automatically manage signing is enabled. If it's not, enable it, and then reset the build settings by selecting Enable Automatic on the pane that appears.
Frequently Asked Questions
What is the usage of Spatial anchors?
Spatial anchors serve as a common reference point to enable users to place digital content at the same physical location so that it can be seen on different devices from the same position and orientation.
What is a cloud anchor?
Cloud Anchors are the ones that connect real world locations with digital content that anyone can access from compatible mobile devices.
What are azure object anchors?
Azure Object Anchors is a mixed reality service that helps you create rich, immersive experiences by automatically aligning 3D content with physical objects.
Conclusion
In this article, we have extensively discussed Spatial anchors in azure, their usage, and running the azure spatial anchor app using unity for hololens, android and ios devices. Having gone through this article, I am sure you must be excited to read similar blogs. Coding Ninjas has got you covered. Here are some similar blogs to redirect: We hope this blog has helped you enhance your knowledge, and if you wish to learn more, check out our Coding Ninjas Blog site and visit our Library. Here are some courses provided by Coding Ninjas: Basics of C++ with DSA, Competitive Programming and MERN Stack Web Development. Do upvote our blog to help other ninjas grow.


 9+ registered

