Do you think IIT Guwahati certified course can help you in your career?
Introduction
Spring Boot's AOP( Aspect-Oriented Programming ) is a programming pattern that allows the cross-cutting concern. The cross-cutting concern is different from the main application logic. We can add additional functionality to our application without modifying the code.
This article will focus on the Spring Boot AOP before advice. We use Before advice to achieve the cross-cutting. This advice ensures that advice runs before executing the target method.
We use the @Before notation to implement the Spring Boot AOP before advice. A few crucial points about Spring Boot AOP Before advice is mentioned below:
This advice runs before the target method execution
It can't stop the execution of the target method unless it throws.
It can access all arguments of the Target method.
It can't alter the argument values to the original method.
Before advice, has to specify a pointcut expression or use a separate @Pointcut expression provider.
Check out our comprehensive Spring Boot Course today for deeper understanding of these concepts.
Let's understand Spring Boot AOP before advice with an example.
Spring Boot AOP Before Advice Setup
This section will set up all the necessary components before moving on with the example.
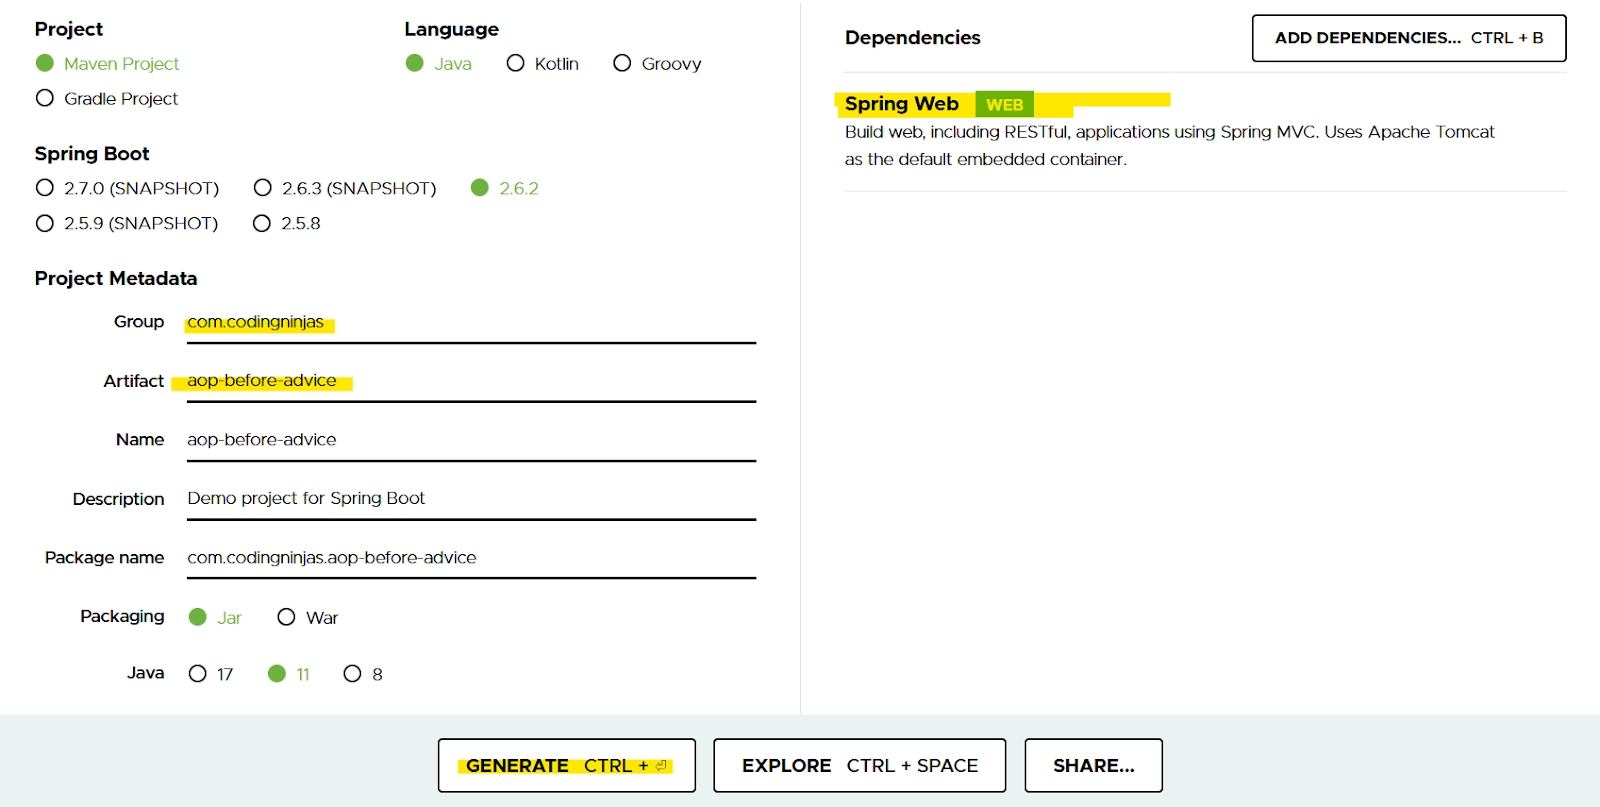
As seen in the above image, we will name our group as com.codingninjas, Artifact as aop-before-advice. We will also add Spring Web dependencyin our project. Now, Let's click on the GENERATE button to wrap all the specifications and download the jar file.
2. Adding Dependency:
To use Spring Boot AOP before advice, we need to add the spring-boot-starter-aop dependency. We will add this Spring Boot starter by writing the following code in our pom.xml file.
While developing an application in Spring, we need to enable the AOP module explicitly. We will achieve this by writing the following code in the AopBeforeAdviceApplication.java file.
@Configuration
@EnableAspectJAutoProxy(proxyTargetClass=true)


public class AopBeforeAdviceApplication
{
      public static void main(String[] args) {
            SpringApplication.run(AopBeforeAdviceApplication.class, args);
      }
}
You can also try this code with Online Java Compiler
The above code enables support for handling components marked with @Aspect annotation. We use it with @Configuration annotation. We can control the proxy type using the proxyTargetClass attribute (default value is false).
Spring Boot AOP Before Advice Example
After doing the initial setup for the Spring Boot AOP before advice, let's proceed with the example. First, let's create a class named Employee.java in the package com.codingninjas.model.
Employee.java :
In the class, we will define the following:
Variable empName, empID, empAge.
Generate getters and setters for the variable.
Create a default constructor.
package com.codingninjas.model;
public class Employee  {


    private String empId;
    private String empName;
    private int empAge;


    // Default constructor
    public Employee()   {
    }


            // Getters and Setters
    public String getEmpId() {
          return empId;
    }
    public void setEmpId(String empId) {
          this.empId = empId;
    }
    public String getEmpName()  {
          return empName;
    }
    public void setEmpName(String Name)  {
          this.empName = Name;
    }
    public int getEmpAge()   {
          return empAge;
    }
    public void setSecondName(int age)  {
          this.empAge = age;
    }
}
You can also try this code with Online Java Compiler
We successfully created the mapping for adding and removing an employee in the EmployeeController.java class in the above code. Now, let's make the service class EmployeeService.java for creating and deleting employees.
EmployeeService.java :
This class is created under the com.codingninjas.service package. In this class, we will define the following:
Method to create an employee.
Method to delete an employee.
package com.codingninjas.service;
import org.springframework.stereotype.Service;
import com.codingninjas.model.Employee;


@Service
public class EmployeeService   {


       public Employee createEmployee( String empId, String empname, int empage) {
             Employee emp = new Employee();
             emp.setEmpId(empId);
             emp.setEmpName(empname);
             emp.setEmpAge(empage);
             return emp;
       }


       public void deleteEmployee(String empId)   {


       }
}
You can also try this code with Online Java Compiler
execution(exp): The exp is a method where we will apply before advice logic.
@Before: The method with @Before annotation executes before all the matching methods with the pointcut expression.
Now that we have successfully built our application, let's run the application by clicking on AopBeforeAdviceApplication.java and selecting Run As > Java Application.
Open the browser and open the following URL: http://localhost:8080/add/employee?empId={id}&empName={empname}&empAge={empage}
Output
Let's have a look at the console. We see that @before invoking the createEmployee() method of EmployeeService.java class, the method beforeAdvice() of EmployeeServiceAspect.java class invokes, as shown below.
2022-01-09 19:11:28.016 INFO 952 --- [main] o.s.web.servelet.Dispatcherservelet
Before method: Employee com.codingninjas.service.EmployeeService.createEmployee(String, String, int)
Creating Employee with name - Coding Ninjas, age - 8 and id - 101
Similarly, we can also remove the employee by invoking the URL http://localhost:8080/remove/employee?empId=101. It returns a message Employee removed successfully, as shown in the below image.
What is a Spring Boot AOP? Spring Boot's AOP( Aspect-Oriented Programming ) is a programming pattern that allows the cross-cutting concern in the application.
What are different Spring Boot AOP advice? Spring Boot advice is associated with a pointcut expression and runs before, after, or around method executions matched by the pointcut. Spring Boot offers the following AOP advice: Before advice, After returning advice, After throwing advice, After (finally) advice, Around advice, Advice parameters, and Advice ordering.
Key Takeaways
In this article, we learned about spring boot AOP before advice. We implemented AOP Before advice with a detailed example and learned how to use it.


 9+ registered

