Do you think IIT Guwahati certified course can help you in your career?
Introduction
There are several application development frameworks available, but one of the most popular frameworks when working with java is the Spring framework.
You will be completely fascinated with the Spring framework and its ability to manage applications.
source: Giphy
In this article, we will learn about the CRUD operations that are available in Spring Boot. There are basically four CRUD operations in Spring Boot, namely create, read, update and delete.
Let us get into the concept of CRUD operations.
What are CRUD operations?
The CRUD stands for Create, Read/Retrieve, Update, and Delete. These are the four basic functions of persistence storage.
The CRUD operation can be defined as user interface conventions that allow view, search, and modify information through computer-based forms and reports. CRUD is data-oriented and the standardized use of HTTP action verbs. HTTP has a few important verbs.
POST: Creates a new resource
GET: Reads a resource
PUT: Updates an existing resource
DELETE: Deletes a resource
Within a database, each of these operations maps directly to a series of commands. However, their relationship with a RESTful API is slightly more complex.
Standard CRUD operations
The standard CRUD operations available in Spring Boot are:
CREATE Operation: It performs the INSERT statement to create a new record.
READ Operation: It reads table records based on the input parameter.
UPDATE Operation: It executes an update statement on the table. It is based on the input parameter.
DELETE Operation: It deletes a specified row in the table. It is also based on the input parameter.
How do CRUD operations work?
CRUD operations are at the foundation of the most dynamic websites. Therefore, we should differentiate CRUD from HTTP action verbs.
Suppose, if we want to create a new record, we should use the HTTP action verb POST. To update a record, we should use the PUT verb. Similarly, if we want to delete a record, we should use the DELETE verb. Through CRUD operations, users and administrators have the right to retrieve, create, edit, and delete records online.
We have many options for executing CRUD operations. One of the most efficient choices is to create a set of stored procedures in SQL to execute operations.
The CRUD operations refer to all major functions that are implemented in relational Database applications. Each letter of the CRUD can map to a SQL statement and HTTP methods.
Operation
SQL
HTTP verbs
RESTful Web Service
Create
INSERT
PUT/POST
POST
Read
SELECT
GET
GET
Update
UPDATE
PUT/POST/PATCH
PUT
Delete
DELETE
DELETE
DELETE
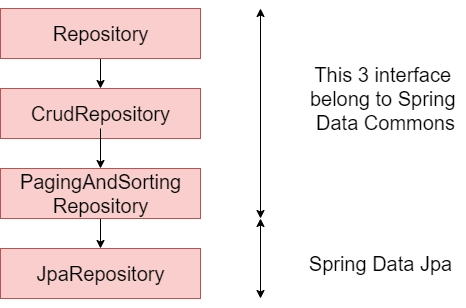
Spring Boot CrudRepository
Spring Boot provides an interface called CrudRepository that contains methods for CRUD operations. It is defined in the package org.springframework.data.repository. It extends the Spring Data Repository interface. It provides generic Crud operation on a repository. If we want to use CrudRepository in an application, we have to create an interface and extend the CrudRepository.
Syntax
public interface CrudRepository<T,ID> extends Repository<T,ID>
You can also try this code with Online Java Compiler
In the above example, we have created an interface named StudentRepository that extends CrudRepository. Where Student is the repository to manage, and Integer is the type of Id that is defined in the Student repository.
Spring Boot JpaRepository
JpaRepository provides JPA related methods such as flushing, persistence context, and deletes a record in a batch. It is defined in the package org.springframework.data.jpa.repository. JpaRepository extends both CrudRepository and PagingAndSortingRepository.
For example:
public interface BookDAO extends JpaRepository { }
You can also try this code with Online Java Compiler
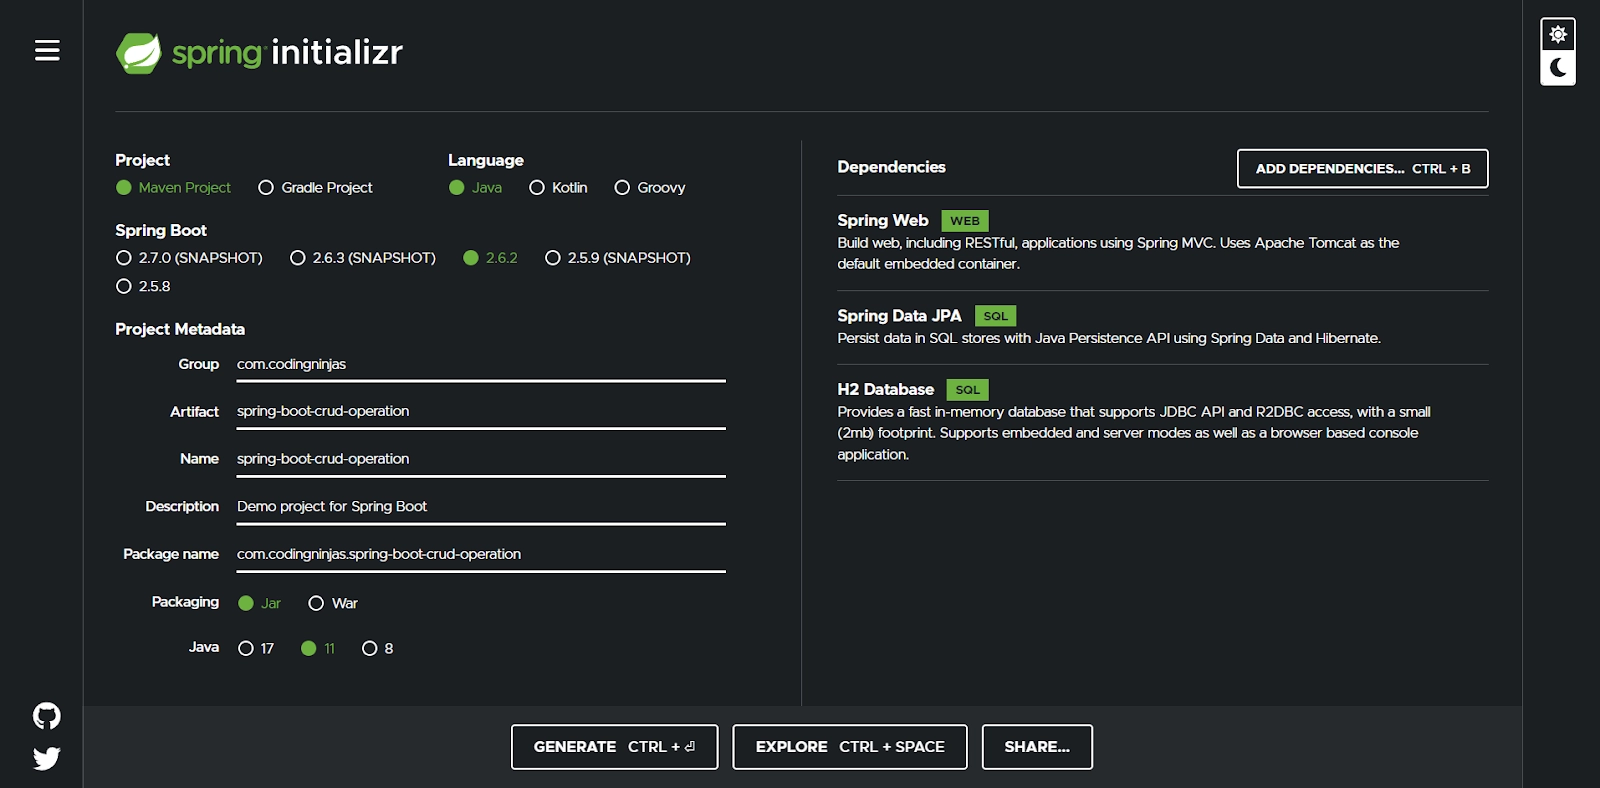
Step 2: Provide the Group name. We have provided com.codingninjas.
Step 3: Provide the Artifact Id. We have provided spring-boot-crud-operation.
Step 5: Add the dependencies Spring Web, Spring Data JPA, and H2 Database.
Step 6: Click on the Generate button. When we click on the Generate button, it wraps the specifications in a Jar file and downloads it to the local system.
Step 7: Extract the Jar file and paste it into the STS workspace.
Step 9: Create a package with the name com.codingninjas.model in the folder src/main/java.
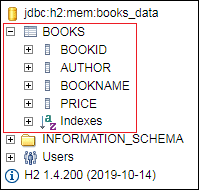
Step 10: Create a model class in the package com.codingninjas.model. We have created a model class with the name Books. In the Books class, we have done the following:
Define four variable bookid, bookname, author, and
Generate Getters and Setters. Right-click on the file -> Source -> Generate Getters and Setters.
Mark the class as an Entity by using the annotation @Entity.
Mark the class as Table name by using the annotation @Table.
Define each variable as Column by using the annotation @Column.
Books.java
package com.codingninjas.model;
import javax.persistence.Column;
import javax.persistence.Entity;
import javax.persistence.Id;
import javax.persistence.Table;
//mark class as an Entity
@Entity
//defining class name as Table name
@Table
public class Books {
   //Defining book id as primary key
   @Id
   @Column
   private int bookid;
   @Column
   private String bookname;
   @Column
   private String author;
   @Column
   private int price;
   public int getBookid() {
       return bookid;
   }
   public void setBookid(int bookid) {
       this.bookid = bookid;
   }
   public String getBookname() {
       return bookname;
   }
   public void setBookname(String bookname) {
       this.bookname = bookname;
   }
   public String getAuthor() {
       return author;
   }
   public void setAuthor(String author) {
       this.author = author;
   }
   public int getPrice() {
       return price;
   }
   public void setPrice(int price) {
       this.price = price;
   }
}
You can also try this code with Online Java Compiler
Step 11: Create a package with the name com.codingninjas.controller in the folder src/main/java.
Step 12: Create a Controller class in the package com.codingninjas.controller. We have created a controller class with the name BooksController. In the BooksController class, we have done the following:
Mark the class as RestController by using the annotation @RestController.
Autowire the BooksService class by using the annotation @Autowired.
Define the following methods:
getAllBooks(): It returns a List of all Books.
getBooks(): It returns a book detail that we have specified in the path variable. We have passed bookid as an argument by using the annotation @PathVariable. The annotation indicates that a method parameter should be bound to a URI template variable.
deleteBook(): It deletes a specific book that we have specified in the path variable.
saveBook(): It saves the book detail. The annotation @RequestBody indicates that a method parameter should be bound to the body of the web request.
update(): The method updates a record. We must specify the record in the body, which we want to update. To achieve the same, we have used the annotation @RequestBody.
BooksController.java
package com.codingninjas.controller;
import java.util.List;
import org.springframework.beans.factory.annotation.Autowired;
import org.springframework.web.bind.annotation.DeleteMapping;
import org.springframework.web.bind.annotation.GetMapping;
import org.springframework.web.bind.annotation.PathVariable;
import org.springframework.web.bind.annotation.PostMapping;
import org.springframework.web.bind.annotation.PutMapping;
import org.springframework.web.bind.annotation.RequestBody;
import org.springframework.web.bind.annotation.RestController;
import com.codingninjas.model.Books;
import com.codingninjas.service.BooksService;
//mark class as Controller
@RestController
public class BooksController {
   //autowire the BooksService class
   @Autowired
   BooksService booksService;
   //creating a get mapping that retrieves all the books detail from the database
   @GetMapping("/book")
   private List < Books > getAllBooks() {
       return booksService.getAllBooks();
   }
   //creating a get mapping that retrieves the detail of a specific book
   @GetMapping("/book/{bookid}")
   private Books getBooks(@PathVariable("bookid") int bookid) {
       return booksService.getBooksById(bookid);
   }
   //creating a delete mapping that deletes a specified book
   @DeleteMapping("/book/{bookid}")
   private void deleteBook(@PathVariable("bookid") int bookid) {
       booksService.delete(bookid);
   }
   //creating post mapping that post the book detail in the database
   @PostMapping("/books")
   private int saveBook(@RequestBody Books books) {
       booksService.saveOrUpdate(books);
       return books.getBookid();
   }
   //creating put mapping that updates the book detail
   @PutMapping("/books")
   private Books update(@RequestBody Books books) {
       booksService.saveOrUpdate(books);
       return books;
   }
}
You can also try this code with Online Java Compiler
Step 13: Create a package with the name com.codingninjas.service in the folder src/main/java.
Step 14: Create a Service class. We have created a service class with the name BooksService in the package com.codingninjas.service.
BooksService.java
package com.codingninjas.service;
import java.util.ArrayList;
import java.util.List;
import org.springframework.beans.factory.annotation.Autowired;
import org.springframework.stereotype.Service;
import com.codingninjas.model.Books;
import com.codingninjas.repository.BooksRepository;
//defining the business logic
@Service
public class BooksService {
   @Autowired
   BooksRepository booksRepository;
   //getting all books record by using the method findaAll() of CrudRepository
   public List < Books > getAllBooks() {
       List < Books > books = new ArrayList < Books > ();
       booksRepository.findAll().forEach(books1 - > books.add(books1));
       return books;
   }
   //getting a specific record by using the method findById() of CrudRepository
   public Books getBooksById(int id) {
       return booksRepository.findById(id).get();
   }
   //saving a specific record by using the method save() of CrudRepository
   public void saveOrUpdate(Books books) {
       booksRepository.save(books);
   }
   //deleting a specific record by using the method deleteById() of CrudRepository
   public void delete(int id) {
       booksRepository.deleteById(id);
   }
   //updating a record
   public void update(Books books, int bookid) {
       booksRepository.save(books);
   }
}
You can also try this code with Online Java Compiler
Step 15: Create a package with the name com.codingninjas.repository in the folder src/main/java.
Step 16: Create a Repository interface. We have created a repository interface with the name BooksRepository in the package com.codingninjas.repository. It extends the Crud Repository interface.
BooksRepository.java
package com.codingninjas.repository;
import org.springframework.data.repository.CrudRepository;
import com.codingninjas.model.Books;
//repository that extends CrudRepository
public interface BooksRepository extends CrudRepository < Books, Integer > {}
You can also try this code with Online Java Compiler
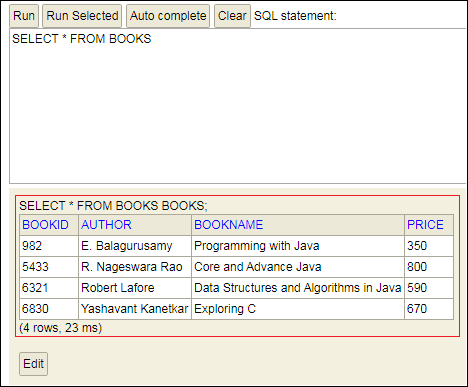
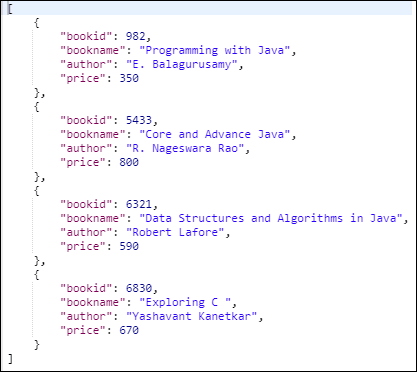
Let's send a GET request with the URL http://localhost:8080/book/{bookid}. We have specified the bookid 6830. It returns the detail of the book whose id is 6830.
Similarly, we can also send a DELETE request to delete a record. Suppose we want to delete a book record whose id is 5433.
Select the DELETE method and invoke the URL http://localhost:8080/book/5433. Again, execute the Select query in the H2 console. We see that the book whose id is 5433 has been deleted from the database.
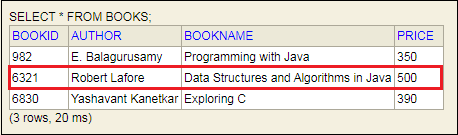
Similarly, we can also update a record by sending a PUT request. Let's update the price of the book whose id is 6321.
Select the PUT
In the request body, paste the record which you want to update and make the changes. In our case, we want to update the record of the book whose id is 6321. In the following record, we have changed the price of the book.
{
 "bookid": "6321",
 "bookname": "Data Structures and Algorithms in Java",
 "author": "Robert Lafore",
 "price": "500"
}
Click on the Send
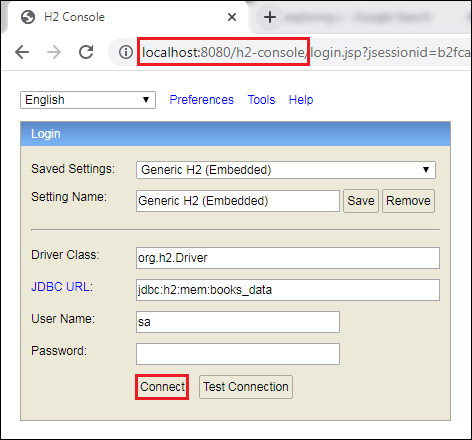
Now, move to the H2 console and see the changes have reflected or not. We see that the price of the book has been changed, as shown below.
The Spring framework is one of the most popular application development frameworks of Java. The important feature of the spring framework is dependency injection or the Inversion of Control.
2.What is Spring Boot?
Spring Boot is one of the modules of the Spring Framework. It helps us to build a stand-alone application with very minimal or almost zero configurations.
3.What are CRUD operations?
The four basic CRUD operations are Create, Read, Update and Delete.
Key Takeaways
We learned about the various frameworks of Spring. In this article, we learned about the various CRUD operations in detail. We also learned about the detailed example to demonstrate CRUD operations in Spring Boot.
You can also consider our Spring Boot Course to give your career an edge over others.


 9+ registered

