Do you think IIT Guwahati certified course can help you in your career?
Introduction
Embarking on the transformative journey of microservices architecture, developers often turn to powerful frameworks like Spring Boot to streamline the development and deployment of modular, scalable applications. Spring Boot Microservices refers to the utilization of the Spring Boot framework to develop, deploy, and manage microservices-based applications.
In this article, we will learn how to create these microservices with the help of Spring Boot. In this article, we will learn how to create these microservices with the help of Spring Boot. Through this article, you will also know what is meant by Spring Boot Microservices.
So without any delays, let's dive deep into the topic.
What are microservices?
Microservices which is also known as microservice architecture is an architectural style in which applications are structured as a collection of services.
The features of this service are that they are independent of each other and are loosely coupled. They are organized by a small team and have limited functionality.
The independent components or the microservices interact with each other through APIs and work to carry out the task.
The microservice architecture enables an organization to deliver large, complex applications rapidly, frequently, reliably, and sustainably - a necessity for competing and winning in today's world.
What is Spring Boot Microservices?
Java Spring Boot is an open-source tool that makes it easier to use Java-based frameworks to create microservices and web apps. Java Spring Framework (Spring Framework) is a popular, open-source, enterprise-level framework for creating standalone applications that run on the Java Virtual Machine (JVM). It makes developing web applications and microservices with Spring Framework faster and easier.
Enroll in our Spring Boot Course to boost your skills and stand out in the competitive job market.
Stepwise Guide For Creating Spring Boot Microservices
Step 1: Creating a new Spring Boot Project
We will start off by creating a new project in Spring Initializr using the Eclipse IDE. For the project, you should choose the following options while creating the project.
Project: Maven
Language: Java
Packaging: Jar
Java: 17
We will then choose the dependencies that you intend to use in your project. We will be using the following dependencies-
Spring Boot DevTools
Spring Data JPA
MySQL Driver
Spring Web
Step 2: Creating Schema in MySQL Workbench
We are going to create a schema in the MySQL server and then we will be connecting them to our application. We will be also adding data in our tables in the SQL server that we will be fetching later on through our application.
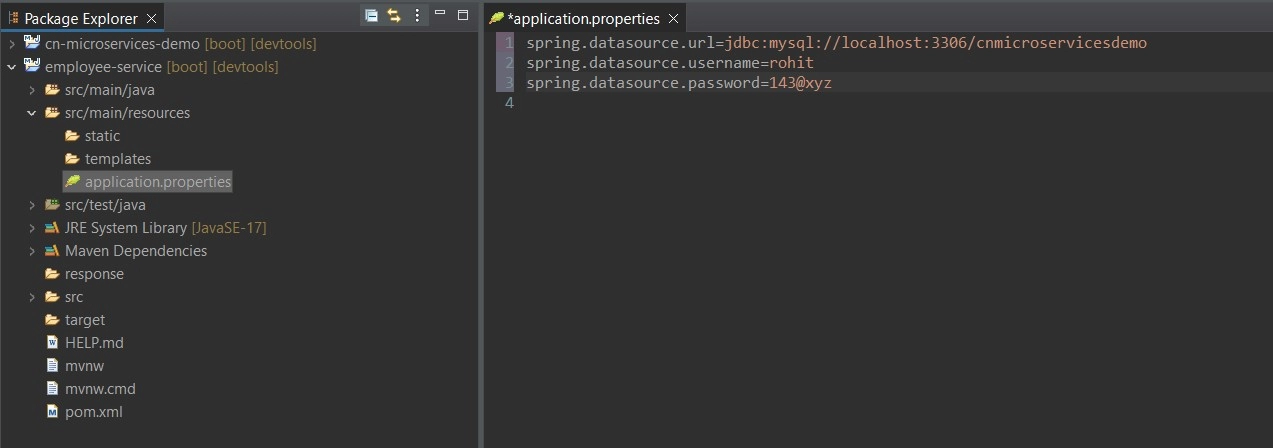
Step 3: Modifying the application.properties File
We will be making the following changes to our application.properties file-
spring.datasource.url=jdbc:mysql://localhost:3306/cnsmicroservicesdemo
spring.datasource.username=put your username here
spring.datasource.password=put your password here
You can refer to the image below-
Step 4: Creating Model Class
Go to the src > main > java > entity and create a class Employee and put the below code. This is our model class.
package com.cn.employeaap.entity;

import jakarta.persistence.*;

@Entity
@Table(name = "employee")
public class Employee {

@Id
@GeneratedValue(strategy = GenerationType.IDENTITY)
@Column(name = "id")
private int id;

@Column(name = "name")
private String name;

@Column(name = "email")
private String email;

@Column(name = "age")
private String age;

public int getId() {
return id;
}

public void setId(int id) {
this.id = id;
}

public String getName() {
return name;
}

public void setName(String name) {
this.name = name;
}

public String getAge() {
return age;
}

public void setAge(String age) {
this.age = age;
}
}
Step 5: Creating the Repository Interface
We will go to the src > main > java > repository to create an interface EmployeeRepo and put the below code. This is the repository where we write code that is related to the database.
We will go to the src > main > java > response and create a class EmployeeResponse which will contain the below code.
package com.cn.employeaap.response;

public class EmployeeResponse {

	private int id;
	private String name;
	private String email;
	private String age;

	public int getId() {
		return id;
	}

	public void setId(int id) {
		this.id = id;
	}

	public String getName() {
		return name;
	}

	public void setName(String name) {
		this.name = name;
	}

	public String getEmail() {
		return email;
	}

	public void setEmail(String email) {
		this.email = email;
	}

	public String getAge() {
		return age;
	}

	public void setAge(String age) {
		this.age = age;
	}
}
Step 7: Create the Service Class
We will be going to the src > main > java > service and creating a class EmployeeService and putting the below code. The service class will be containing our business logic.
We will go to the src > main > java > controller and create a class EmployeeController. We will be putting the below code in that file. Here we are going to create an endpoint “/employees/{id}” to find an employee using the employee id.
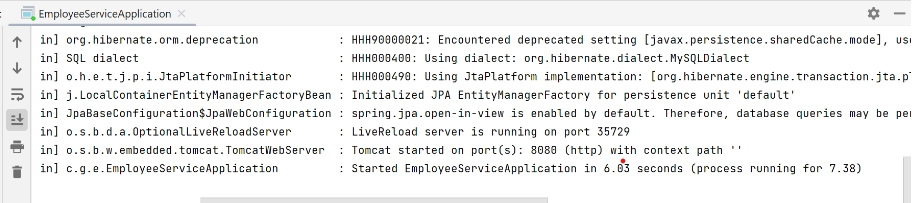
To run our Employee Microservice we go to src > main > java > EmployeeServiceApplication and click on the Run button.The following screen is in your console. Please refer to the below image.
In the process of creating microservices with Spring Boot, a crucial step involves testing the implemented endpoints using Postman. Postman, a popular API testing tool, allows developers to send HTTP requests to their microservice and inspect the responses. After developing and running the Spring Boot application, developers use Postman to create requests, selecting the appropriate HTTP method and entering the endpoint URL. They can add headers and parameters, send the request, and inspect the response for correct status codes, bodies, and headers.
Testing different scenarios, debugging, and iterating through this process ensures that the microservice behaves as expected under various conditions, providing a critical validation step before deployment.
Why there is a need for Spring Boot?
Spring Boot addresses several needs and challenges in modern application development, making it a valuable framework for developers. Here are some key reasons why there is a need for Spring Boot:
Spring Boot follows the convention-over-configuration principle, reducing the need for extensive XML configurations. It provides sensible defaults, enabling developers to get started quickly with minimal setup.
With embedded servers like Tomcat and Jetty, Spring Boot facilitates the development of standalone, ready-to-run applications. Developers can focus on writing business logic without the need for extensive server configurations.
Spring Boot is well-suited for building microservices. It supports the creation of independent, modular services that can be easily deployed and scaled. It simplifies the development of microservices-based applications by providing built-in features for service discovery, configuration, and communication.
Leveraging the broader Spring ecosystem, Spring Boot integrates seamlessly with other Spring projects like Spring Data, Spring Security, and Spring Cloud. This integration streamlines the development process and provides a comprehensive set of tools for building enterprise-grade applications.
Spring Boot includes embedded servers like Tomcat, Jetty, and Undertow, eliminating the need for external server installations. This simplifies deployment and reduces the complexity associated with configuring and managing application servers.
Spring Boot manages dependencies through its built-in dependency management system. It ensures that the application uses compatible versions of libraries, reducing potential conflicts and making it easier to maintain dependencies.
Features of Spring Boot Microservices
Spring Boot has a number of features that helps in application development. Let's learn about some of the features in detail.
Web Development
It is well suited Spring module for web application development. We can easily create a self-contained HTTP server using embedded Tomcat, Jetty or Undertow. We can use the spring-boot- starter-web module to start and run applications quickly.
Admin Support
Spring Boot provides admin support and the facility to enable admin features for the application. It can be used to access and manage applications remotely. We can allow it to by simply using spring.application.admin.enabled property.
Security
Spring Boot applications are spring-based web apps. So, it is provided security by default with basic authentication on all HTTP endpoints. A set of Endpoints are available for developing a secure Spring Boot application.
Application Event Listeners
Spring Boot uses event listeners to perform several tasks. It helps in the creation of factory files that can be used to add listeners. We refer them by using the ApplicationListener key.
Challenges With Microservice Architectures
Microservice architectures offer various benefits, but they also present unique challenges that organizations must navigate. Some of the key challenges include:
Microservices involve multiple independent services communicating over a network. Managing the complexity of distributed systems, including issues like network latency and fault tolerance, can be challenging.
Coordinating communication and data consistency between microservices, especially in transactions that span multiple services, requires careful design. Implementing effective service orchestration or choreography is crucial.
Handling data consistency and maintaining relationships between services can be complex. Microservices often have their own databases, and managing data synchronization and ensuring eventual consistency is challenging.
Discovering and communicating with microservices dynamically, especially in large and dynamic environments, requires robust service discovery mechanisms. Issues like load balancing and fault tolerance must be addressed.
Managing the deployment of numerous microservices, ensuring version compatibility, and implementing continuous integration/continuous deployment (CI/CD) practices require a mature DevOps culture and automation tools.
Benefits of Using Spring Boot for Microservices
Utilizing Spring Boot for microservices development offers a range of benefits, contributing to the efficiency, scalability, and maintainability of the applications. Some key advantages include:
Spring Boot simplifies the development process by providing a convention-over-configuration approach. Developers can quickly set up projects with minimal boilerplate code, focusing more on business logic.
Spring Boot seamlessly integrates with microservices architectures. It offers features like embedded servers, easy configuration, and built-in support for creating RESTful APIs, facilitating the development of independent and modular microservices.
With embedded servers like Tomcat and Jetty, Spring Boot eliminates the need for external server configurations. Applications become self-contained and can be easily deployed with a single JAR file.
Spring Boot's auto-configuration feature allows for rapid prototyping, reducing the time spent on setup and configuration. Developers can quickly experiment with ideas and iterate on their applications.
Leveraging the broader Spring ecosystem, Spring Boot integrates seamlessly with other Spring projects such as Spring Data, Spring Security, and Spring Cloud. This integration enhances the development process with comprehensive tools and functionalities.
Spring Boot simplifies dependency management through its built-in dependency management system. It ensures that the application uses compatible versions of libraries, reducing dependency conflicts.
Frequently Asked Questions
Why Spring Boot is best for microservices?
Spring Boot simplifies microservices development with its convention-over-configuration approach, embedded servers, seamless integration with the Spring ecosystem, and support for rapid prototyping.
How to handle multiple microservices in Spring Boot?
Use Spring Cloud for managing multiple microservices. It provides tools for service discovery, load balancing, configuration management, and more, facilitating seamless coordination in a distributed environment.
How is Spring Boot different from Spring?
Spring is a Java-based framework used for building applications, whereas Springboot is a framework built on top of Spring for building REST APIs.In Spring, the configurations are built manually, whereas, in Springboot, there are default configurations making it faster.
What are some alternatives for Springboot for creating microservices?
There are several alternatives to Springboot that can be used for creating microservices. Some of them are Micronaut, Quarkus, ApacheStatus, and DropWizard.
Conclusion
Congrats, Ninja!! You've learned about Spring boot microservices. You have also learned about the difference between Spring and Spring Boot and how the latter is used for creating Spring Boot microservices. We have also added some FAQs related to the Spring Boot Microservices.
Thanks for reading this article. I hope you would have found the blog insightful and understood what is Spring Boot Microservices
Happy Learning!!
Live masterclass
Prompt Engineering: Must-have GenAI Skill for 30L+ Roles at Amazon
by Anubhav Sinha
16 Jul, 2026
12:30 PM
Using Netflix Data to Master Power BI
by Ashwin Goyal
13 Jul, 2026
12:30 PM
Top GenAI Skills to crack 30L+ CTC at Amazon & Google
by Sumit Shukla
14 Jul, 2026
11:30 AM
JioHotstar Sports Analytics using IPL Dataset
by Prerita Agarwal
15 Jul, 2026
12:30 PM
Prompt Engineering: Must-have GenAI Skill for 30L+ Roles at Amazon


 8+ registered

