Do you think IIT Guwahati certified course can help you in your career?
Introduction
The stack() function in NumPy is a versatile tool that allows you to combine multiple arrays to create a new array with increased dimensionality. Unlike simple concatenation, stack() introduces a new axis along which the arrays are joined. This function proves invaluable for creating more organised data structures, especially when dealing with diverse datasets or multidimensional arrays. It opens the door to advanced data manipulation, preprocessing, and feature engineering in various data science applications.
Let’s discuss about stack() in NumPy
Defining stack() in NumPy
The stack() function in NumPy is a method designed to combine multiple arrays into a single array while introducing a new axis. Unlike traditional concatenation methods, stack() enhances the dimensionality of the resulting array by creating a new axis along the specified dimension. This function is particularly useful when you need to maintain the distinct identity of the input arrays while organising them into a higher-dimensional structure. The primary purpose of the stack() function is to facilitate advanced array manipulation and data organisation in various data science and numerical computing tasks.
The stack() function in NumPy is like stacking building blocks. It helps us put different arrays together to make a bigger array. But here's the cool part: it also adds a new layer or level. It's like putting the building blocks on top of each other and making a tower.
Syntax of stack() in NumPy
numpy.stack(arrays, axis=0)
The numpy.stack() function takes two main things:
arrays: These are the blocks (arrays) you want to stack. You can give it a list of arrays.
axis: This is like the direction in which you want to stack the blocks. It's like choosing if you want to stack them horizontally (side by side) or vertically (on top of each other). When you say axis=0, it means you're stacking them on top of each other. If you said axis=1, it would mean you're stacking them side by side.
So, when you use numpy.stack(arrays, axis=0), you're telling the computer to take the arrays in the list you provide and stack them on top of each other to make a bigger array tower.
Purpose of stack() in NumPy
The primary purpose of the stack() function in NumPy is to bring together multiple arrays in a way that creates a new array with an added dimension. Unlike basic array combination methods, like putting things side by side, stack() adds a new "layer" to the arrays you're combining.
This new layer is like having a fresh level in your data, which can be useful for things like organising different pieces of information or working with various aspects of your data all at once. By using the stack() function, you're able to make your arrays more organised and structured, which can be super helpful for all sorts of data tasks in fields like science, engineering, and data analysis.
Example
Imagine you have a collection of puzzle pieces, and you want to make a new puzzle with them. The stack() function in NumPy helps you do just that, but with arrays instead of puzzle pieces. It takes different arrays and puts them together in a smart way.
But here's the interesting part:
It doesn't just put them side by side or on top of each other like blocks. It adds a new layer, almost like putting different pictures on different levels of a cake. This can be really helpful when you're dealing with different types of information or data points and you want to organise them in a special way.
So, in the simplest words, the stack() function helps you create a new array by combining existing arrays with a new twist.
Using stack() function in 1-D Array
When you use the stack() function with 1-D arrays in NumPy, it's like stacking up single blocks to create a new tower. You start with your individual blocks, which in this case are the 1-D arrays. Then, when you apply the stack() function, it creates a new array with an additional dimension, turning your individual blocks into layers of a tower.
Example
if you have two 1-D arrays like [1, 2, 3] and [4, 5, 6], and you stack them using numpy.stack(), you'll get a new array like [[1, 2, 3], [4, 5, 6]]. It's as if you placed one block on top of the other to form a tower of data.
This added dimension can be really handy when you need to work with multiple sets of data or if you want to keep different data points separate but organised in a unified way. It's a bit like building with Lego bricks – you start with individual pieces, and using stack() lets you create a more structured and interesting shape with those pieces.
Code
Python
Python
import numpy as np
# Creating two 1-D arrays
array1 = np.array([1, 2, 3])
array2 = np.array([4, 5, 6])
# Using the stack() function to combine the arrays
stacked_array = np.stack((array1, array2))
# Printing the result
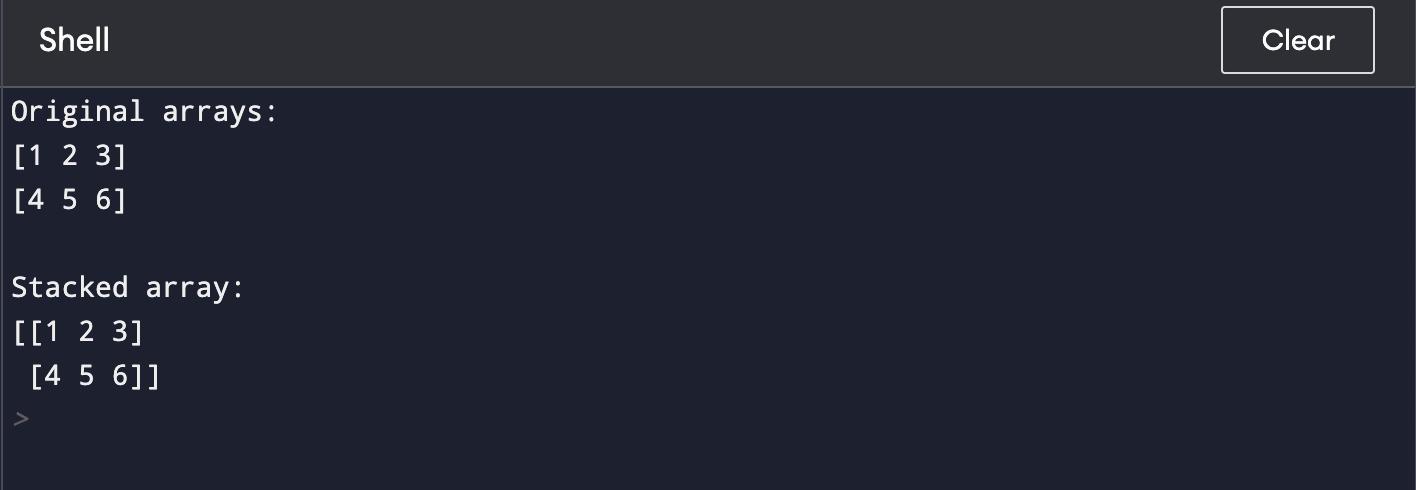
print("Original arrays:")
print(array1)
print(array2)
print("\nStacked array:")
print(stacked_array)
You can also try this code with Online Python Compiler
This above code showcases the use of the stack() function from the NumPy library to combine two 1-dimensional arrays into a new 2-dimensional array.
Importing Libraries
The code starts by importing the numpy library under the alias np. This library provides advanced numerical computing capabilities, including the stack() function that we'll be using.
Creating Arrays
Two 1-dimensional arrays, array1 and array2, are created using the np.array() function. These arrays hold the values [1, 2, 3] and [4, 5, 6] respectively.
Using the stack() Function
The stacked_array is created using the np.stack() function. Inside the function, the two arrays array1 and array2 are passed as a tuple (array1, array2) to be stacked together. The stack() function combines these arrays by introducing a new dimension, resulting in a 2-dimensional array where each original array forms a row.
Printing Results
The program then prints out the original arrays and the newly stacked array using the print() function. The original arrays are displayed separately, and the stacked array is shown as a 2-dimensional array with two rows.
Output
When the code is executed, the output shows the original arrays [1 2 3] and [4 5 6] on separate lines, and the stacked array [[1 2 3] [4 5 6]] is displayed as a 2D structure with each original array forming a row.
Using stack() in 2-D Array
The stack() function in NumPy serves as a mechanism to concatenate or merge two 2-dimensional arrays along a new dimension, resulting in a higher-dimensional array. This function introduces a new axis to accommodate the combination of arrays. When applied to 2-D arrays, the stack() function essentially aligns the arrays in such a way that they become "layers" in a new 3-dimensional array.
In a more formal sense, the stack() function requires two 2-dimensional arrays as input and an axis parameter indicating the position of the new axis. By default, this new axis is added as the first axis (axis 0). Consequently, the two input arrays are placed along this new axis, effectively forming two separate layers within the resulting 3-dimensional array.
The stack() function is particularly valuable when dealing with data that is inherently structured in layers or when it's necessary to maintain a clear distinction between the input arrays. This higher-dimensional representation is especially useful for scenarios where comprehensive data analysis, manipulation, or modelling is required.
Example
Imagine you have two puzzle boards with different pictures on them. The stack() function in NumPy helps you combine these puzzle boards in a way that creates a new 3-dimensional structure, almost like building a tower from these boards.
In this case, each puzzle board represents a 2-dimensional array. When you use the stack() function with these arrays, it adds a new layer to them, making a new structure that holds both arrays in a distinct layer. It's as if you're stacking one puzzle board on top of the other, and the result is like a tower made from these two boards.
Code
Python
Python
import numpy as np
# Creating two 2-D arrays
array1 = np.array([[1, 2, 3],
[4, 5, 6]])
array2 = np.array([[7, 8, 9],
[10, 11, 12]])
# Using the stack() function to combine the arrays along a new axis
stacked_array = np.stack((array1, array2))
# Printing the original arrays and the stacked array
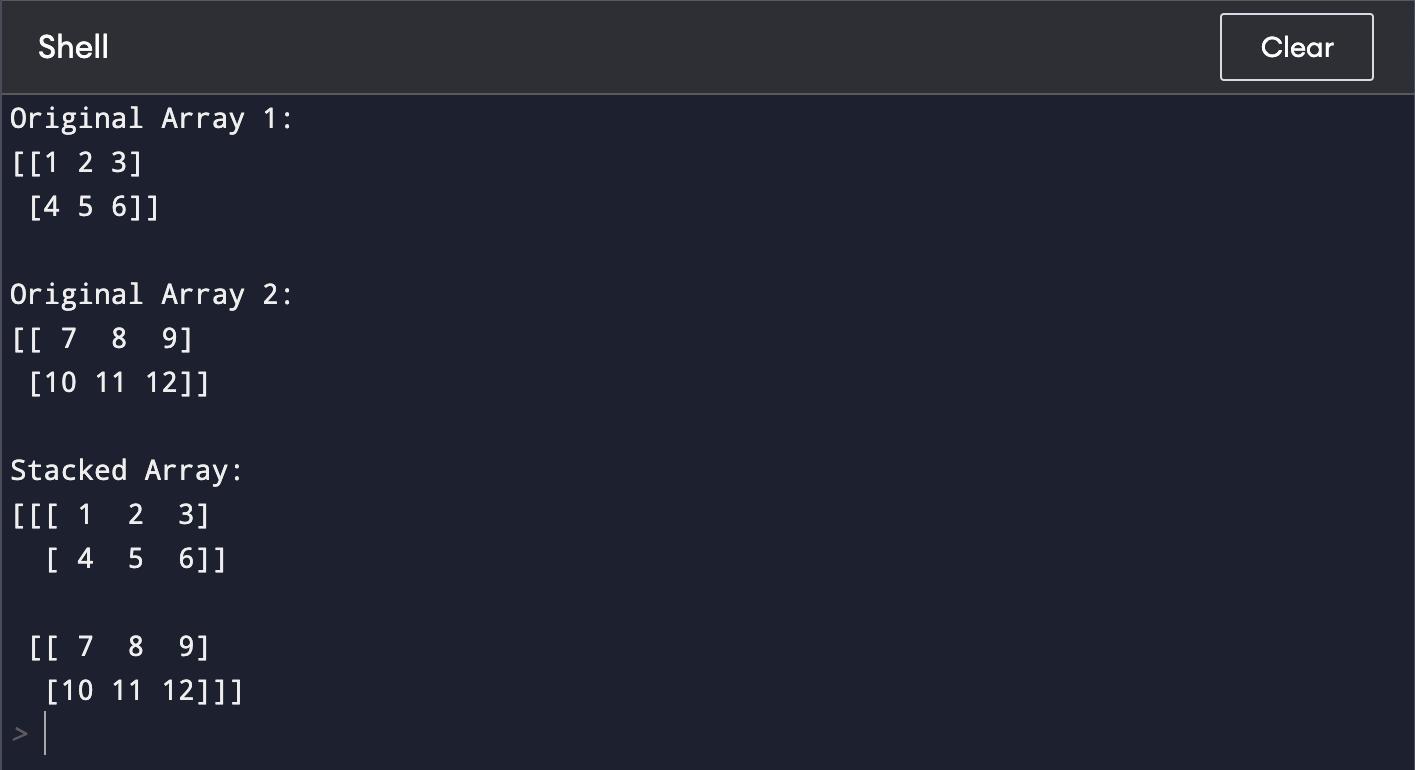
print("Original Array 1:")
print(array1)
print("\nOriginal Array 2:")
print(array2)
print("\nStacked Array:")
print(stacked_array)
You can also try this code with Online Python Compiler
The provided code demonstrates the practical use of the stack() function from the NumPy library to combine two separate 2-dimensional arrays into a new 3-dimensional array.
Importing NumPy
The code starts by importing the numpy library using the alias np. NumPy is a powerful library for numerical operations, and it includes functions like stack() for array manipulation.
Creating Arrays
Two distinct 2-dimensional arrays, named array1 and array2, are created using the np.array() function. These arrays contain sets of numbers organised in rows and columns, forming grids of data.
Using the stack() Function
The stacked_array is formed using the np.stack() function. Inside this function, the arrays array1 and array2 are enclosed within a tuple (array1, array2). The stack() function takes these arrays and, by default, introduces a new dimension (axis) at the start of the array. This results in the arrays being arranged as separate layers within the new 3-dimensional array.
Printing Results
The code proceeds to print the original arrays, array1 and array2, using the print() function. Following that, it displays the newly created stacked_array, now organized as a 3-dimensional structure. Each of the original arrays occupies its own layer in this structure.
Output
When the code is executed, it generates an output. The original arrays are printed as 2-dimensional grids, and the stacked_array is revealed as a 3-dimensional arrangement. This demonstrates how the stack() function introduces an additional dimension, transforming the layout of the input arrays into a structured 3-dimensional array.
Using stack() in 3-D Array
Using the stack() function with 3-D arrays in NumPy involves the process of combining and organising three separate 3-dimensional arrays into a newly formed 4-dimensional array structure. This procedure is accomplished through the utilisation of the np.stack() function, a tool provided by the NumPy library. Within this context, the term "stack" pertains to the alignment of the input arrays along a new dimension, effectively creating an additional layer or stratum within the resulting array. The newly introduced dimension corresponds to the axis specified during the stacking operation, which, by default, is added as the initial axis.
The stack() function accepts three distinct 3-dimensional arrays as input and concatenates them along the designated axis. This axis is usually referred to as the stacking axis. The outcome of this operation is a 4-dimensional array wherein each of the original arrays forms a distinct layer, thus yielding a higher-dimensional arrangement. This approach is particularly valuable when dealing with complex data structures that require the preservation of individual arrays while achieving a more organised and structured representation. The stacked 4-dimensional array subsequently provides a framework for advanced data manipulation, analysis, or modelling tasks in fields such as scientific research, engineering, and data science.
Example
Medical Imaging Volumes
Imagine a medical research project that focuses on analyzing brain scans from different patients. Each brain scan is represented as a 3-dimensional array, where the dimensions correspond to the height, width, and depth of the scan. The goal of the study is to compare brain structures between patients and identify any patterns or abnormalities.
In this scenario, the stack() function can be incredibly valuable.
Let's say you have brain scans from three different patients, each represented as a 3-dimensional array:
patient1_scan (3-D array of brain scan for patient 1)
patient2_scan (3-D array of brain scan for patient 2)
patient3_scan (3-D array of brain scan for patient 3)
By using the np.stack() function, you can combine these individual 3-D arrays into a new 4-dimensional array, allowing you to work with all patient scans collectively. This might be necessary for conducting advanced analyses or creating predictive models that require a structured dataset.
Let's break down what each part of the code is doing:
Array Creation
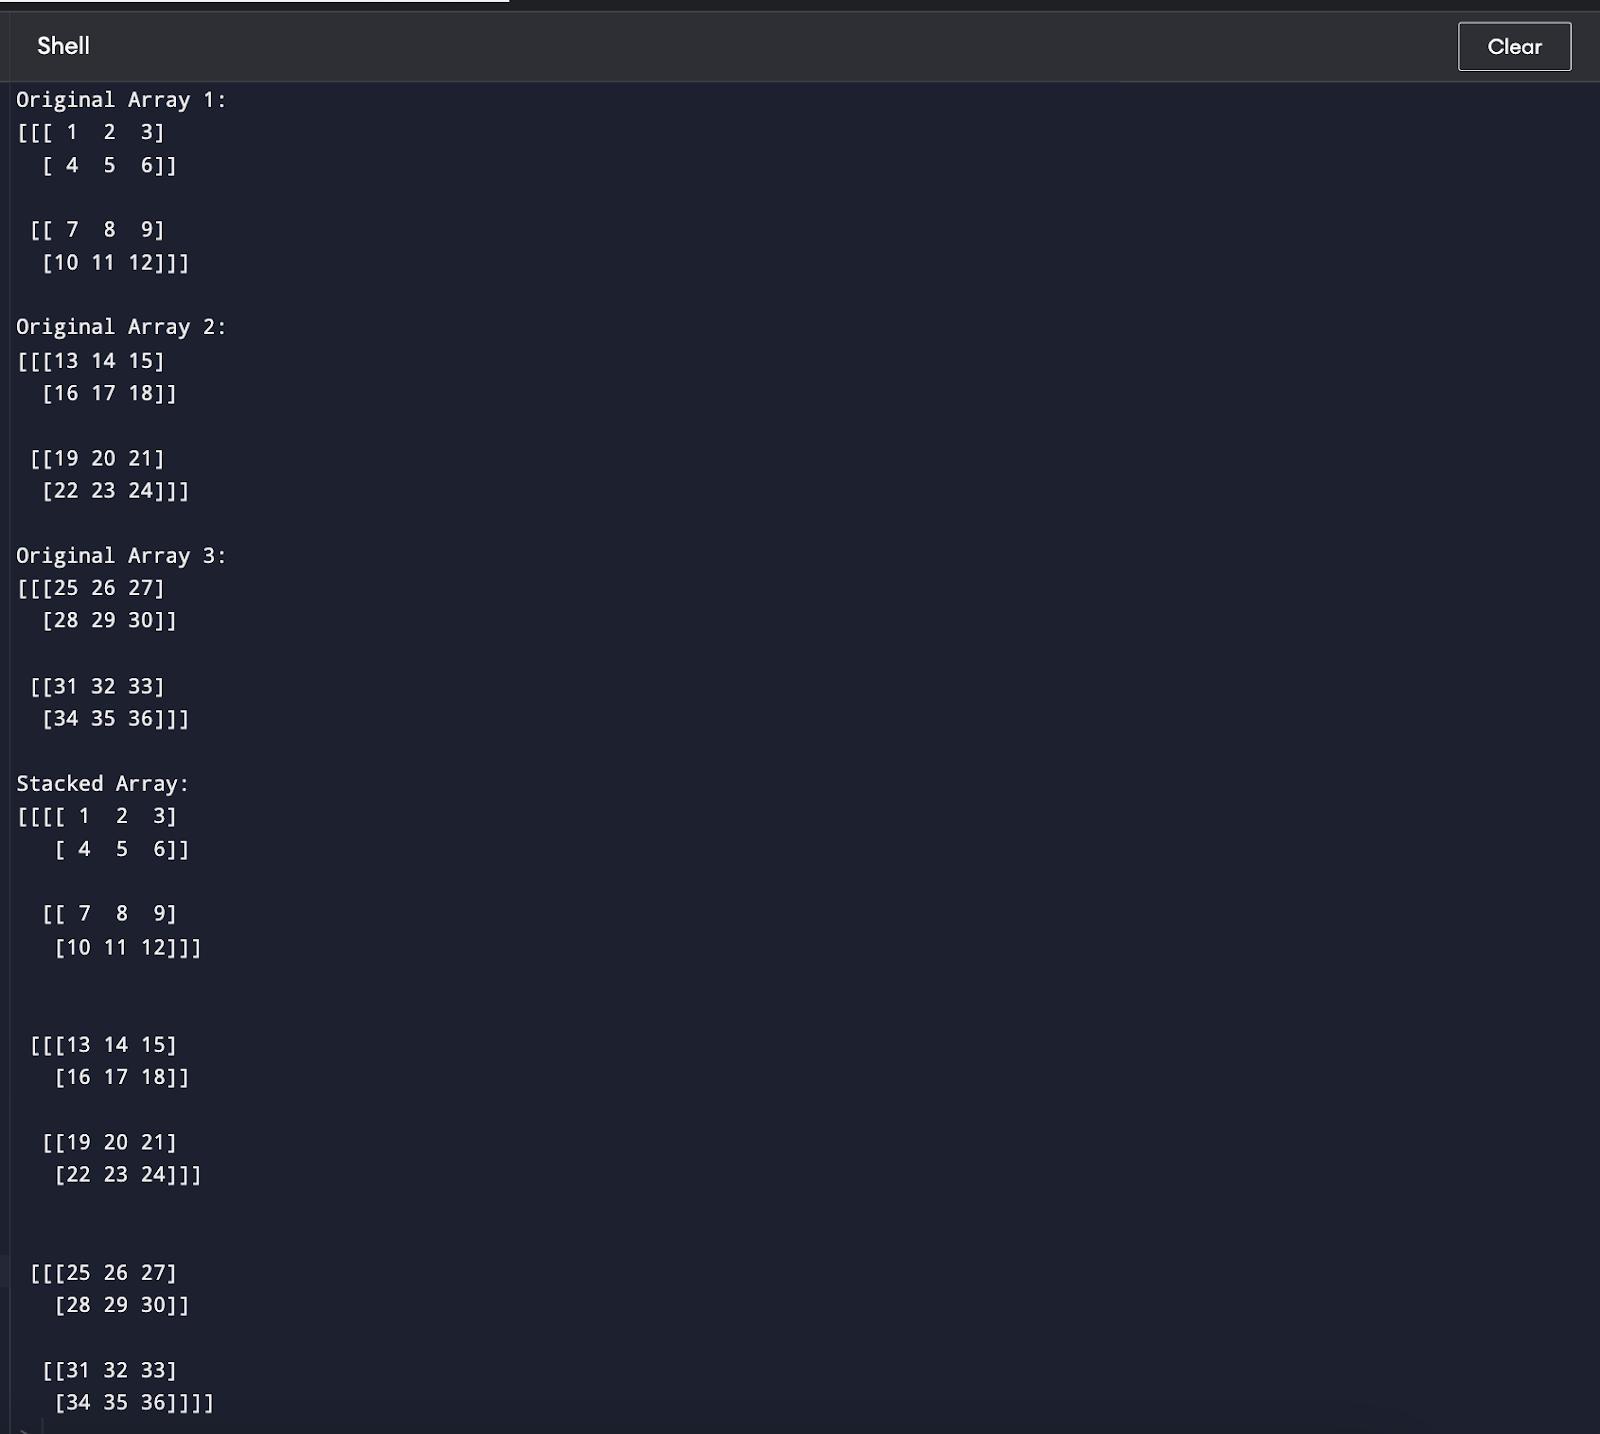
The code begins by creating three distinct 3-dimensional arrays, labelled as array1, array2, and array3. These arrays are constructed using the np.array() function. Each array holds numerical values organised in three levels of depth, with rows and columns forming a structured 3D arrangement.
Utilising the stack() Function
The stacked_array is formed using the np.stack() function. Inside the parentheses, the three arrays array1, array2, and array3 are placed within a tuple. The stack() function is employed to combine these arrays along a new dimension. By default, the new dimension is added as the first axis (axis 0), resulting in the arrays being stacked as separate layers within a new 4-dimensional array.
Printing Original Arrays and Stacked Array
The code then proceeds to display the original arrays (array1, array2, and array3) by using the print() function. After that, it showcases the newly generated stacked_array, which has now taken on a 4-dimensional form. Each of the original arrays forms a separate layer within this newly structured array.
Output Display
Upon execution, the code produces output to the console. The original arrays are presented in their structured 3-dimensional layout, and the stacked_array is revealed as a 4-dimensional construct. This illustrates how the stack() function introduces an additional dimension, effectively transforming the arrangement of the input arrays into a more complex 4-dimensional structure.
In summary, this code provides an example of how the stack() function in NumPy is utilised to stack three distinct 3-dimensional arrays into a single, higher-dimensional structure. Such an approach is valuable in scenarios where a more organised and structured representation of multi-layered data is required for subsequent data analysis or manipulation tasks.
h.stack() Function
The numpy.hstack() function is a pivotal tool within the NumPy library that is specifically designed to horizontally stack or concatenate multiple arrays. It enables the fusion of arrays by aligning them side by side along their columns, effectively increasing the size of the resultant array along the horizontal axis. This function is particularly useful when you want to combine datasets that share the same number of rows, thereby augmenting the overall dataset width.
Syntax
The fundamental syntax of the numpy.hstack() function is as follows:
numpy.hstack(tup)
tup: This parameter denotes a sequence (tuple, list, etc.) of arrays that are to be horizontally stacked together.
Example
Consider a scenario where you have two arrays, array1 and array2, both with the same number of rows. To horizontally stack these arrays using the numpy.hstack() function, you can utilise the following code example:
Code
Python
Python
import numpy as np
# Creating two arrays
array1 = np.array([[1, 2],
[3, 4]])
array2 = np.array([[5, 6],
[7, 8]])
# Horizontally stacking the arrays
stacked_array = np.hstack((array1, array2))
# Displaying the original arrays and the stacked array
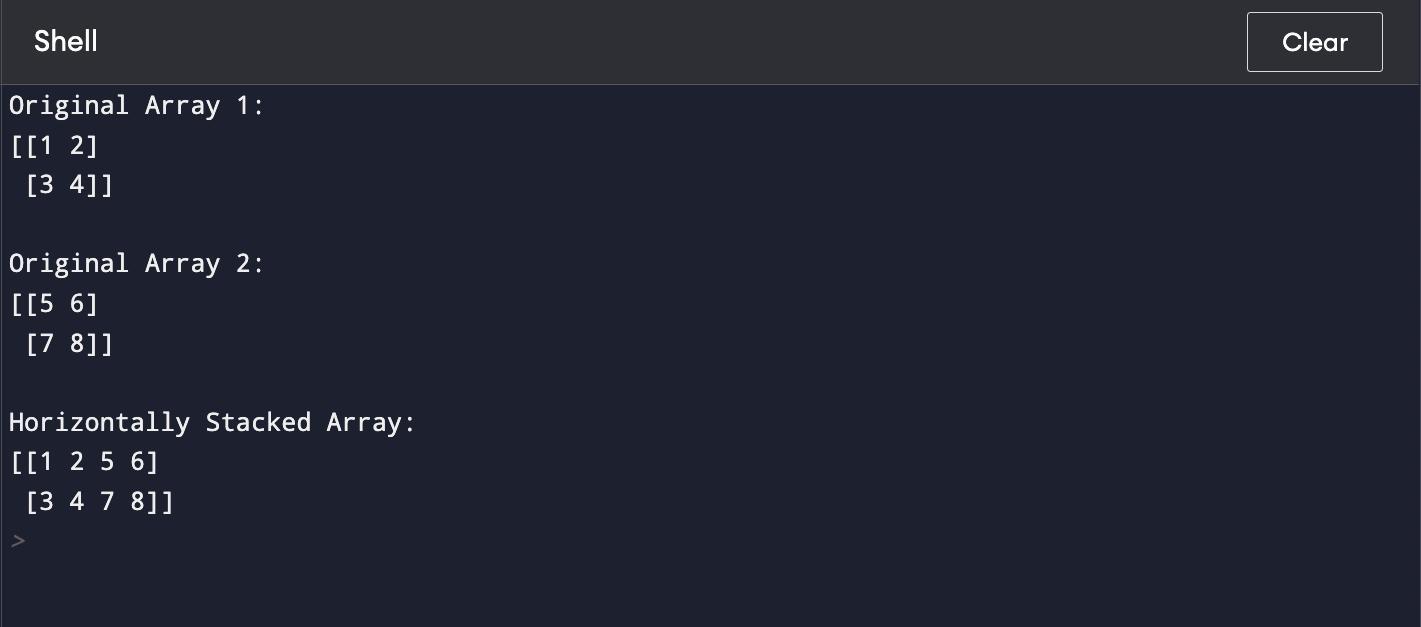
print("Original Array 1:")
print(array1)
print("\nOriginal Array 2:")
print(array2)
print("\nHorizontally Stacked Array:")
print(stacked_array)
You can also try this code with Online Python Compiler
The given Python code showcases the application of the numpy.hstack() function, which is used to horizontally stack two arrays together, combining their columns. Let's break down the code step by step:
Array Creation
Two separate arrays, denoted as array1 and array2, are created using the np.array() function. These arrays are initialised with numerical values, arranged in a 2x2 format. Each array represents a set of data, and they are structured as 2-dimensional matrices.
Utilising numpy.hstack()
The numpy.hstack() function is employed to horizontally stack these two arrays. It takes both array1 and array2 as input, enclosed within a tuple (array1, array2). The function's purpose is to concatenate these arrays side by side, aligning their columns. This results in the formation of a new array, stacked_array.
Displaying Original Arrays and Stacked Array
The code proceeds to display the original arrays, array1 and array2, using the print() function. Following that, it showcases the newly created stacked_array. This array is a combined representation of both original arrays, with columns from each array arranged horizontally.
Output Display
Upon executing the code, the output is displayed in the console. The original arrays are presented as separate 2x2 matrices, while the stacked_array is revealed as a combined 2x4 matrix. This demonstrates how the numpy.hstack() function performs horizontal concatenation, effectively augmenting the width of the data by merging corresponding columns from each array.
In summary, this code exemplifies how the numpy.hstack() function in NumPy is utilized to horizontally stack two arrays, enabling the efficient combination of their columns. This approach proves useful for scenarios where you need to expand the dataset horizontally while maintaining the same number of rows.
v.stack() Function
The numpy.vstack() function, a fundamental feature of the NumPy library, is purpose-built for vertically stacking or concatenating multiple arrays. It enables the fusion of arrays by aligning them one on top of the other along their rows, thereby extending the size of the resulting array along the vertical axis. This function is particularly valuable when you need to combine datasets that share the same number of columns, effectively increasing the overall dataset's height.
Syntax
The basic syntax of the numpy.vstack() function is as follows:
numpy.vstack(tup)
tup: This parameter signifies a sequence (list, tuple, etc.) of arrays that are intended to be vertically stacked together.
Example
Imagine you have two arrays, array1 and array2, with the same number of columns. To vertically stack these arrays using the numpy.vstack() function, you can utilize the following code example:
Code
Python
Python
import numpy as np
# Creating two arrays
array1 = np.array([[1, 2],
[3, 4]])
array2 = np.array([[5, 6],
[7, 8]])
# Vertically stacking the arrays
stacked_array = np.vstack((array1, array2))
# Displaying the original arrays and the vertically stacked array
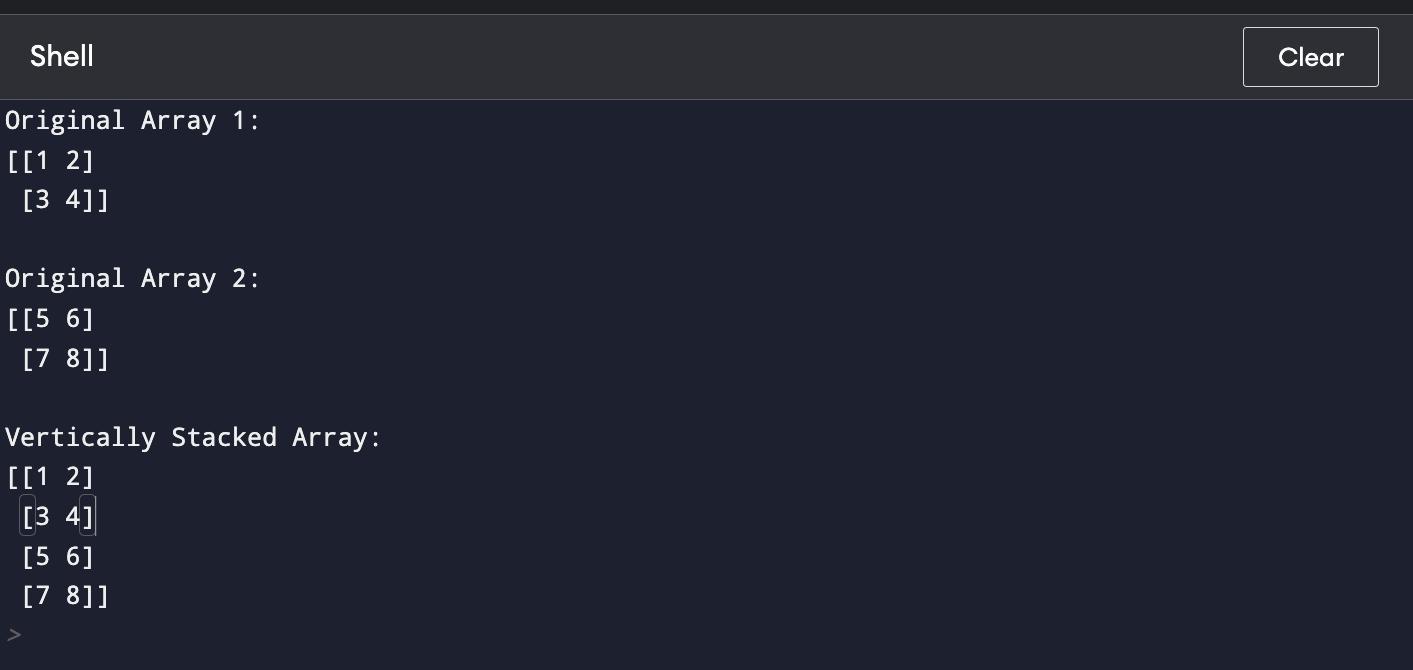
print("Original Array 1:")
print(array1)
print("\nOriginal Array 2:")
print(array2)
print("\nVertically Stacked Array:")
print(stacked_array)
You can also try this code with Online Python Compiler
The given code showcases the application of the numpy.vstack() function, which is used to vertically stack or concatenate two arrays together, combining their rows.
Here's a breakdown of the code:
Array Creation
The code starts by creating two distinct arrays: array1 and array2. These arrays are generated using the np.array() function and are populated with numerical values organized in a 2x2 format. Each array signifies a set of data and is structured as a 2-dimensional matrix.
Using numpy.vstack()
The numpy.vstack() function is employed to vertically stack these two arrays. The function takes both array1 and array2 as input, enclosed within a tuple (array1, array2). Its purpose is to concatenate these arrays on top of each other, aligning their rows. The result is a new array, stacked_array.
Displaying Original Arrays and Vertically Stacked Array
The code goes on to display the original arrays, array1 and array2, using the print() function. After that, it presents the newly formed stacked_array. This array reflects the combined representation of both original arrays, with rows from each array stacked vertically.
Output Display
Upon executing the code, the output is shown in the console. The original arrays are displayed as separate 2x2 matrices, and the stacked_array emerges as a combined 4x2 matrix. This illustrates how the numpy.vstack() function carries out vertical concatenation, extending the data's height by merging corresponding rows from each array.
In summary, this code effectively demonstrates how the numpy.vstack() function in NumPy is used to vertically stack two arrays, enabling the streamlined combination of their rows. This technique is beneficial for cases where you need to increase the dataset's height while retaining the same number of columns.
Frequently Asked Questions
Why is the stack() function used in NumPy?
The stack() function in NumPy is employed to merge arrays together while introducing a new dimension. It's akin to assembling building blocks – you keep the blocks separate but create a new structure by adding another layer.
How does stack() differ from other array methods?
Unlike some methods that alter arrays, stack() maintains the original arrays' integrity. It's like adding a shelf to a bookcase – books (arrays) remain distinct, but now you can see them all together in a more organised arrangement.
How does stack() work with 3-dimensional arrays?
Think of placing boxes in a storage unit. Each box symbolises a 3D array, and stack() adds a new compartment, which becomes a new dimension. This makes it simpler to manage intricate data arrangements.
Conclusion
The stack() function in NumPy is like a tool that lets us neatly pile up arrays, creating new layers of information. It's handy for making data more organised and manageable, especially when dealing with complex data structures. By adding extra dimensions to our arrays, we can build a structured and organised way to work with our data, just like adding new floors to a building. So, whether it's combining pictures, numbers, or any kind of data, the stack() function helps us stack it up for easier handling and analysis.


 9+ registered

