Table of contents
1.
Introduction 
2.
StackLayout
3.
Creating a StackLayout
4.
Frequently Asked Questions
4.1.
What is StackLayout?
4.2.
What is Kivy?
4.3.
Kivy is an open-source library that is used for building multi-touched applications.
4.4.
List some row-wise orientations.
4.5.
Does Kivy support Linux?
4.6.
How can we import StackLayout?
5.
Conclusion
Last Updated: Mar 27, 2024
Easy

StackLayout in Kivy

Author Ankit Kumar
0 upvote
Career growth poll
Do you think IIT Guwahati certified course can help you in your career?

Introduction 

Kivy is a GUI tool in Python, independent of the platform, to develop Android applications and can be used for Desktop applications development. It can be run on Windows, iOS, Android, and Linux.

The StackLayout is a layout method in Kivy used to arrange widgets horizontally or vertically, irrespective of their size, in a layout. Horizontally can be left-to-right or right-to-left, and vertically, top-to-bottom or bottom-to-top. And in this article, we will discuss StackLayout, some features, and a few programs to justify the points.

Let us see a brief explanation of StackLayout.

StackLayout

As discussed, StackLayout arranges children's widgets (like buttons) horizontally or vertically in a layout, as many as the layout can fit it. But to use StackLayout, first, we need to import it from Kivy by the following command:


Code:

from kivy.uix.stacklayout import StackLayout
You can also try this code with Online Python Compiler
Run Code


But sometimes, it's quite confusing to differentiate BoxLayout from StackLayout. Boxlayout is a 1'Dimensional means it can only organize the widgets either horizontally or vertically. The orientation of StackLayout is 2'Dimensional and can organize the widgets with more complexity. It has four row-wise and four column-wise orientations.

Row-wise: ‘rl-bt’ , ‘rl-tb’ , ‘lr-bt’ , ‘lr-tb’.

Column-wise: ‘bt-rl’ , ‘bt-lr’ , ‘tb-rl’ , ‘tb-lr’. 

The orientation of the widget in a layout is shown below.

Let us see a basic approach to how to create StackLayout.

Creating a StackLayout

Listed below are some steps to create StackLayout:

  1. Import libraries and modules named Kivy, Kivy App, Button, StackLayout
  2. Then set the minimum version of Kivy. It's a purely optional step.  
  3. After that, create an App class. And under this class, we will make a function that contains orientation, buttons, and widgets command.
  4. Return the widgets in StackLayout.
  5. At last, run an instance of the class.


These are the basic steps. Now it's time to implement them. 


Code:

# Importing kivy module
import kivy

# Setting up the version 
kivy.require("1.9.1")

# Importing kivy App
from kivy.app import App

# Importing stacklayout
from kivy.uix.stacklayout import StackLayout

# Importing Button
from kivy.uix.button import Button

# Creating an app class
class StackLayoutApp(App):
def build(self):
SLayout = StackLayout(orientation ='lr-tb')

# Creating Multiple Buttons
buttton1 = Button(text ="Buttton1",font_size = 20,size_hint =(.2, .1))
buttton2 = Button(text ="Buttton2",font_size = 20,size_hint =(.2, .1))
buttton3 = Button(text ="Buttton3",font_size = 20,size_hint =(.2, .1))
buttton4 = Button(text ="Buttton4",font_size = 20,size_hint =(.2, .1))
buttton5 = Button(text ="Buttton5",font_size = 20,size_hint =(.2, .1))
buttton6 = Button(text ="Buttton6",font_size = 20,size_hint =(.2, .1))
buttton7 = Button(text ="Buttton7",font_size = 20,size_hint =(.2, .1))
buttton8 = Button(text ="Buttton8",font_size = 20,size_hint =(.2, .1))
buttton9 = Button(text ="Buttton9",font_size = 20,size_hint =(.2, .1))
buttton10 = Button(text ="Buttton10",font_size = 20,size_hint =(.2, .1))

# Adding widgets
SLayout.add_widget(buttton1)
SLayout.add_widget(buttton2)
SLayout.add_widget(buttton3)
SLayout.add_widget(buttton4)
SLayout.add_widget(buttton5)
SLayout.add_widget(buttton6)
SLayout.add_widget(buttton7)
SLayout.add_widget(buttton8)
SLayout.add_widget(buttton9)
SLayout.add_widget(buttton10)

# SLayout returning widgets
return SLayout
if __name__ == '__main__':
StackLayoutApp().run()
You can also try this code with Online Python Compiler
Run Code


Output:

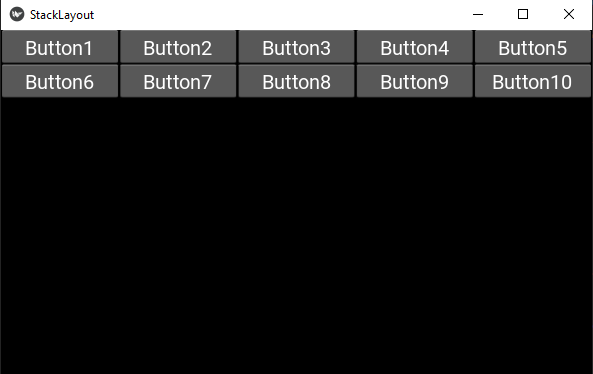
The output above shows 'lr-tb' orientation as we gave the parameter in "StackLayout(orientation =' lr-tb')". We can also change the orientation row-wise and column-wise accordingly. For row-wise we can use these parameters -‘rl-bt’ , ‘rl-tb’ , ‘lr-bt’ , ‘lr-tb’ and for column-wise we can use given parameters- ‘bt-rl’ , ‘bt-lr’ , ‘tb-rl’ , ‘tb-lr’.

Below is the output for all orientations.


Row-wise orientation methods-

Change the orientation in following code

Slayout = StackLayout(orientation = ‘lr-tb’)
You can also try this code with Online Python Compiler
Run Code


Outputs:


Slayout = StackLayout(orientation = ‘lr-bt’)
You can also try this code with Online Python Compiler
Run Code


Output:


Slayout = StackLayout(orientation = ‘rl-tb’)
You can also try this code with Online Python Compiler
Run Code


Output:


Slayout = StackLayout(orientation = ‘rl-bt’)
You can also try this code with Online Python Compiler
Run Code


Output:


Column-wise orientation method-

Slayout = StackLayout(orientation = ‘tb-lr’)
You can also try this code with Online Python Compiler
Run Code


Output:


Slayout = StackLayout(orientation = ‘tb-rl’)
You can also try this code with Online Python Compiler
Run Code


Output:


Slayout = StackLayout(orientation = ‘bt-lr’)
You can also try this code with Online Python Compiler
Run Code


Output:


Slayout = StackLayout(orientation = ‘bt-rl’)
You can also try this code with Online Python Compiler
Run Code


Output:


Let us see some FAQs related to the topic.

Frequently Asked Questions

What is StackLayout?

StackLayout is a module that arranges widgets horizontally or vertically.

What is Kivy?

Kivy is an open-source library that is used for building multi-touched applications.

List some row-wise orientations.

Row-wise orientation are: ‘rl-bt’ , ‘rl-tb’ , ‘lr-bt’ , ‘lr-tb’.

Does Kivy support Linux?

Kivy is a cross-platform which supports Linux, OSX, Windows, Android, and iOS.

How can we import StackLayout?

By using the following command: from kivy.uix.stacklayout import StackLayout

Conclusion

In this article, we have extensively discussed StackLayout. At first, we have seen some brief explanations about StackLayout. Then we have seen the approach to creating a StackLayout. And at last, program to create a StackLayout.

After reading about StackLayout in Kivy, are you not feeling excited to read/explore more articles on the topic of KIVY? Don't worry; Coding Ninjas has you covered. To learn, see the Introduction to KivyThe drop-down List In KivyWidgets in Kivy, and Kivy Float Layout in Python.

Refer to our Guided Path on Coding Ninjas Studio to upskill yourself in Data Structures and AlgorithmsCompetitive ProgrammingJavaScriptSystem Design, and many more! If you want to test your competency in coding, you may check out the mock test series and participate in the contests hosted on Coding Ninjas Studio! But if you have just started your learning process and are looking for questions asked by tech giants like Amazon, Microsoft, Uber, etc; you must look at the problems, interview experiences, and interview bundle for placement preparations.

Nevertheless, you may consider our paid courses to give your career an edge over others!

Do upvote our blogs if you find them helpful and engaging!

Happy Learning!

Live masterclass