Table of contents
1.
Introduction
2.
State Management from Scratch
2.1.
Explanation
3.
State Management Pattern
4.
Example
4.1.
Output
4.2.
Explanation
5.
FAQs
6.
Key Takeaways
Last Updated: Mar 27, 2024

State Management in Vuejs

Author Naman Kukreja
0 upvote
Career growth poll
Do you think IIT Guwahati certified course can help you in your career?

Introduction

Whenever an application is created, it is simple to manage, but as time goes, when more features are added to the application, the app becomes more and more complex.

The same goes with the frontend, as when the code size increases, the number of bugs also increases.

We have  State management in Vue to solve this problem, which uses Vuex. Further in the blog, we will learn more about them.

State Management from Scratch

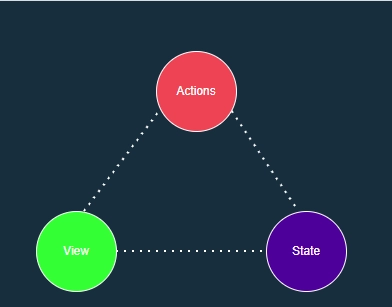
State management refers to implementing a design pattern that manages the states of one or more user interfaces and combines them into one state to use them application-wide.

It is beneficial for maintaining cleaner apps and is also perfect for large applications because of the single state or the source of truth.

In Vue applications, the source of truth is often overlooked, reactive data.

You need to make your objective reactive to make your single piece of state to be shared by multiple instances, and you can make your object reactive as same as done below:

const { createApp, reactive } = Vue

 
const sourceOfTruth = reactive({
  message: 'Making Reactive'
})

 
const appX = createApp({
  data() {
    return sourceOfTruth
  }
}).mount('#app-x')

 
const appY = createApp({
  data() {
    return sourceOfTruth
  }
}).mount('#app-y')


<div id="app-a">App X: {{ message }}</div>
 
<div id="app-b">App Y: {{ message }}</div>

Explanation

In the above-stated example, we are creating two apps named X and Y, respectively, and both are returning the souceofTruth. Here sourceofTruth refers to the message that we are providing.

And the mount function attaches the element to the DOM.

Both appX and Y will automatically update their views when sourceofTruth is mutated.

Although we have a single source of truth now, debugging will be difficult. Any part of our app can change any piece of data without leaving a trace.:

const appY = createApp({
    data() {
      return sourceOfTruth
    },
    mounted() {
      sourceOfTruth.message = 'changing message' // both apps will render 'changing message' message now
    }
  }).mount('#app-b')

We can adopt a store pattern to solve this problem:

  const store = {
    debug: true,
 
    state: reactive({
      message: 'Hi!'
    }),
 
    setMessageAction(newValue) {
      if (this.debug) {
        console.log('setMessageAction triggered with', newValue)
      }
 
      this.state.message = newValue
    },
 
    clearMessageAction() {
      if (this.debug) {
        console.log('clearMessageAction triggered')
      }
 
      this.state.message = ''
    }
  }

Inside the Store, we have put all the actions that can mutate its state. This makes it easy to understand the type of mutation that can be triggered. This is the type of centralized state management. Now we will have a log to find if anything happened and the reasons for the bug.

Each component can still manage and own its own private state:

<div id="app-x">{{sharedState.message}}</div> 
<div id="app-y">{{sharedState.message}}</div>
 const appX = createApp({
    data() {
      return {
        privateState: {},
        sharedState: store.state
      }
    },
    mounted() {
      store.setMessageAction('Changed!')
    }
  }).mount('#app-x')
 
  const appY = createApp({
    data() {
      return {
        privateState: {},
        sharedState: store.state
      }
    }
  }).mount('#app-y')

The state management uses Vuex, a centralized store for all the application's components. It is a library + state management pattern. 

Now we will learn about state management patterns.

State Management Pattern

All actions that can mutate and change the store state are put inside the single store class itself. Let’s understand it with an example

new Vue({
  // state
  data () {
    return {
      count: 0
    }
  },
   // actions
  methods: {
    increment () {
      this.count++
    }
  }
})
 // view
  template: `
    <div>{{ count }}</div>
  `,

It contains three parts, i.e., State, Action, View. We will learn all of them one by one.

State: Here in the application-wide, a single source of truth is shared.

View: On view components, it represents the state or a part of it.

Actions: These are the possible ways a state can change in response to user interaction with the views.

The multiple components that share a common state quickly break down the simplicity.

  • Sometimes an action may need to mutate the same piece of the state although coming from different views.
  • Sometimes the same state can have multiple views dependent on it.

For problem one, we often use solutions like synchronizing and mutating multiple state copies via an event or reaching to direct child/parent instance references.

For problem second, passing props can be tedious for deeply nested components, which will not work for sibling components.

We can extract the shared state out and manage it globally. With this, the component tree will become a big “view” and can access the trigger and state actions, no matter their position in the tree.

Using the concepts learned in state management and defining and separating the concepts involved gave our code more maintainability and structure.

Example

Let's understand state management with an example:

<!DOCTYPE html>
<head>
    <script src="https://unpkg.com/vue"></script>
    <script src="https://unpkg.com/vuex"></script>
</head>
<body>
    <div id="app">
        <h1>{{welcome}}</h1>
        <h2>{{message}} </h2>
        <h3>{{count}}</h3>
        <button @click="pressed">Increment Counter</button>
    </div>
    <script>
        const store =new Vuex.Store({
state:{
message: 'Hello From Vuex',
count:0
},
mutations:{
increment(state,payload){
    state.count+=payload;
}
},
actions: {
increment(state, payload){
  state.commit('increment',payload);
}
},
getters:{
message(state){
    return state.message.toUpperCase();
},
counter(state){
    return state.count;
}
}
        })
        new Vue({
            e1:'#app',
            data(){
                return{
                    welcome:'Hello World'
                }
            },
            computed:{
                message(){
                    return store.getters.message
                },
                count(){
                    return store.getters.counter;
                }
            },
            methods:{
                pressed(){
                    //  store.commit('increment',10);
                    store.dispatch('increment',20);
                }
            }
        });
    </script>
</body>
</html>

Output

Explanation

We have written the above code in an HTML file now we are going to understand how the code works.

First, we have used the functions in Vue by which we are controlling the whole code. Now let's understand each function one by one.

State: through the state function, we are displaying the message with the h2 tag, i.e., "Hello From Vuex". It is displayed as uppercased on the home page, but we will surely learn why.

Counter: This function is basically returning the count to the h3 tag by which we are displaying the count on the home screen.

Getters: They are used to perform all the commands like transferring the text into the upper case or increasing when the button is pressed. They are used with functions in Vue to perform operations. They return the answer to the function for displaying on the home page like computed methods functions in the above code.

Mutations and actions: They both perform the same task of incrementing the count whenever the button is pressed, but the only difference between them is that mutations only perform synchronous commands while actions can perform on both synchronous and asynchronous commands. 

This management of functions to reduce the length of code and modules is state management.

FAQs

  1. Why is Vue.js known as a progressive framework?
    It is known as a progressive framework because it is developed and changes continuously.
     
  2. What is Vuex in state management?
    It is a library + state management pattern for Vue.js applications.
     
  3. State any one method for using Vue state.
    The method for using the Vue state is repetition.
     
  4. 4. What is reactivity in Vue.js?
    Any changes in the data value leads to the triggering of page update to reflect data changes.

Key Takeaways

In this blog, we have learned about state management in Vuejs from fundamentals and also about Vuex and state management patterns.

Want to learn more about frontend development? You must look at coding ninja's Front end web development course.

Live masterclass