


Introduction
Hello, ninjas! You must have heard about terms like Spring Boot in Java, Swagger in Spring Boot, API, Open-source projects, etc. In this article, we will study Swagger in Spring Boot and its implementation.

Swagger in Spring Boot
Swagger in Spring Boot is an open-source project that helps generate documents of REST APIs for RESTful web services via a web browser. It renders the documentation of an API visually using web services.
Open API is the specification, and Swagger is a tool that helps implement the API specification. It provides various tools and libraries to work with. Also, Check out our spring boot course and take your programming skills to the next level
Let us study its implementation by creating a Spring Boot project.
Getting Started With a Spring Boot Project
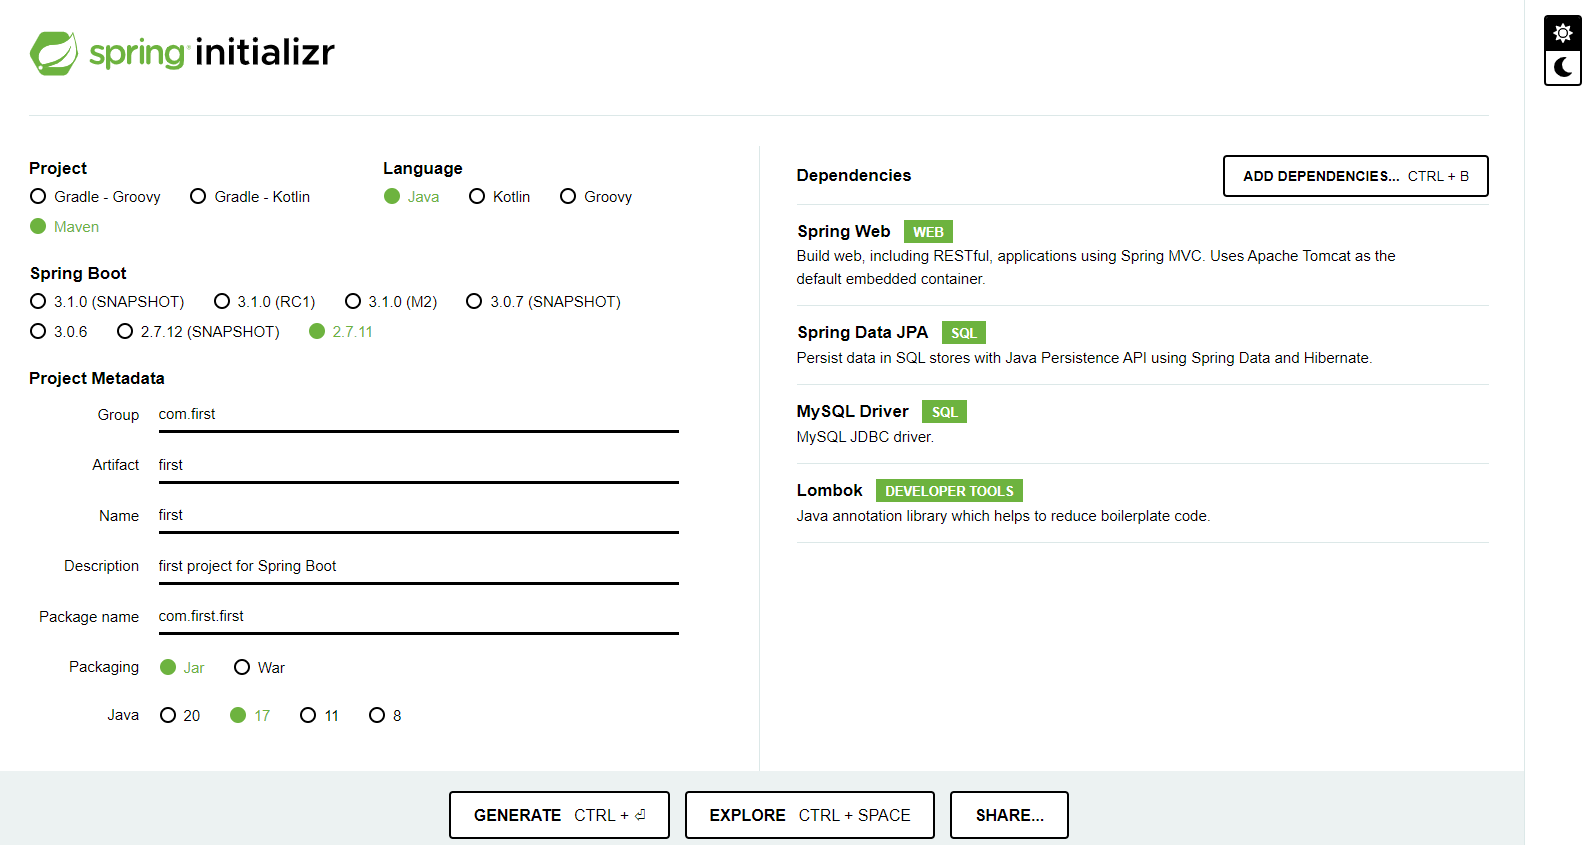
You can easily make a Spring Boot project using the website spring initializr. In that, you have many versions available that you can use in completing the project.
In this article, we will see its implementation using a Maven project, Spring Boot version 2.7.11, Jar packaging, and Java language.
You can edit the Project Metadata in whichever way you like. Also, we will add Spring Web, Spring Data JPA, MySQL Driver, and Lombok as initial dependencies.
Note: JAVA Development Kit must be installed in your system.
Dependencies
You should add the following dependencies in the pom.xml file for Swagger in Spring Boot. Notice the versions used of Swagger and Spring Boot carefully. Here, we are using version 2.7.0 for Swagger dependencies.
<dependency>
   <groupId>io.springfox</groupId>
   <artifactId>springfox-swagger2</artifactId>
   <version>2.7.0</version>
</dependency>
<dependency>
   <groupId>io.springfox</groupId>
   <artifactId>springfox-swagger-ui</artifactId>
   <version>2.7.0</version>
</dependency>
Main Application
You must enable your main application file to use Swagger.
@EnableSwagger2 is used for it and after enabling it, your main application file should like as follows:
package com.first.first;

import org.springframework.boot.SpringApplication;
import org.springframework.boot.autoconfigure.SpringBootApplication;
import org.springframework.stereotype.Component;
import springfox.documentation.swagger2.annotations.EnableSwagger2;

@EnableSwagger2
@SpringBootApplication
@Component
public class FirstApplication {

   public static void main(String[] args) {
      SpringApplication.run(FirstApplication.class, args);
   }

}
Also read about - Introduction to Swagger Documentation Format
Configuration of Swagger File
You must add a swagger configuration file in your project in the java folder for use.
In this, we add a Docket object containing all properties that can be customized and generate documentation. The file can be as follows:
package com.first.first.config;

import org.springframework.context.annotation.Configuration;
import springfox.documentation.builders.PathSelectors;
import springfox.documentation.builders.RequestHandlerSelectors;
import springfox.documentation.spi.DocumentationType;
import springfox.documentation.spring.web.plugins.Docket;

@Configuration
public class SwaggerConfig {

   public Docket SwaggerApi() {
       return new Docket(DocumentationType.SWAGGER_2)
               .select()
               .apis(RequestHandlerSelectors.any())
               .paths(PathSelectors.any())
               .build();
   }
}Patient Control Definition and Application Properties
In our project, we are making a patient controller API. So, we have created it using the following code. In it, we have made five attributes for the table:
-
patient_id
-
patient_name
-
patient_address
-
contact_number
- patient_disease
package com.first.first.entity;

import lombok.*;

import javax.persistence.*;

@Entity
@Table(name = "patient")
@Data
public class Patient {
   @Id
   @Column(name = "patient_id", length = 45)
   @GeneratedValue(strategy = GenerationType.AUTO)
   private int patientID;

   @Column(name = "patient_name", length = 100, nullable = false)
   private String patientName;

   @Column(name = "patient_address", length = 150, nullable = false)
   private String patientAddress;

   @Column(name = "contact_number", length = 11)
   private String contactNumber;

   @Column(name = "patient_disease")
   private String patientDisease;

}
Also, since we are using a Local Instance of MYSQL as the database in this project, we have to write its properties in the application properties file in resources.
In this, we have to write the code to make a table in the local database(if not already made). We provide the username and password of the local database for it.
Also, JPA stands for Java Persistence API. The JPA vendor adapter configuration serves as a single configuration point for all the vendor-specific properties.
spring.datasource.url=jdbc:mysql://localhost:3306/first?createDatabaseIfNotExist=true
spring.datasource.username=root
spring.datasource.password=<your_root_password>

#jpa vendor adapter configuration
spring.jpa.database-platform=org.hibernate.dialect.MySQL5Dialect
spring.jpa.generate-ddl=true
spring.jpa.show-sql=true
Code For Controller
This is the main code that we have to write for our main “patient-controller”. It is used to make RESTful web services. Here the web service used is “POST”.
package com.first.first.controller;

import org.springframework.web.bind.annotation.CrossOrigin;
import org.springframework.web.bind.annotation.PostMapping;
import org.springframework.web.bind.annotation.RequestMapping;
import org.springframework.web.bind.annotation.RestController;

@RestController
@CrossOrigin
@RequestMapping("api/v1/patient")
public class PatientController {
   @PostMapping("/save")
   public String savePatient(){
       return null;
   }
}Pom File
After adding all the dependencies, the pom.xml file is as follows:
<?xml version="1.0" encoding="UTF-8"?>
<project xmlns="http://maven.apache.org/POM/4.0.0" xmlns:xsi="http://www.w3.org/2001/XMLSchema-instance"
   xsi:schemaLocation="http://maven.apache.org/POM/4.0.0 https://maven.apache.org/xsd/maven-4.0.0.xsd">
   <modelVersion>4.0.0</modelVersion>
   <parent>
      <groupId>org.springframework.boot</groupId>
      <artifactId>spring-boot-starter-parent</artifactId>
      <version>2.7.11</version>
      <relativePath/> <!-- lookup parent from repository -->
   </parent>
   <groupId>com.first</groupId>
   <artifactId>first</artifactId>
   <version>0.0.1-SNAPSHOT</version>
   <name>first</name>
   <description>first project for Spring Boot</description>
   <properties>
      <java.version>17</java.version>
   </properties>
   <dependencies>
      <dependency>
         <groupId>org.springframework.boot</groupId>
         <artifactId>spring-boot-starter-data-jpa</artifactId>
      </dependency>
      <dependency>
         <groupId>org.springframework.boot</groupId>
         <artifactId>spring-boot-starter-web</artifactId>
      </dependency>

      <dependency>
         <groupId>com.mysql</groupId>
         <artifactId>mysql-connector-j</artifactId>
         <scope>runtime</scope>
      </dependency>
      <dependency>
         <groupId>org.projectlombok</groupId>
         <artifactId>lombok</artifactId>
         <optional>true</optional>
      </dependency>
      <dependency>
         <groupId>org.springframework.boot</groupId>
         <artifactId>spring-boot-starter-test</artifactId>
         <scope>test</scope>
      </dependency>

      <dependency>
         <groupId>io.springfox</groupId>
         <artifactId>springfox-swagger2</artifactId>
         <version>2.7.0</version>
      </dependency>

      <dependency>
         <groupId>io.springfox</groupId>
         <artifactId>springfox-swagger-ui</artifactId>
         <version>2.7.0</version>
      </dependency>


   </dependencies>

   <build>
      <plugins>
         <plugin>
            <groupId>org.springframework.boot</groupId>
            <artifactId>spring-boot-maven-plugin</artifactId>
            <configuration>
               <excludes>
                  <exclude>
                     <groupId>org.projectlombok</groupId>
                     <artifactId>lombok</artifactId>
                  </exclude>
               </excludes>
            </configuration>
         </plugin>
      </plugins>
   </build>

</project>
URL of API Documentation
After doing the following and running the application in your IDE, hit the following URL:
http://localhost:8080/swagger-ui.html to view your Swagger UI page containing the API documentation.

Here, apart from the “basic-error-controller”, we can see the “patient-controller” that we have made. It also has the functionalities in order to interact with it.
In our project, we have made the POST functionality as it is shown above.
Also read about - Enhancing Swagger Documentation With Custom Annotations


 9+ registered

