Switch Widget
The Switch device is active or inactive as a mechanical lightweight switch. The user will swipe to the left/right to activate/deactivate it. The value pictured by the Switch is either True or False, meaning the Switch will be either in the On position or Off position.
To work with Switch, you must import:
from kivy. uix. switch import Switch
Widgets will be supplemental to your phone's home as a fast method to access bound info from apps while not having to open the app itself. One example is the Calendar device, which provides a fast read of the future events in your calendar while not having to open the Calendar application.
The Switch device is a twin of the Switch management (an electrical switch that's not customizable) in iPhone and presents two reciprocally exclusive selections or states. The Switch device displays the present state. You need to slide the management to pick out the opposite worth.
Attaching Callback
A switch's state transition is either ON to OFF or OFF to ON.
When a switch makes a transition, a request is raised, a new state is typically obtained, i.e., arrived, and alternative actions generally are made to support the state.
The gizmo's illustration is static by default and the needed minimum size is 83*32 pixels.
The entire device is operational, not just the graphics dispense. It will work as long as you swipe over the widget's bounding box.
Basic Strategy:
- Bring in kivy
- Install kivyApp
- Import Grid layout
- Import Switch
- Import the Label
- Select the minimal version (optional)
-
Make a Layout class. (Here's how you make a switch):
--> define the Switch's callback in this
- Construct an App class
-
Make a.kv file with the same name as the app class:
- make a boxLayout
- Add a label
- Add a switch
- If necessary, bind a callback.
- Layout/widget/Class should be returned (according to requirement)
- Execute a class instance
Here Comes the Implementation:
We will use the above strategy to write the code in Python as well as Kivy for the implementation of Switch Widget.
Python Code
import kivy

from kivy.app import App

kivy.require('1.9.0')

from kivy.uix.switch import Switch

# The GridLayout for arranging children in a matrix.
# It takes the available space
# then divides it into columns and rows,
# and nadds widgets to the resulting “cells”.
from kivy.uix.gridlayout import GridLayout

# For rendering text.
from kivy.uix.label import Label

# Switch Class
class SimpleSwitch(GridLayout):

   rows = 4

   #Callback function
   def switch_callback(self, switchObject, switchValue):

      # Switch value are True and False
      if(switchValue):
         print('Switch is ON')
      else:
         print('Switch is OFF')


# Defining the App Class
class SwitchApp(App):
   # define build function
   def build(self):
      # return the switch class
      return SimpleSwitch()


# Run the kivy app
if __name__ == '__main__':
   SwitchApp().run()

You can also try this code with Online Python Compiler
.kv Code
The .kv code will include the entire functions of a switch along with labels
<SimpleSwitch>:


    # creating box layout for better view
    BoxLayout:
        size_hint_y: None
        height: '48dp'


        # Adding label to switch
        Label:
            text: 'Normal Switch'


        # creating the switch
        Switch:


            # False for OFF and True for ON
            active: False

            # Arranging a callback to the switch
            on_active: root.switch_callback(self, self.active)


    # Second switch

    BoxLayout:
        size_hint_y: None
        height: '48dp'


        Label:
            text: 'Active Switch'
        Switch:
            active: True
            on_active: root.switch_callback(self, self.active)


    # Third Switch


    BoxLayout:
        size_hint_y: None
        height: '48dp'


        Label:
            text: 'Switch Off Switch (disabled)'

        Switch:
            # disabled True , After making switch False
            # it is disabled, So you cannot change its state
            disabled: True
            active: False


    # Fourth Switch


    BoxLayout:
        size_hint_y: None
        height: '48dp'


        Label:
            text: 'On Switch (disabled)'
        Switch:
            disabled: True
            active: True
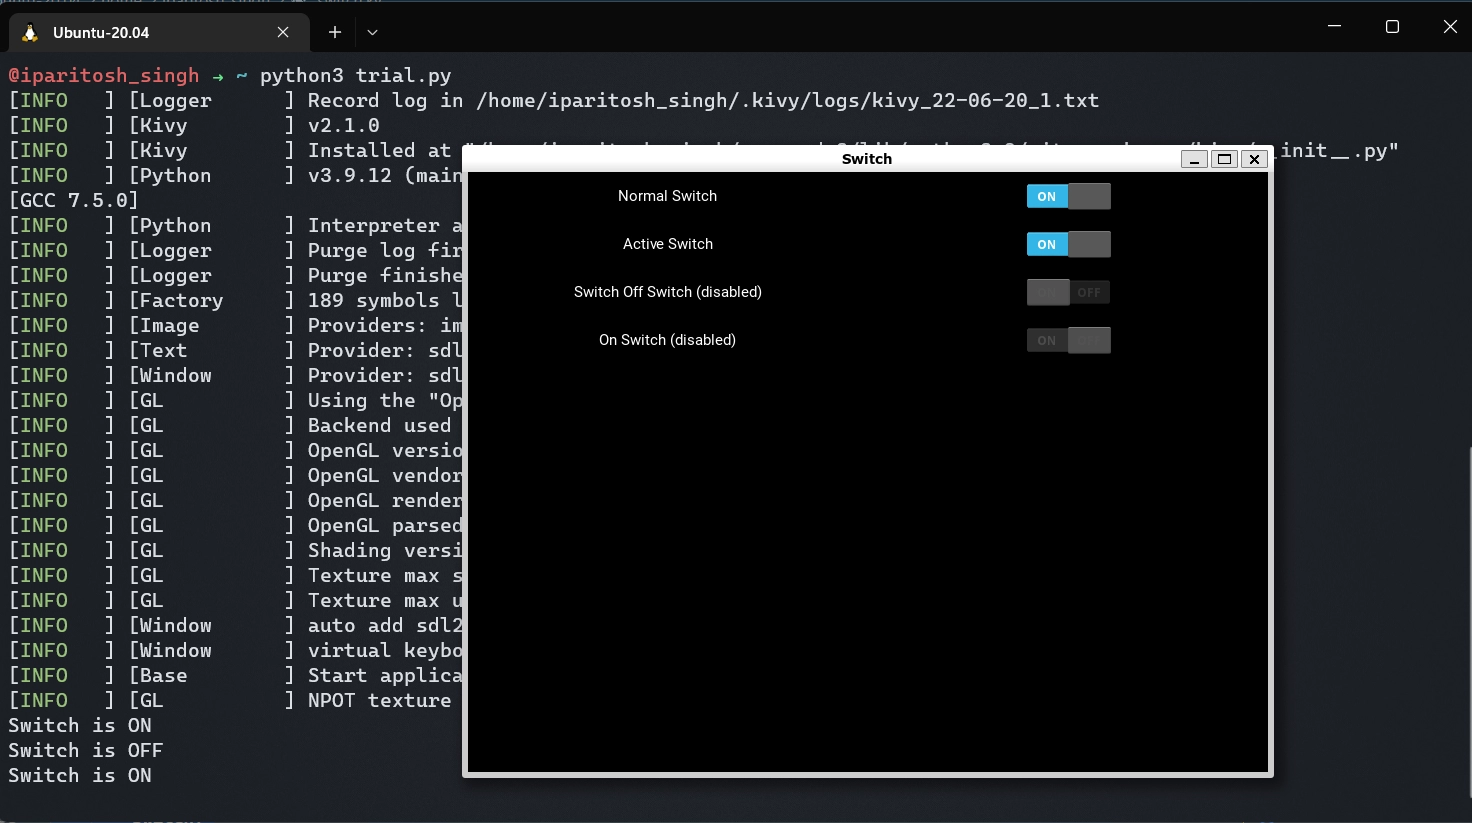
OUTPUT:


Frequently Asked Question
What are KV files?
A kV is a file in the Kivy language created by Kivy. It is basically an associate ASCII text file Python library that you can use to develop multi-touch enabled, cross-platform applications. It stores ASCII text files within the Kivy syntax, which can embody rule definitions, root contrivance, dynamic category definitions, and templates.
What is a root contraption in KIVY?
Widgets in Kivy are organised in trees. Your application includes a root contraption that typically has kids that may have kids of their own. kids of a gadget are delineated because the kids attribute a Kivy ListProperty.
How do I add a contrivance to Kivy?
Basic Approach to follow when making button :
- import kivy.
- Import kivyApp.
- Import BoxLayout.
- set minimum version(optional)
- Add widgets.
- Extend the category.
- Return layout.
- Run associate degree instances of the category.
Conclusion
This article thoroughly covered the concept of the Switch widget in kivy using a .kv file. We begin with the overview of the switch widget and then go over each syntax with examples.
We hope that this blog has helped you enhance your knowledge of switch widget in Kivy Python and if you would like to learn more, check out our articles on switch widget using .kv file and switch widget in kivy. Do upvote our blog to help other ninjas grow, and head over to our practice platform Coding Ninjas Studio to practice top problems, attempt mock tests, read interview experiences, and much more.
Happy learning!


 9+ registered

