Attributes of TableLayout
The various attributes involved in making the Table through TableLayout are listed. Let us go through them one by one to understand them:
- android:id: This attribute gives an id that identifies a particular instance of Table Layout uniquely.
- android:collapseColumns: This attribute helps us in collapsing numerous columns together. A comma must separate the several column indices specified for this attribute. It has zero-based indexing.
- android:shrinkColumns: As already satiated, the columns have zero-based indexing. Hence, this attribute takes the zero-based index of the column we want to shrink. Again, we must separate the column indices by commas, as in the case of android:collapseColumns attribute.
- android:stretchColumns:This attribute stretches the columns whose indices we specify. Remember that just like in previous attributes for Columns of a table, this uses zero-based indexing, and commas must separate the index we have provided.
- android:layout_span: We can use this attribute in any view inside the table row. We use it to assign more column space to a particular view compared to others. Hence, it helps a view to span multiple columns.
Public Methods of Adding Elements
We can add views in different ways to a table. The various methods are listed here:
- public void addView (View child, int index): We use it to add a child view to the table. Since no layout parameters are defined here, the default parameters are for
- public void addView (View child, ViewGroup.LayoutParams params): We use it to add a view by defining certain specific parameters.
- public void addView (View child, int index, ViewGroup.LayoutParams params): It helps us add a view at a given index value and specified parameters.
Example of Table Layout
Let’s try to understand TableLayout better by implementing it with an example.
In this example, we will create a table of marks of various students using Table Layout.
The activity_main.xml file
In this file, we will declare TableLayout and use TableRow to start adding table rows. Create a ranking of students that defines four columns: S.No., name,subjects, and marks.
activity_main.xml will look like this after modification:
Code:
<?xml version="1.0" encoding="utf-8"?>
<TableLayout xmlns:android="http://schemas.android.com/apk/res/android"
    android:layout_width="match_parent"
    android:layout_height="match_parent"
    android:layout_marginTop="10dp"
    android:paddingLeft="5dp"
    android:paddingRight="5dp"
    android:background="@color/white">

    <TextView
        android:id="@+id/txt"
        android:layout_width="wrap_content"
        android:layout_height="wrap_content"
        android:text="Results:"
        android:textSize = "25dp"
        android:textStyle="bold">

    </TextView>


    <TableRow android:background="#EC8A48" android:padding="10dp">
        <TextView
            android:layout_width="wrap_content"
            android:layout_height="wrap_content"
            android:layout_weight="1"
            android:text="S.No."
            android:textSize="20dp"/>
        <TextView
            android:layout_width="wrap_content"
            android:layout_height="wrap_content"
            android:layout_weight="1"
            android:text="Name"
            android:textSize="20dp"/>
        <TextView
            android:layout_width="wrap_content"
            android:layout_height="wrap_content"
            android:layout_weight="1"
            android:text="Subjects"
            android:textSize="20dp"/>
        <TextView
            android:layout_width="wrap_content"
            android:layout_height="wrap_content"
            android:layout_weight="1"
            android:text="Marks (50)"
            android:textSize="20dp"/>
    </TableRow>
    <TableRow android:background="#DBDFDF" android:padding="5dp">
        <TextView
            android:layout_width="wrap_content"
            android:layout_height="wrap_content"
            android:layout_weight="1"
            android:text="1"
            android:textSize="10dp"
            android:textColor="@color/black"/>
        <TextView
            android:layout_width="wrap_content"
            android:layout_height="wrap_content"
            android:layout_weight="1"
            android:text="Ninja 1"
            android:textSize="10dp"
            android:textColor="@color/black"/>
        <TextView
            android:layout_width="wrap_content"
            android:layout_height="wrap_content"
            android:layout_weight="1"
            android:text="AI"
            android:textSize="10dp"
            android:textColor="@color/black"/>
        <TextView
            android:layout_width="wrap_content"
            android:layout_height="wrap_content"
            android:layout_weight="1"
            android:text="38"
            android:textSize="10dp"
            android:textColor="@color/black"/>
    </TableRow>
    <TableRow android:background="#DBDFDF" android:padding="5dp">
        <TextView
            android:layout_width="wrap_content"
            android:layout_height="wrap_content"
            android:layout_weight="1"
            android:text="2"
            android:textSize="10dp"
            android:textColor="@color/black"/>
        <TextView
            android:layout_width="wrap_content"
            android:layout_height="wrap_content"
            android:layout_weight="1"
            android:text="Ninja 2"
            android:textSize="10dp"
            android:textColor="@color/black"/>
        <TextView
            android:layout_width="wrap_content"
            android:layout_height="wrap_content"
            android:layout_weight="1"
            android:text="Operating System"
            android:textSize="10dp"
            android:textColor="@color/black"/>
        <TextView
            android:layout_width="wrap_content"
            android:layout_height="wrap_content"
            android:layout_weight="1"
            android:text="30"
            android:textSize="10dp"
            android:textColor="@color/black"/>

    </TableRow>
    <TableRow android:background="#DBDFDF" android:padding="5dp">
        <TextView
            android:layout_width="wrap_content"
            android:layout_height="wrap_content"
            android:layout_weight="1"
            android:text="3"
            android:textSize="10dp"
            android:textColor="@color/black"/>
        <TextView
            android:layout_width="wrap_content"
            android:layout_height="wrap_content"
            android:layout_weight="1"
            android:text="Ninja 3"
            android:textSize="10dp"
            android:textColor="@color/black"/>
        <TextView
            android:layout_width="wrap_content"
            android:layout_height="wrap_content"
            android:layout_weight="1"
            android:text="COA"
            android:textSize="10dp"
            android:textColor="@color/black"/>
        <TextView
            android:layout_width="wrap_content"
            android:layout_height="wrap_content"
            android:layout_weight="1"
            android:text="37"
            android:textSize="10dp"
            android:textColor="@color/black"/>

    </TableRow>

    <TableRow android:background="#DBDFDF" android:padding="5dp">
        <TextView
            android:layout_width="wrap_content"
            android:layout_height="wrap_content"
            android:layout_weight="1"
            android:text="4"
            android:textSize="10dp"
            android:textColor="@color/black"/>
        <TextView
            android:layout_width="wrap_content"
            android:layout_height="wrap_content"
            android:layout_weight="1"
            android:text="Ninja 4"
            android:textSize="10dp"
            android:textColor="@color/black"/>
        <TextView
            android:layout_width="wrap_content"
            android:layout_height="wrap_content"
            android:layout_weight="1"
            android:text="Computer Graphics"
            android:textSize="10dp"
            android:textColor="@color/black"/>
        <TextView
            android:layout_width="wrap_content"
            android:layout_height="wrap_content"
            android:layout_weight="1"
            android:text="28"
            android:textSize="10dp"
            android:textColor="@color/black"/>

    </TableRow>

</TableLayout>
The MainActivity.kt file
After creating the layout, you need to load the XML layout resource from the activity's onCreate () callback method and use findViewById to access the UI element from XML.
The MainActivity.kt file will look like this:
Code:
package com.example.tablelayout

    import android.R
        import android.os.Bundle
            import androidx.appcompat.app.AppCompatActivity

    class MainActivity : AppCompatActivity()
{
    override fun onCreate(savedInstanceState: Bundle?)
    {
        super.onCreate(savedInstanceState)
            setContentView(R.layout.activity_main)
    }
}
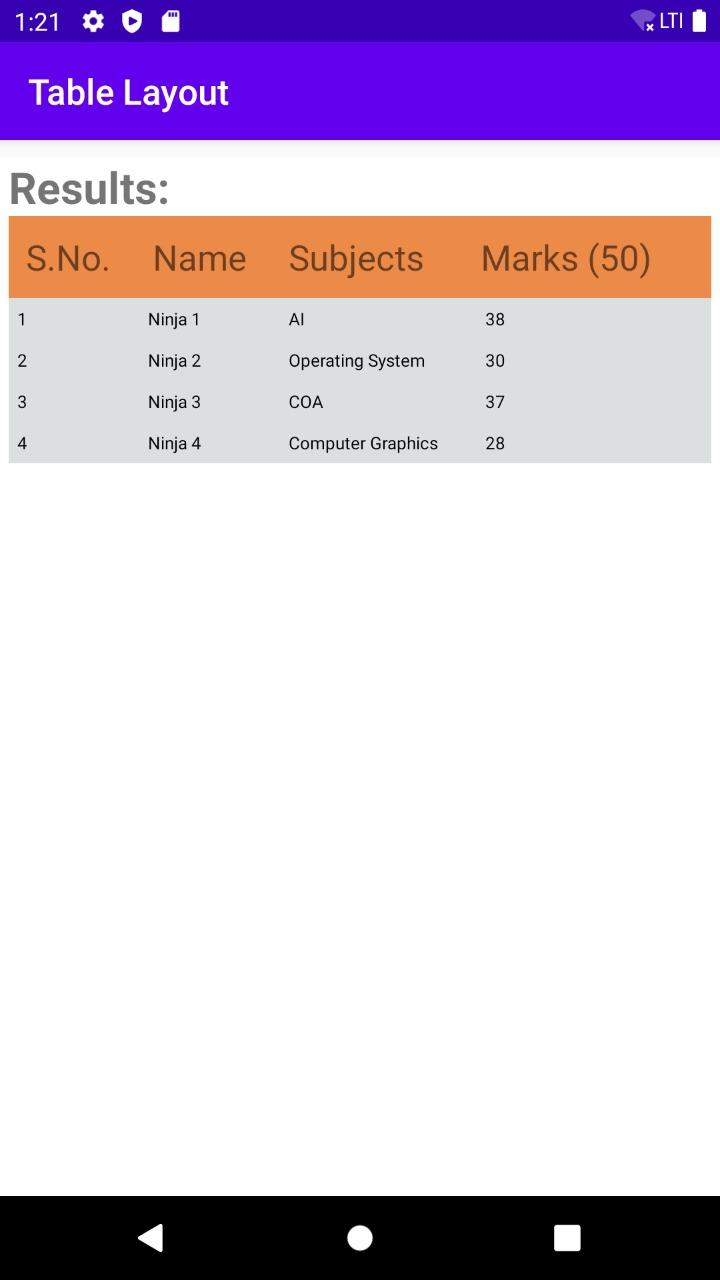
Output

After running the application on the emulator, it would look like this.
As visible in the above example, we have made a Table Layout, and it has four columns, namely as S.No., Name, Subjects, and Marks, and we have ranked the students according to their names.
FAQs
-
Table Layout is a subclass of which class in android?
Ans: Table Layout is a subclass of the ViewGroup class in android and is used to display the child View elements in the form of rows and columns.
-
What is the difference between grid and Table Layout?
Ans: Table Layout shows data in the form of rows and columns, whereas grid view displays data in the form of a strict grid.
-
Can we show borders of rows and columns in the Table Layout?
Ans: No, Table Layout does not support showing the borders of their columns, rows, or cells.
Key Takeaways
In this article, we have extensively discussed Table Layouts in Android and a sample application containing the implementation of a sample Table Layout. You can also read the blog Android UI layouts on the Coding Ninjas Website to create different Android UI layouts in your Android application.
We hope this blog has helped you enhance your knowledge regarding Table Layout in Android. If you want to learn more, check out our Android Development Course on the Coding Ninjas Website to learn everything you need to know about Android development. Do upvote our blog to help other ninjas grow. Happy Coding!


