


Introduction
Tic-Tac-Toe is a classic game that has been enjoyed by people of all ages for generations. It is a simple game that requires two players to take turns marking Xs and Os on a 3x3 grid, with the objective of getting three in a row. The game is easy to learn but can become quite competitive once players start to master their strategies.
In this blog post, we will go through the steps of building a Tic-Tac-Toe game in JavaScript, using HTML and CSS to style the game board.
Steps to Create Tic-Tac-Toe Using JavaScript
Step 1: Create the HTML Structure
The first step in building a Tic-Tac-Toe game is to create the HTML structure for the game board. We will create a 3x3 grid using the HTML table element.

Some Basics of HTML code, we used:
- <!DOCTYPE html> - This declaration tells the browser what type of HTML we're using.
- <html lang="en">- This is the opening tag for the HTML document, with a language attribute set to "en".
- <head> - This is where we put meta information about the page, such as the title, links to stylesheets, and scripts.
- <title> - This page title will appear in the browser tab.
- <link rel="stylesheet" href="style.css"> - This is a link to the external stylesheet that we will use to style the game.
- <body> - This is where we put the visible content of the page.
- <script src="game.js"></script> - This is a script tag that links to the game.js file where we will write our JavaScript code.
The HTML code above creates the layout for our Tic-Tac-Toe game. The game is wrapped in a main container and consists of two players, a game board, and buttons for restarting the game.
The player information is displayed in two separate containers, with each container displaying the player's name and assigned symbol. The assigned symbols are "X" and "O," which will be used to represent the players' moves on the game board.
The game board is enclosed in a container with nine buttons, each representing a cell on the board. The buttons are given a unique "data-cell-index" attribute, which will be used later to determine which cell was clicked by the player.
Lastly, we have two buttons, one for restarting the game, and another for starting a new game. The "Restart Game" button will refresh the current game, while the "New Game" button will clear the board and allow the players to start a new game. We also have a popup container that will be hidden at first but will display the game's outcome once the game is over.
The final step is to add functionality to the game using JavaScript, which is done in the game.js file.
Step 2: Style the Game Board with CSS
The CSS code is for a blog that includes a game of Tic Tac Toe. The code defines the basic styles for the web page, including font, background color, and layout. It also defines the styles for the game board, cells, and players' symbols. The code also includes styles for a popup that appears when the game is won, with a message and a restart button. Finally, the code includes styles for a restart button outside the popup and a hover effect for both restart buttons.
Step 3: Add Interactivity with JavaScript
Now that we have created the HTML structure and styled the game board with CSS, let's add some interactivity to the game using JavaScript.
- JavaScript
JavaScript
//This function is executed when a player wins
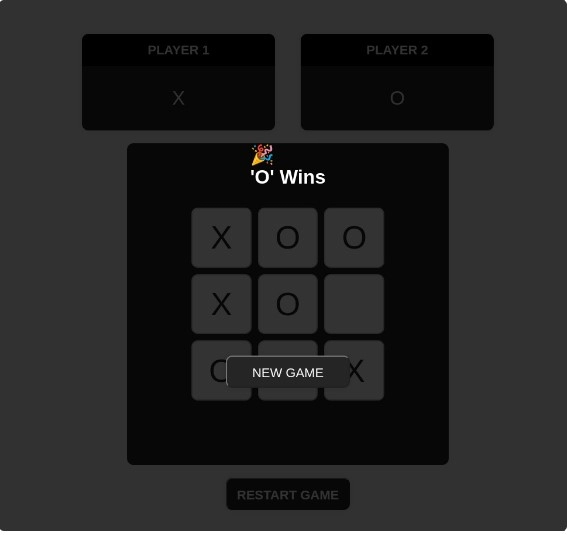
const winFunction = (letter) => {
disableButtons();
if (letter == "X") {
msgRef.innerHTML = "🎉 <br> 'X' Wins";
} else {
msgRef.innerHTML = "🎉 <br> 'O' Wins";
}
};
//Function for draw
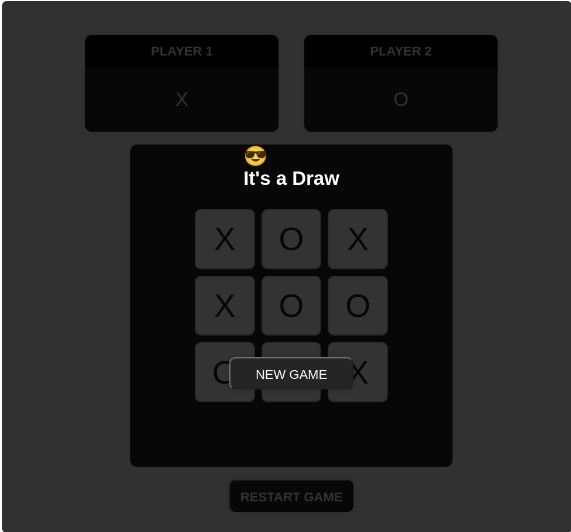
const drawFunction = () => {
disableButtons();
msgRef.innerHTML = "😎 <br> It's a Draw";
};
//New Game
newgameBtn.addEventListener("click", () => {
count = 0;
enableButtons();
});
restartBtn.addEventListener("click", () => {
count = 0;
enableButtons();
});
//Win Logic
const winChecker = () => {
//Loop through all win patterns
for (let i of winningPattern) {
let [element1, element2, element3] = [
btnRef[i[0]].innerText,
btnRef[i[1]].innerText,
btnRef[i[2]].innerText,
];
//Check if elements are filled
//If 3 empty elements are same and would give win as would
if (element1 != "" && (element2 != "") & (element3 != "")) {
if (element1 == element2 && element2 == element3) {
//If all 3 buttons have same values then pass the value to winFunction
winFunction(element1);
}
}
}
};
//Display X/O on click
btnRef.forEach((element) => {
element.addEventListener("click", () => {
if (xTurn) {
xTurn = false;
//Display X
element.innerText = "X";
element.disabled = true;
} else {
xTurn = true;
//Display Y
element.innerText = "O";
element.disabled = true;
}
//Increment count on each click
count += 1;
if (count == 9) {
drawFunction();
}
//Check for win on every click
winChecker();
});
});
//Enable Buttons and disable popup on page load
window.onload = enableButtons;

In this code snippet, we can see a JavaScript implementation of a Tic Tac Toe game. The game is played on a 3x3 grid and players take turns marking their X or O on a square of the grid. The code uses event listeners to detect when the user clicks on a square and displays their X or O accordingly.
The code also has functions to check for a winning pattern and disable all the buttons when a player wins or when the game is a draw. When a player wins, the message is displayed with the winning player's symbol.
There are also two buttons, one to start a new game and another to restart the current game. The code uses a count variable to keep track of the number of moves played, and if no winning pattern is found and all squares are filled, the game is considered a draw.
You can compile with the help of Online Javascript Compiler for better understanding
Here's a breakdown of some key features of the code:
- let btnRef = document.Queryselectorall(".board__cell"); - this line selects all the HTML elements with the class name "board__cell" and assigns them to the variable btnRef. These elements represent the individual squares on the Tic Tac Toe board.
- let popupRef = document.querySelector(".popup"); - this line selects the HTML element with the class name "popup" and assigns it to the variable popupRef. This element is used to display a message when the game ends.
- let newgameBtn = document.querySelector(".popup__restart-btn"); - this line selects the HTML element with the class name "popup__restart-btn" and assigns it to the variable newgameBtn. This element is used to start a new game.
- let restartBtn = document.querySelector(".game-restart-btn"); - this line selects the HTML element with the class name "game-restart-btn" and assigns it to the variable restartBtn. This element is used to restart the current game.
- let winningPattern = [...]; - this variable holds an array of arrays, where each inner array represents a winning pattern on the Tic Tac Toe board.
- const disableButtons = () => {...} - this function disables all the buttons on the board and displays the popup message.
- const enableButtons = () => {...} - this function enables all the buttons on the board and hides the popup message.
- const winFunction = (letter) => {...} - this function is called when a player wins and displays the message with the winning player's symbol.
- const drawFunction = () => {...} - this function is called when the game ends in a draw and displays the message that it's a draw.
- newgameBtn.addEventListener("click", () => {...}) and restartBtn.addEventListener("click", () => {...}) - these event listeners are used to handle clicks on the new game and restart buttons.
- const winChecker = () => {...} - this function checks for a winning pattern on the board and calls the winFunction if a pattern is found.
- btnRef.forEach((element) => {...}) - this code adds an event listener to each button on the board that detects when the user clicks on it and displays their X or O accordingly.


 9+ registered

