


Introduction
Toggling a class in JavaScript is a simple yet powerful way to dynamically update an element's appearance or behavior. This technique allows you to add or remove classes based on specific conditions, enhancing interactivity on your web page.
In this article, we will learn about the toggle javascript function. We will discuss this function's uses, syntax, and code implementation.
What is toggle() in JavaScript?
The toggle() function in Javascript adds a class to an element if that class is not already associated with that element. And if the class is already associated with that element, then that class is removed from that element.
We can think of a toggle as a switch used to turn a class on and off for the element it is used for. If the class is on, that class is associated with the element, then it is turned off, which means it is removed from that element. This switching action is done dynamically when certain events occur (onClick, etc.).
Another way to do the toggling of an element class in javascript is by using different HTML elements properties such as classList(), contains(), add(), and remove().
Furthermore, JavaScript offers significant DOM manipulation capabilities, allowing developers to easily create interactive and responsive online apps. Developers may use these features to dynamically update and modify web page content, handle user interactions, perform real-time data updates, and seamlessly incorporate multimedia elements, all of which improve the overall user experience.
Let's see what they do before using them to perform toggle in javascript.
1. classList
It returns the names of the CSS classes associated with an HTML element DOMTokenList object. It just reads the name of classes and cannot modify the class names; hence it is also an example of a read-only DOM method.
Example-
Output-
Explanation-
We are defining an h1 element in the body of our HTML page. Then we print the name of the classes on the console.
2. contains()
It checks whether the given class is present in a given element. It returns a boolean value based on the result.
Example-
Output-
Explanation-
We are defining an h1 element in the body of our HTML page and have added "class1" and "class2" to it. In the script tag, we check if the element contains "class1" and "class3". It returns true for "class1" and false for "class3".
3. add()
It is used to add a given class to a given element without affecting any classes that were already there in that element. If the class we are adding is already present, it won't make any changes.
Example-
Output-
Explanation-
We have defined an h1 element and added "class1" and "class2" to it initially. We then add another class, "class3," to this element and then console the list of classes before adding the "class3" and after adding the "class3".
4. remove()
As the name suggests, it removes a given class from a given element without affecting existing classes. If the class that we are removing was already not present in the element, then it won't make any changes, and neither will it throw any error.
Example-
Output-
Explanation-
We have defined an h1 element and added "class1", "class2," and "class3" to it initially. We then remove the class "class1" from this element and then console the list of classes before removing the "class1" and after removing the "class1".We can see that "class1" has been successfully removed.
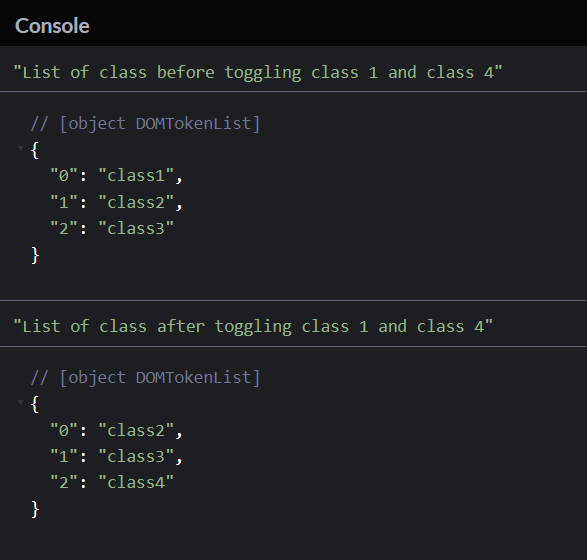
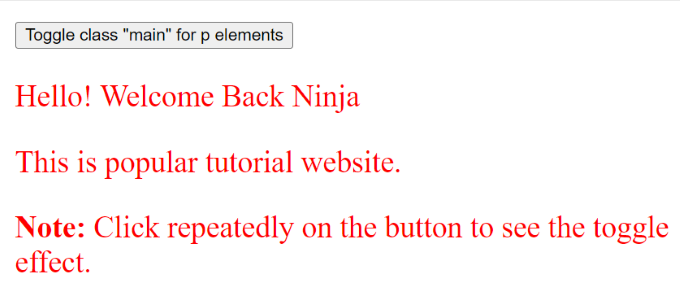
5. toggle()
Toggle() is a JavaScript function for changing the state of a DOM element. It's frequently used to toggle visibility, class names, or styles, making it a useful tool for interactive web development.
Example-
Output:
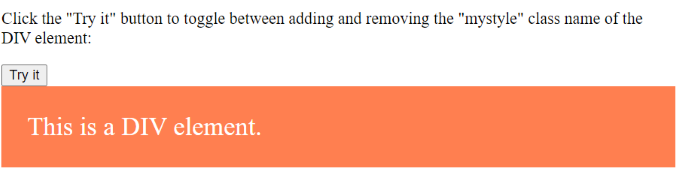
Description-
This HTML code generates a responsive web page with a button that, when pressed, toggles the "mystyle" class on a div> element. The "mystyle" class alters the div>'s appearance by modifying its width, padding, background color, font size, and text color. It shows how to use JavaScript to toggle a simple CSS class.


 8+ registered

