Introduction
Why are we discussing creating a Notepad application in Android? Because With the increasing hassle all over, people often forget carrying a piece of pen and paper when they head out to the market or elsewhere. Having your own space app for noting down stuff is difficult to find in mobile phones as the usual writing spaces are present in SMS, Whatsapp, Messenger and so on.

From the consumers’ perspective, a note app is a very handy solution for noting down worthy arguments, points, to-do stuff, and so on, while from a developer’s perspective a note app gives him/her a clear picture about creating and preserving text files.
For creating and storing text files the developer needs to create objects of FileInput and FileOutput streams in the Java Code. For elementary apps that need the notes to be stored at a single target device, no server connection is required, whereas for collaborative apps such as Trello, server connection and cloud storage are critical pre-requisites.
Although, the idea might appear to be redundant, yet it is very progressive for learners. It assists you in acquiring hands-on knowledge about working with Java Input stream and Output stream and file with .txt extensions.
The untainted strategy includes the creation of an app with more features than the competitor, even if a single feature of your app stands-out among the same kind, your app will receive very high traffic in the Google Play store or App store.
Usually, the code of such apps is very redundant and bewildering, but kudos to the default Java classes that abstract most of the laborious source code into its libraries. You can include any of those by just adding the Gradle scripts in the build. Gradle file in manifests. Analogous to the usual android apps, the creation of the Notepad App also involves two aspects, one is the UI designing and the other is the backend programming.
Phase One: User-Interface Designing
The User-Interface of the Notepad app is very elementary and can be created by adding a single XML code.
The basic UI components are:
- A linear layout that acts as the parent.
- Edit text for writing notes.
- Three Buttons:
- One for creating a new document.
- One for saving the text file.
-
One for opening any previously saved file.

Image depicts the intended app design
Image Source: Android Emulator
The complete XML code for the UI design shown in the image:
<LinearLayout xmlns:android="http://schemas.android.com/apk/res/android"
    xmlns:tools="http://schemas.android.com/tools"
    android:layout_width="match_parent"
    android:layout_height="match_parent"
    tools:context=".MainActivity"
    android:background="#FAD8B5"
    android:orientation="vertical"
    android:weightSum="10">

<LinearLayout
    android:layout_width="match_parent"
    android:layout_height="0dp"
    android:layout_weight="9"
    android:orientation="vertical">

    <EditText
        android:layout_width="match_parent"
        android:layout_height="match_parent"
        android:inputType="textMultiLine"
        android:gravity="top"
        android:id="@+id/text"
        android:scrollbars = "vertical"/>
</LinearLayout>

<LinearLayout
    android:layout_width="match_parent"
    android:layout_height="0dp"
    android:layout_weight="1">

    <Button
        android:layout_width="match_parent"
        android:layout_height="wrap_content"
        android:text="New"
        android:background="@drawable/new_button"
        android:textColor="#FFFFFF"
        android:id="@+id/newButton"
        android:textSize="20dp"
        android:textStyle="bold"
        android:layout_weight="1"
        android:onClick="buttonAction"/>

    <Button
        android:layout_width="match_parent"
        android:layout_height="wrap_content"
        android:text="Save"
        android:layout_marginLeft="6dp"
        android:id="@+id/saveButton"
        android:textColor="#FFFFFF"
        android:background="@drawable/save_button"
        android:textSize="20dp"
        android:textStyle="bold"
        android:onClick="buttonAction"
        android:layout_weight="1"/>

    <Button
        android:layout_width="match_parent"
        android:layout_height="wrap_content"
        android:text="Open"
        android:id="@+id/openButton"
        android:onClick="buttonAction"
        android:textColor="#FFFFFF"
        android:layout_marginLeft="6dp"
        android:textSize="20dp"
        android:textStyle="bold"
        android:background="@drawable/open_button"
        android:layout_weight="1"/>
</LinearLayout>

</LinearLayout>
FAQs based on the above-mentioned code
What is the significance of the attribute android:layout_weight=”1″ in the XML code?
The Layout weight attribute is added in the XML code for specifying the size of the Child Views of any container (parent layout). For instance, refer to the image given below, for ensuring both the buttons occupy exactly half of the screen width, you need to set the Layout weight as 0.5 in the XML code of the Layout.
Apart from the parent, linear layout also allows developers to assign specific weight to each of its children individually. By default, the layout weight is equal to zero. Weight implicitly assigns an “importance” value to the child layouts in terms of size, it can occupy when placed on the screen. A large weight value allows the liberty of stretching to any void space in the parent layout. Weight should be assigned considering proportion among the view elements.
Equal distribution :
If you intend to create a linear layout with equal distribution, i.e. each component occupies a space an equal space, follow these steps:
- Set the android:layout_height of each view to “0dp” (for a vertical layout).
- Set the android:layout_width of each view to “0dp” (for a horizontal layout).
- Finally, set the android:layout_weight of each view to “1”.
Unequal distribution :
If you have to design a linear layout in which each view element occupies a distinct amount of space then, assign the weight to the view elements proportionally. For allowing any view element to occupy the entire remaining space, set its weight as zero.

Image depicts an Android layout with weight=0.5
Image Source: Infobrother
What is the significance of the attribute android:weightSum=”10″ in the XML code?
If the weightSum value is not specified explicitly in the XML code, by default, it is computed as the submission of the weight of individual layout components. In reference to the Android documentation, android: weightSum defines the maximum weight sum. weightSum is considered to be the total value of all the layout size ratios.
For convenience, weightSum accepts floating values, as in 1.2, 3.4, and so on for expressing ratios. WeightSum divides the entire parent layout into pre-defined values; the proportion allotted to each layout depends on its individual weight value, and the total WeightSum of the parent layout or container. This is a very efficient method for accurate allocation of space in various layouts, rather than assigning the height and width values after tedious mathematical calculations.
For instance, if you can a child layout to occupy 70% of the screen, then set its weight to 0.7 and the weightSum of its parent layout to 1.0.
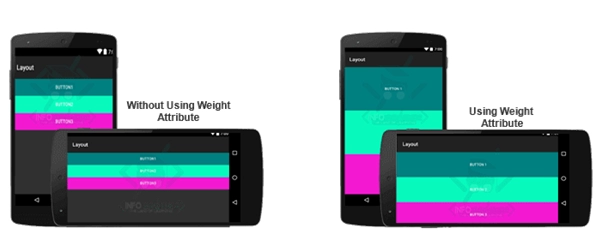
Image depicts the layout structure with and without the weight attribute
Image Source: InfoBrother
What is tools:context=”.MainActivity” included in the layout file?
In the above-mentioned XML layout code, the prime need of tools: context is to specify which activity or fragment is synced with the layout file, by default during the definition of the layout. The activity class name is added in this attribute, using a dot prefix, analogous to the syntax used in the manifest file.
If you add the tools: context explicitly during definition, the Android Studio automatically creates an instance of the layout while preview, this eliminates the hassle of setting the preview settings manually, later. Themes need to defined in the Manifest file as they are associated with activities, whereas one layout file is associated with several activities.
Furthermore, the tools: context XML attribute is used for locating the accurate location invoking onClick handlers for performing operations or for rendering the action bar. Summing up, we can conclude that tools: context attribute is appended in the root element of the layout file and provides information about the activity or fragment, to which the layout file is associated. It is used for a smooth preview of the current layout and views elements.
Why is the need for android: scrollbars = “vertical” attribute?
To make a text View scrollable without enclosing it in the Scroll View tag, the scrollbars are added in the XML code. The Scroll View is used for vertical scrolling. Alternatively, for horizontal scrolling, you can set the scrollbars to attribute in XML to horizontal.
You can even add custom shapes for scroll bars by creating shapes in drawable resource files and add solid for colours and stroke for borders. This is used for overcoming the limitation of the Scroll View that allows only a single child inside a layout. This also comes with an advantage of horizontal scrolling also, which is not permitted in the usual Scroll View.
Phase Two: Creating the Java Class
The Java class needs two additional classes the FileInputStream and the FileOutputStream for reading and writing from memory Input/Output. In addition to this, two alert dialogs are added to the code for taking the user’s confirmation the user clicks on the save and the new button. Just after the Button and the EditText objects are created, we add onClickListerners to the three buttons and call the respective methods.

Image depicts the OPEN File dialog box.
Image Source: Android Emulator
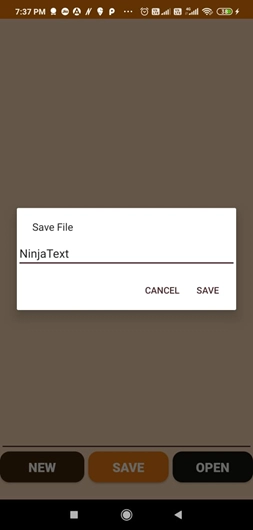
Image depicts the SAVE File dialog box
Image Source: Android Emulator
package com.example.notepad;
import androidx.appcompat.app.AlertDialog;
import android.app.Activity;
import android.content.DialogInterface;
import android.os.Bundle;
import android.view.View;
import android.widget.Button;
import android.widget.EditText;
import android.widget.Toast;
import java.io.FileInputStream;
import java.io.FileOutputStream;

public class MainActivity extends Activity {
    Button newButton,saveButton,openButton;
    EditText text;

    @Override
    protected void onCreate(Bundle savedInstanceState) {
        super.onCreate(savedInstanceState);
        setContentView(R.layout.activity_main);

        newButton=(Button)findViewById(R.id.newButton);
        saveButton=(Button)findViewById(R.id.saveButton);
        openButton=(Button)findViewById(R.id.openButton);
        text=(EditText)findViewById(R.id.text);
    }

    public void buttonAction(View v) {
        final EditText fileName=new EditText(this);
        AlertDialog.Builder ad=new AlertDialog.Builder(this);
        ad.setView(fileName);

        if (v.getId() == R.id.saveButton) {
            ad.setMessage("Save File");

            ad.setPositiveButton("Save",new DialogInterface.OnClickListener() {
                @Override
                public void onClick(DialogInterface dialog, int which) {
                    try {
                        FileOutputStream fout=openFileOutput(fileName.getText().toString()+".txt",MODE_WORLD_READABLE);
                        fout.write(text.getText().toString().getBytes());
                    } catch (Exception e) {
                        Toast.makeText(getApplicationContext(), "Error Occured: "+e,Toast.LENGTH_LONG).show();
                    }
                }
            });

            ad.setNegativeButton("Cancel",new DialogInterface.OnClickListener() {
                @Override
                public void onClick(DialogInterface dialog, int which) {
                    dialog.cancel();
                }
            });

            ad.show();
        }

        if(v.getId()==R.id.openButton) {
            ad.setMessage("Open File");

            ad.setPositiveButton("Open",new DialogInterface.OnClickListener() {
                @Override
                public void onClick(DialogInterface dialog, int which) {

                    int c;
                    text.setText("");

                    try {
                        FileInputStream fin = openFileInput(fileName.getText().toString()+".txt");

                        while ((c = fin.read()) != -1)
                        {
                            text.setText((text.getText().toString() + Character.toString((char) c)));
                        }
                    }catch (Exception e) {
                        Toast.makeText(getApplicationContext(), "Error Occured: "+e,Toast.LENGTH_LONG).show();
                    }
                }
            });

            ad.setNegativeButton("Cancel",new DialogInterface.OnClickListener() {
                @Override
                public void onClick(DialogInterface dialog, int which) {
                    dialog.cancel();
                }
            });
            ad.show();
        }
        if(v.getId()==R.id.newButton) {
            text.setText("");
        }
    }
}

 5+ registered